Last time, I installed Ubuntu in virtual machine, but on the real SSD-disk, which was passthrown into the VM as an RDM-disk. Now I will do the same, but the NVMe disk will be passthrown into the virtual machine not as an RDM-disk, but as a PCI device. At home, Ubuntu will run through the hypervisor, and on the road it will run directly on the hardware, without virtualization.
Before installing, you must download the installation image Ubuntu MATE 20.04 LTS (Focal Fossa), to do this, open the link and download the iso-file with installer. For installation, I will use the disk with the latest night build of Ubuntu, after the official release is released in April, it can be downloaded from this page.
Next, create a virtual machine and run it from our iso-disk.
Installation.
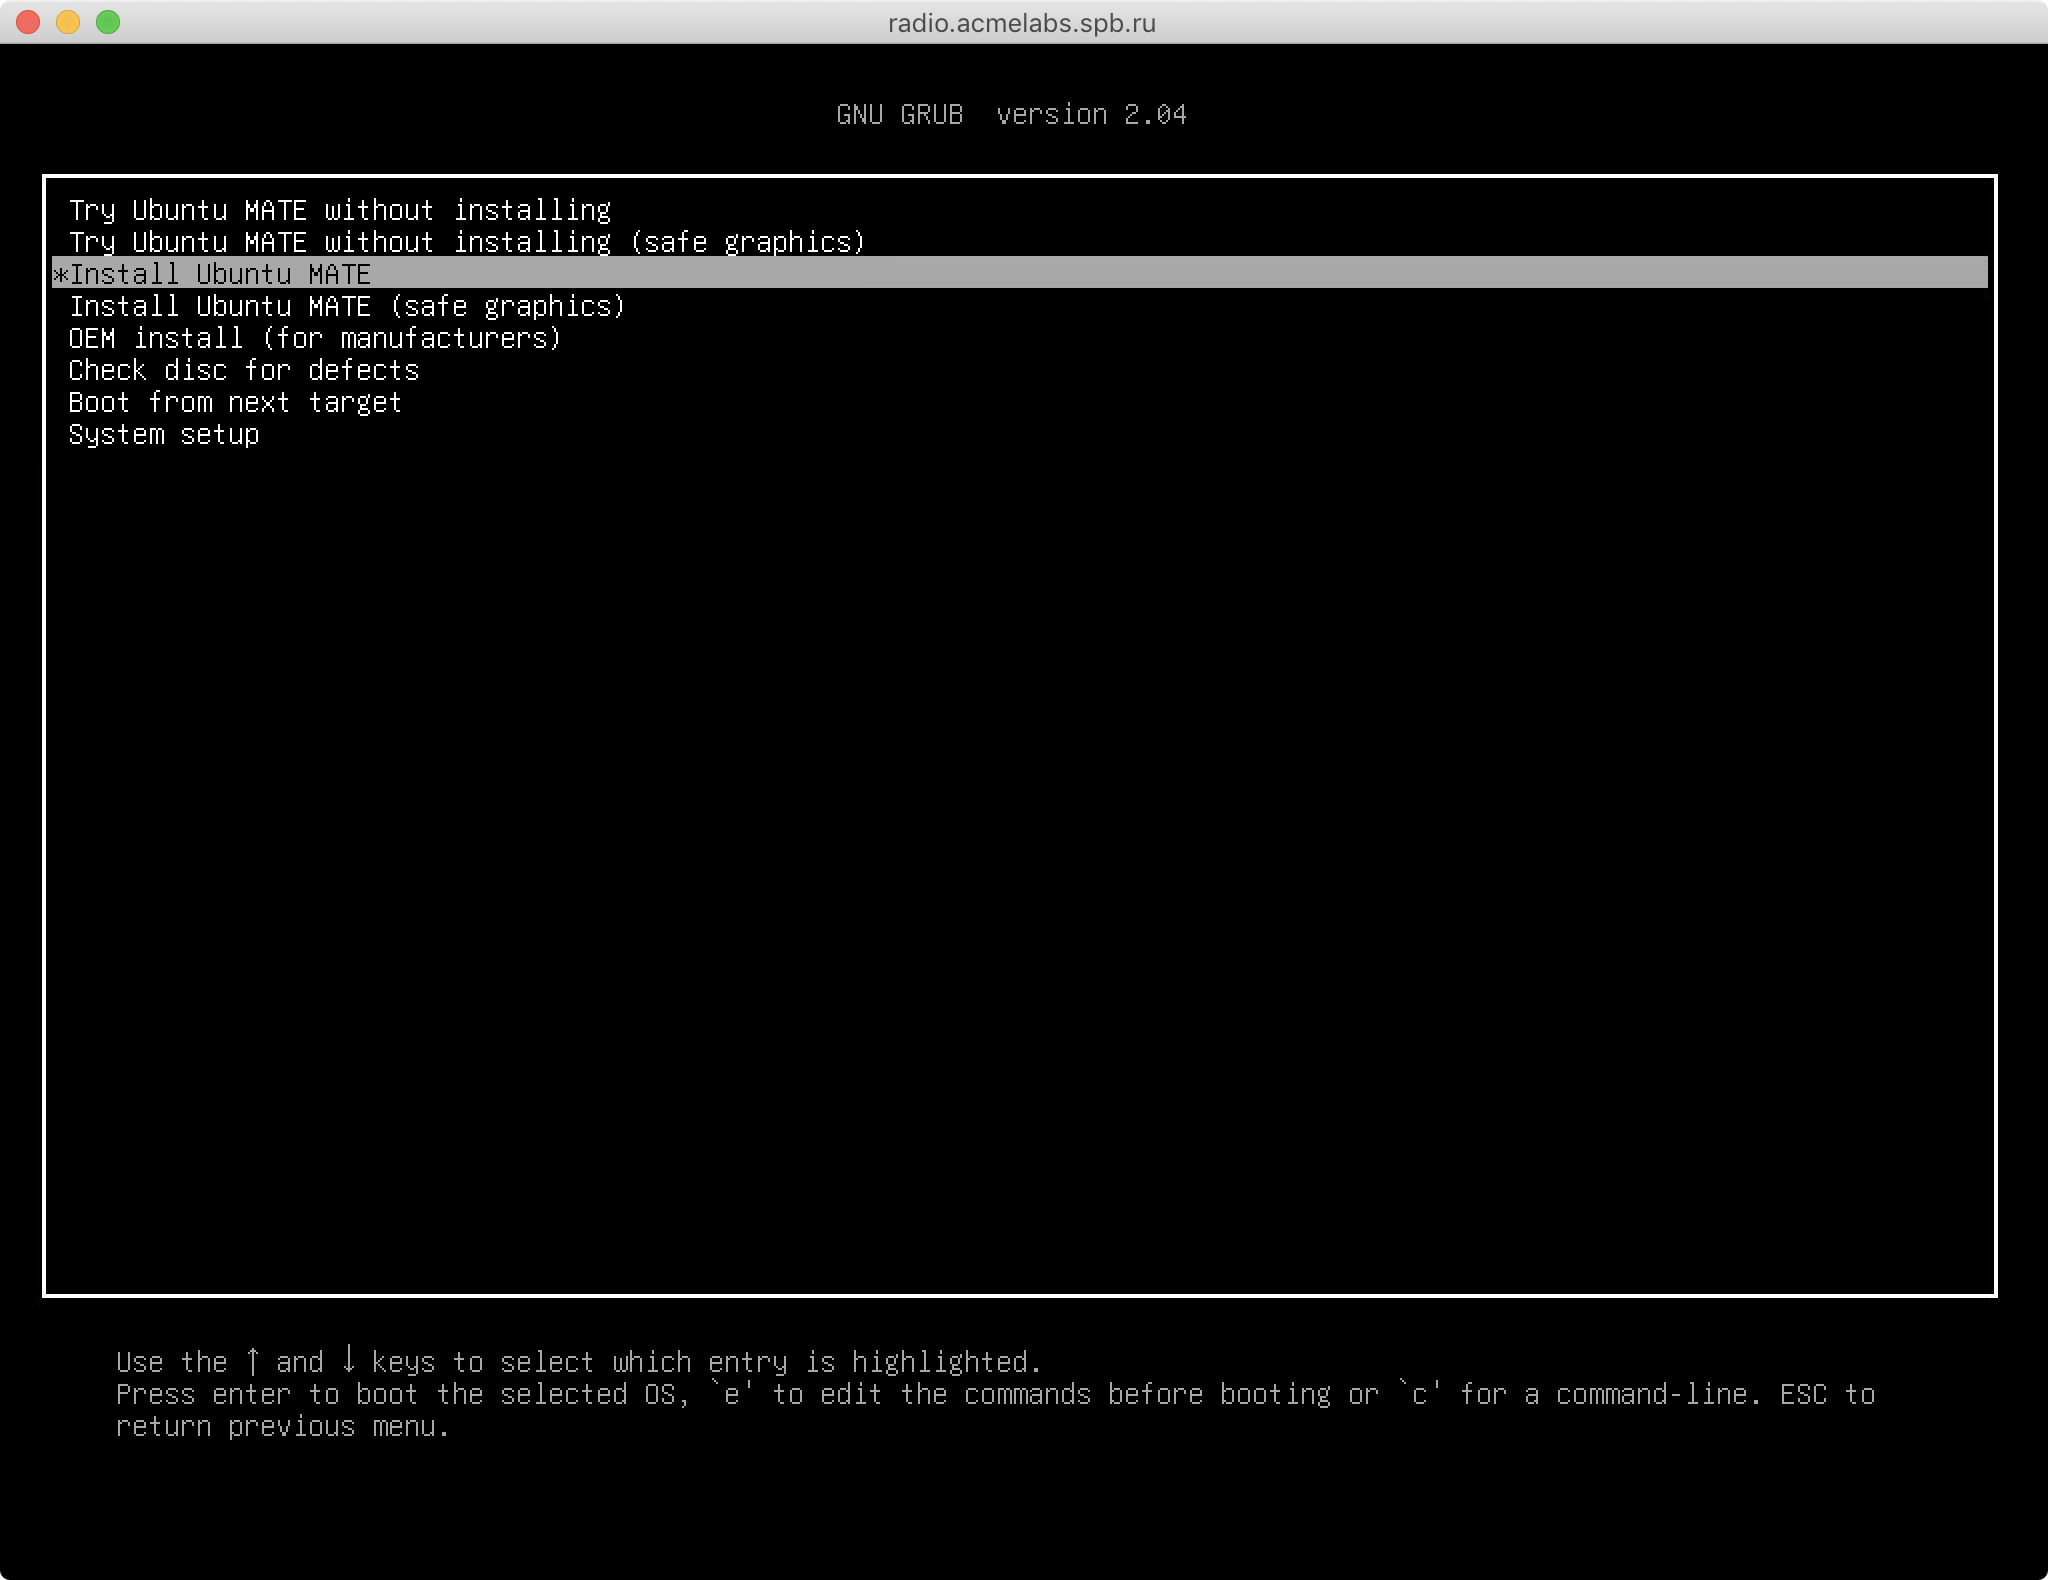
In the Grub loader menu, we are offered to try Ubuntu MATE without installing, Install Ubuntu MATE, Check disc for defects, or boot from the first installed disk. Select Install Ubuntu MATE and press Enter.
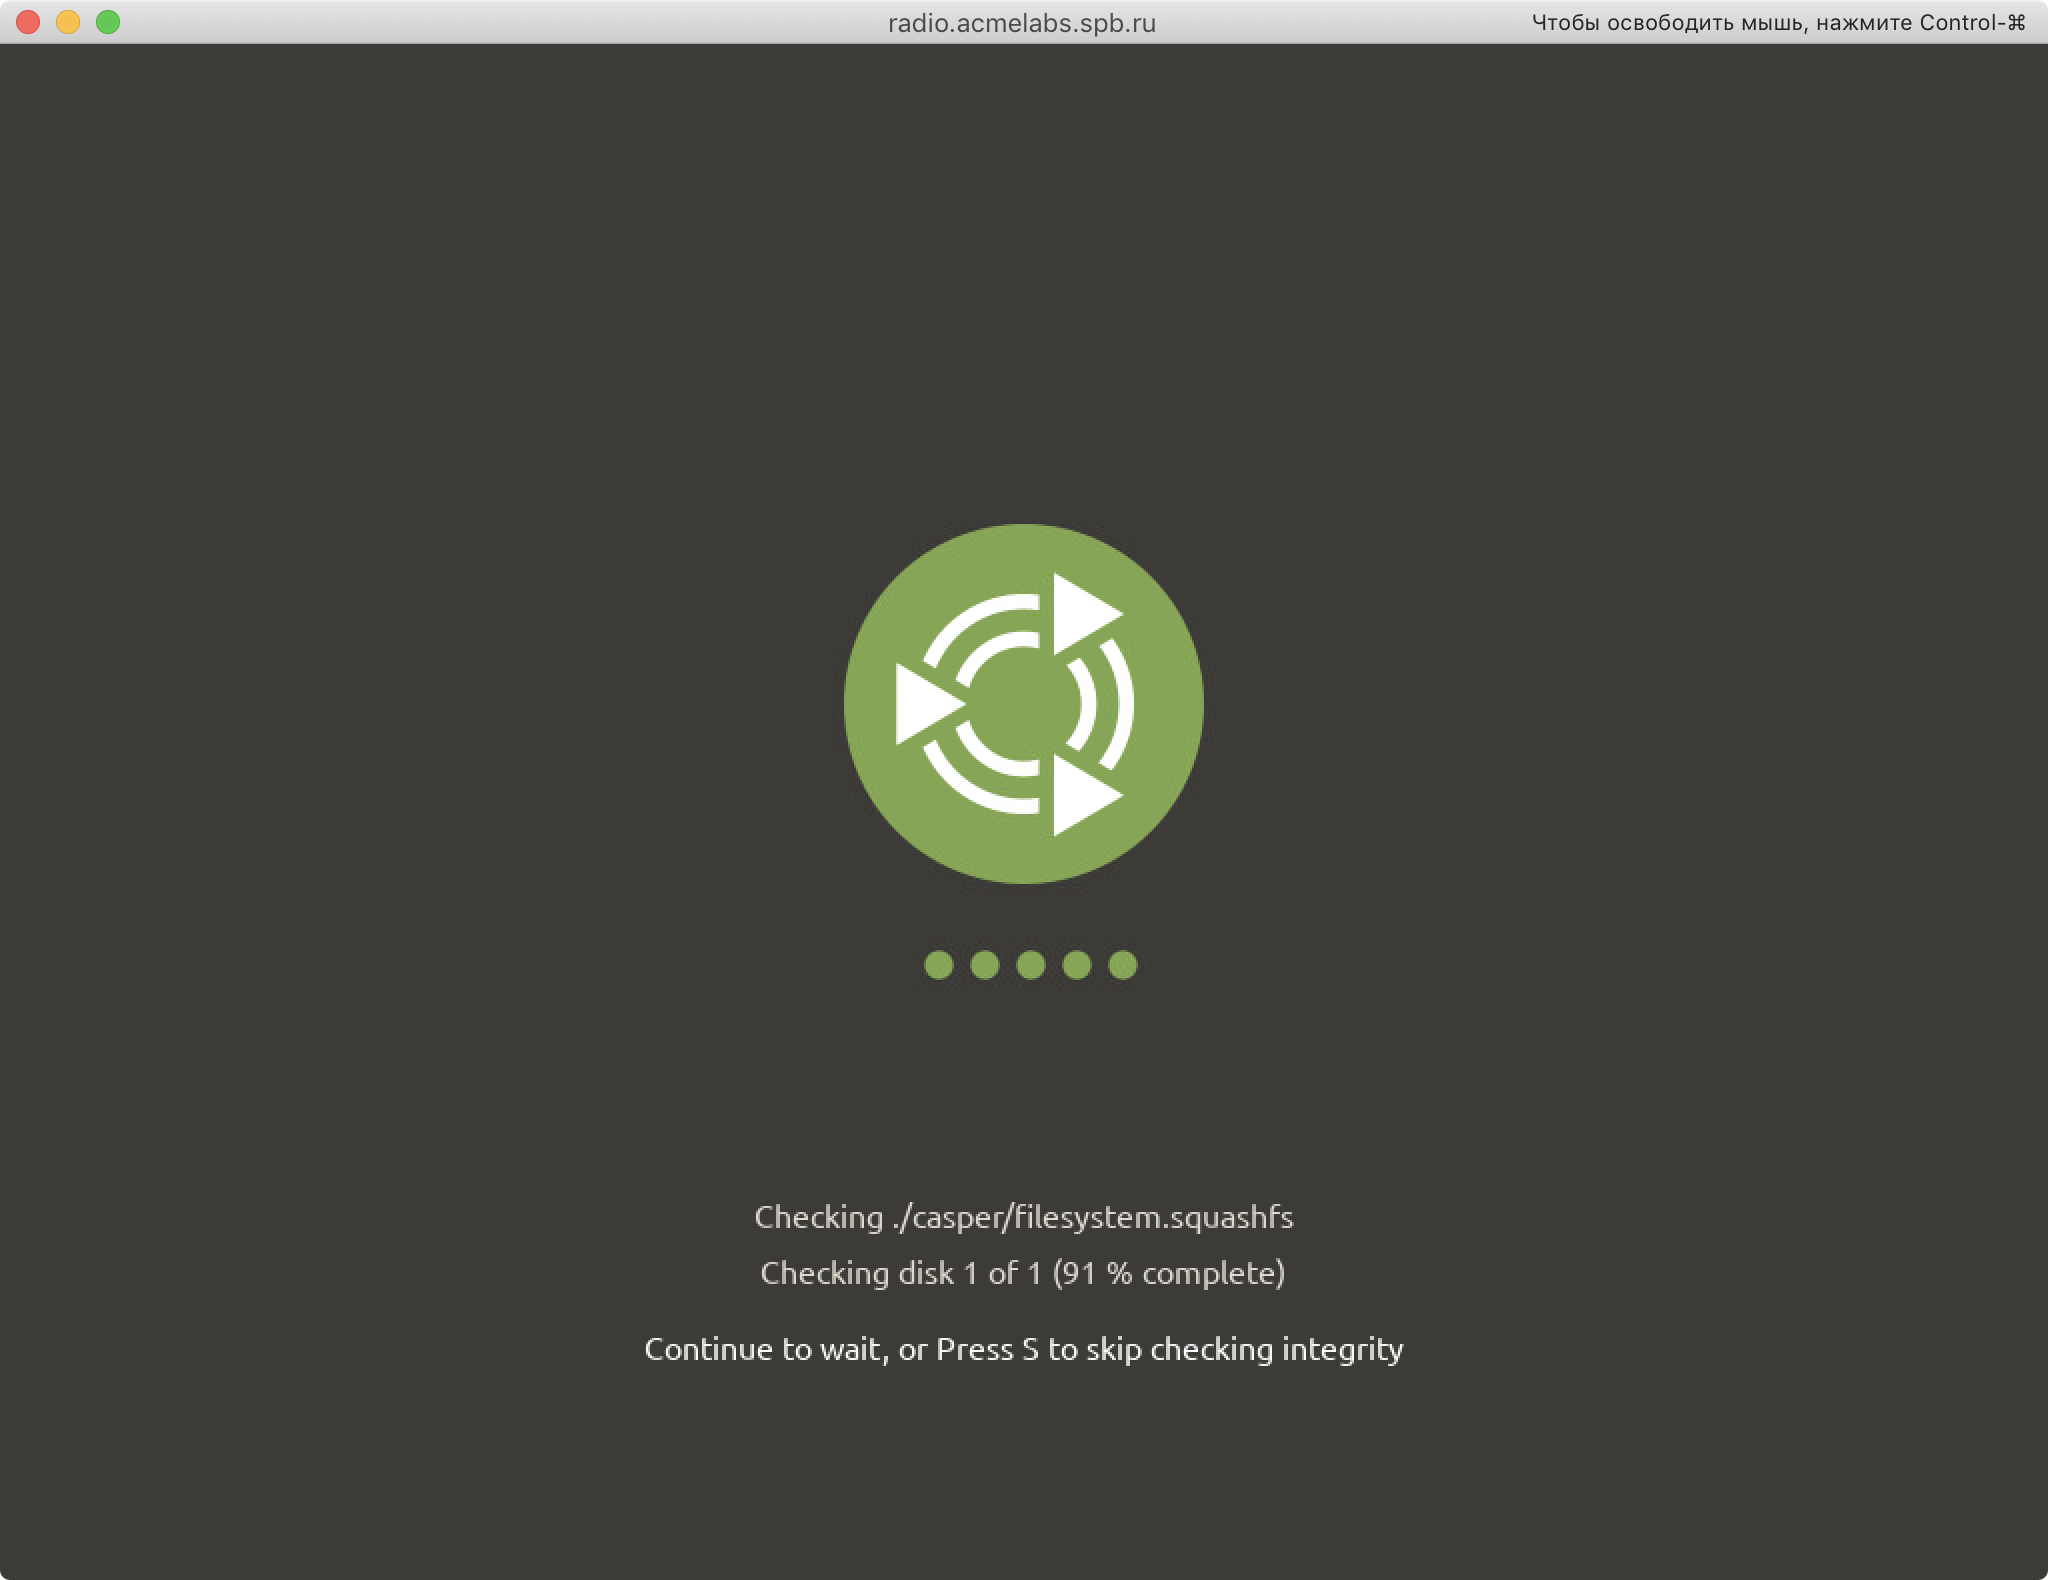
Before running the installer, the checksums of files on the installer disk will be checked.

On the first screen of the installer, we need to select the language of the installer. Selecting Russian is not recommended at this stage, because in addition to the Russian interface of the installer, the directories in the user's home folder will be called in Russian Рабочий стол, Мои документы, and so on, which will cause a number of inconveniences in the future. I think this applies to all languages except default English.
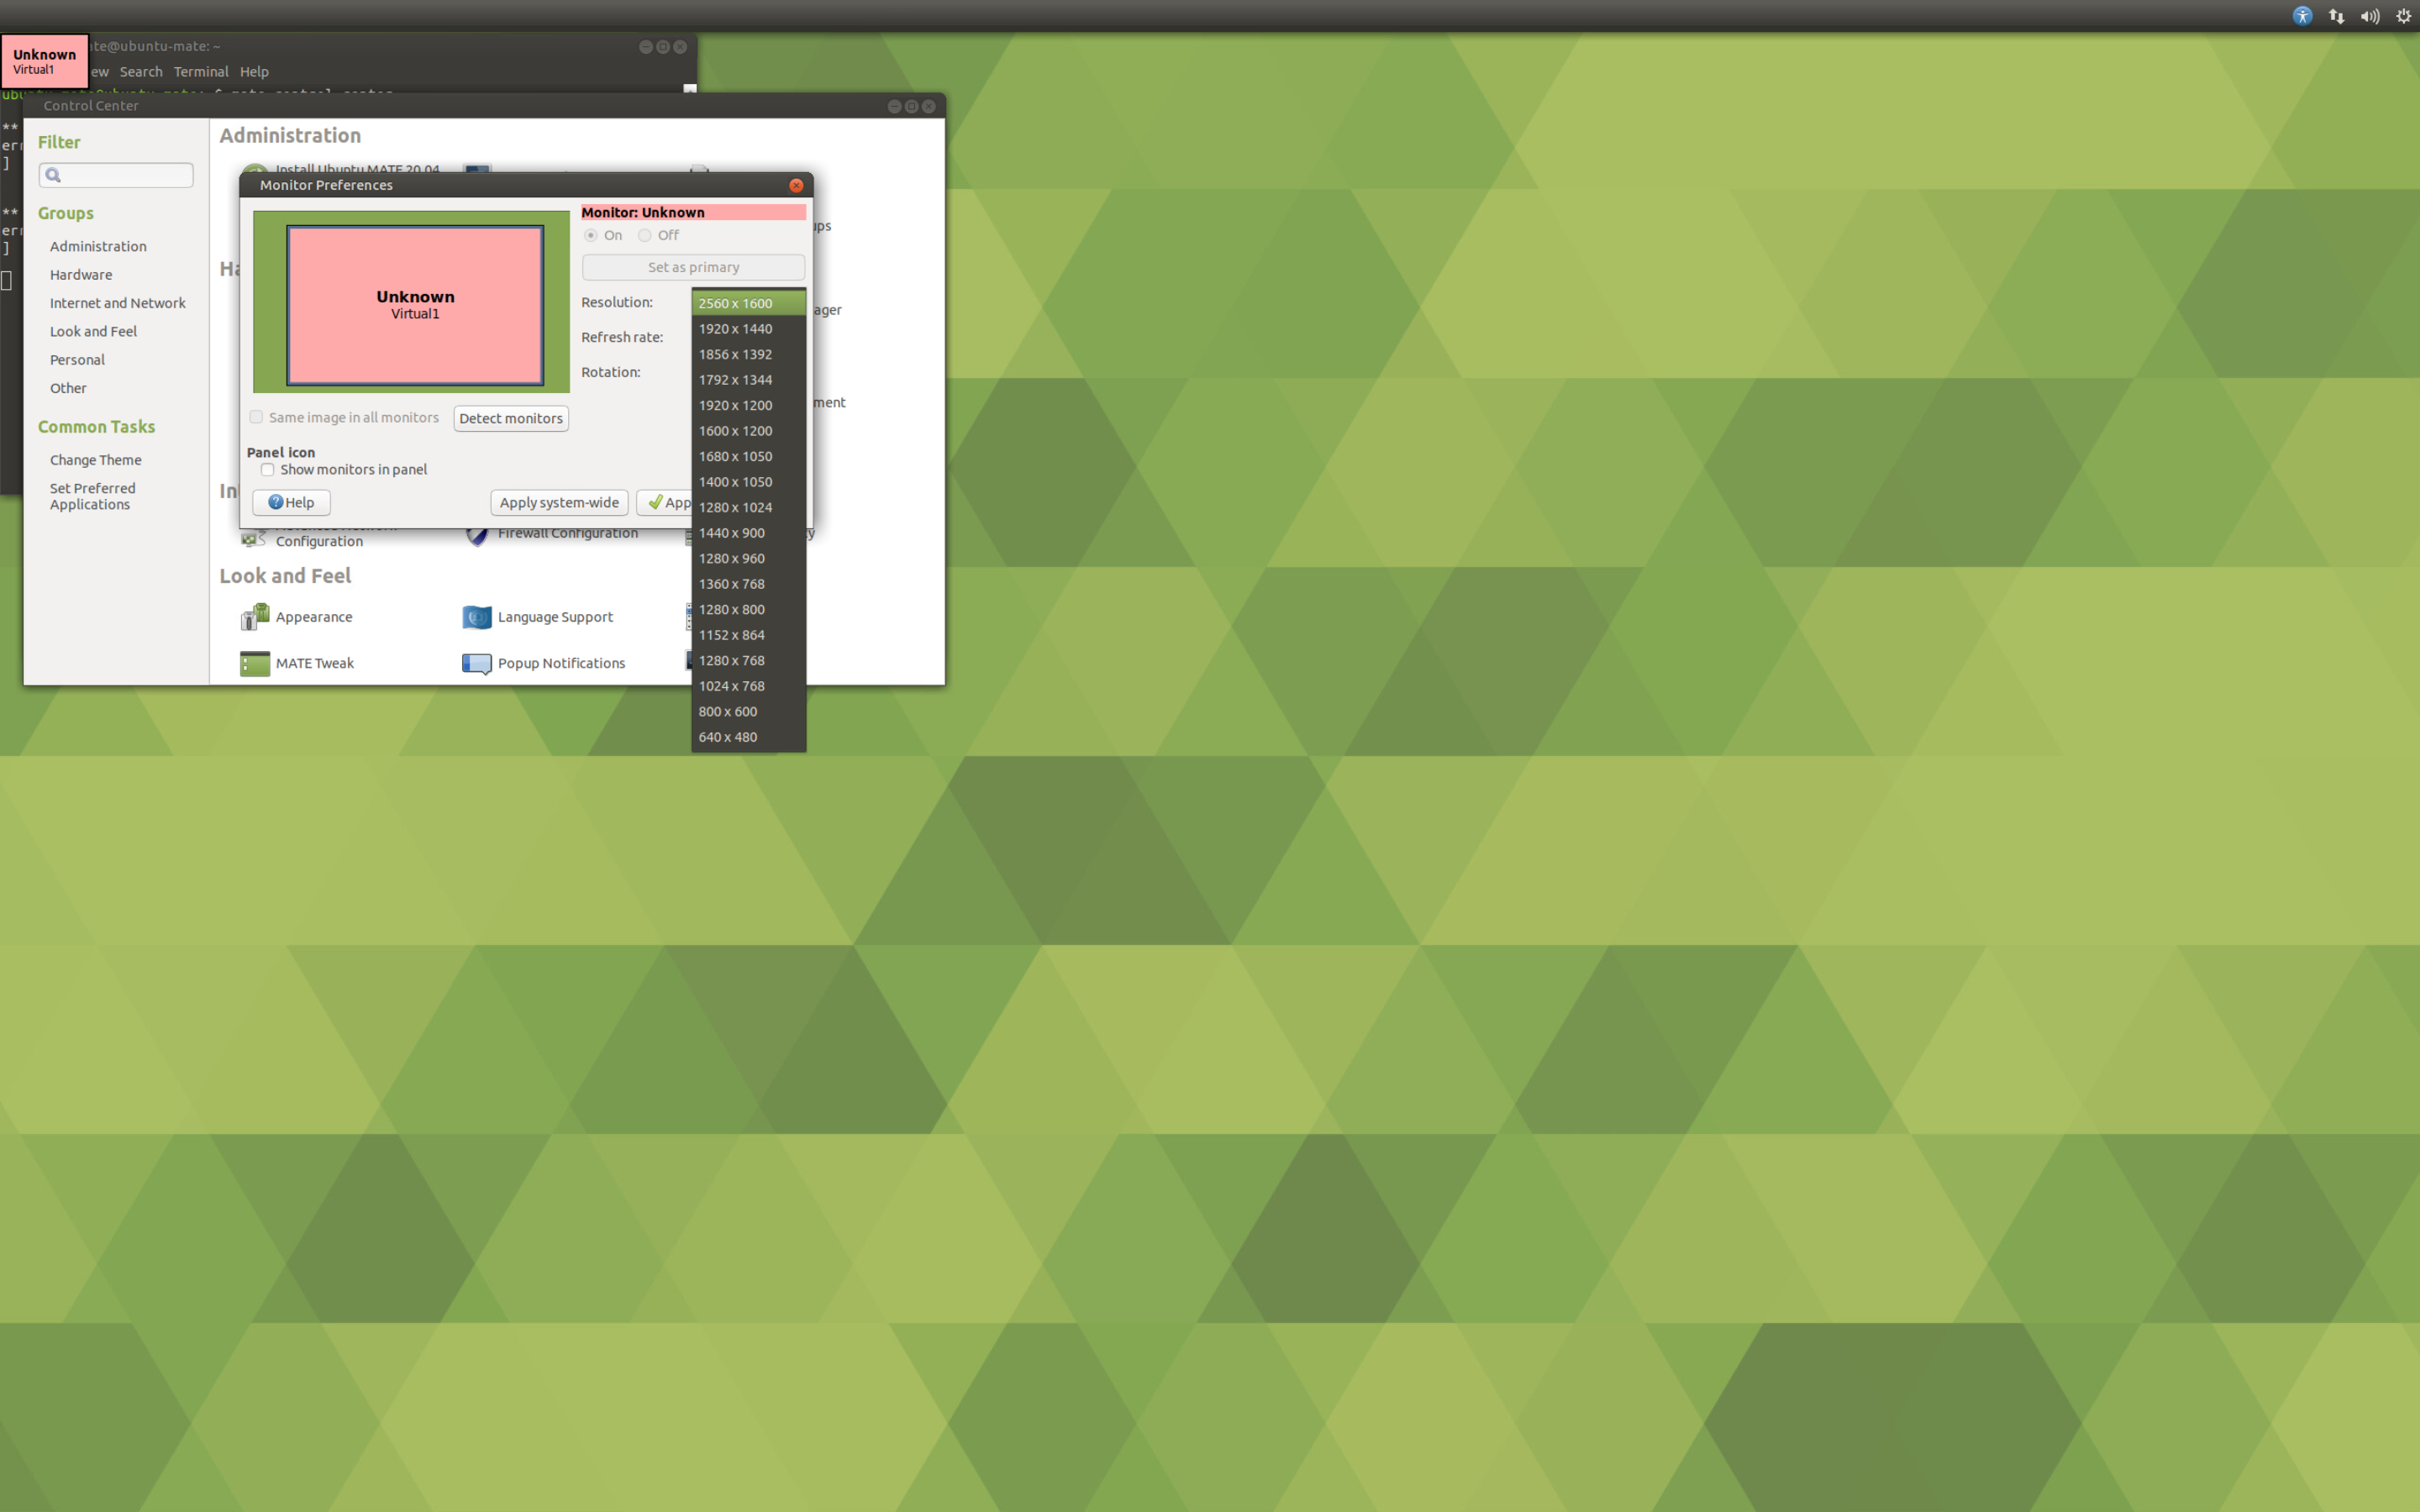
With the default video driver, the Ubuntu MATE installer runs in Parallels Desktop with a resolution of 1400x1050, and in VMware ESXi with a resolution of 1024x768. For ease of further installation, it is better to immediately change the resolution to a more comfortable one. To do this, press Ctrl+Alt+T on the keyboard – we will launch MATE Terminal, and in it we execute the command mate-control-center to launch the MATE Control Center.
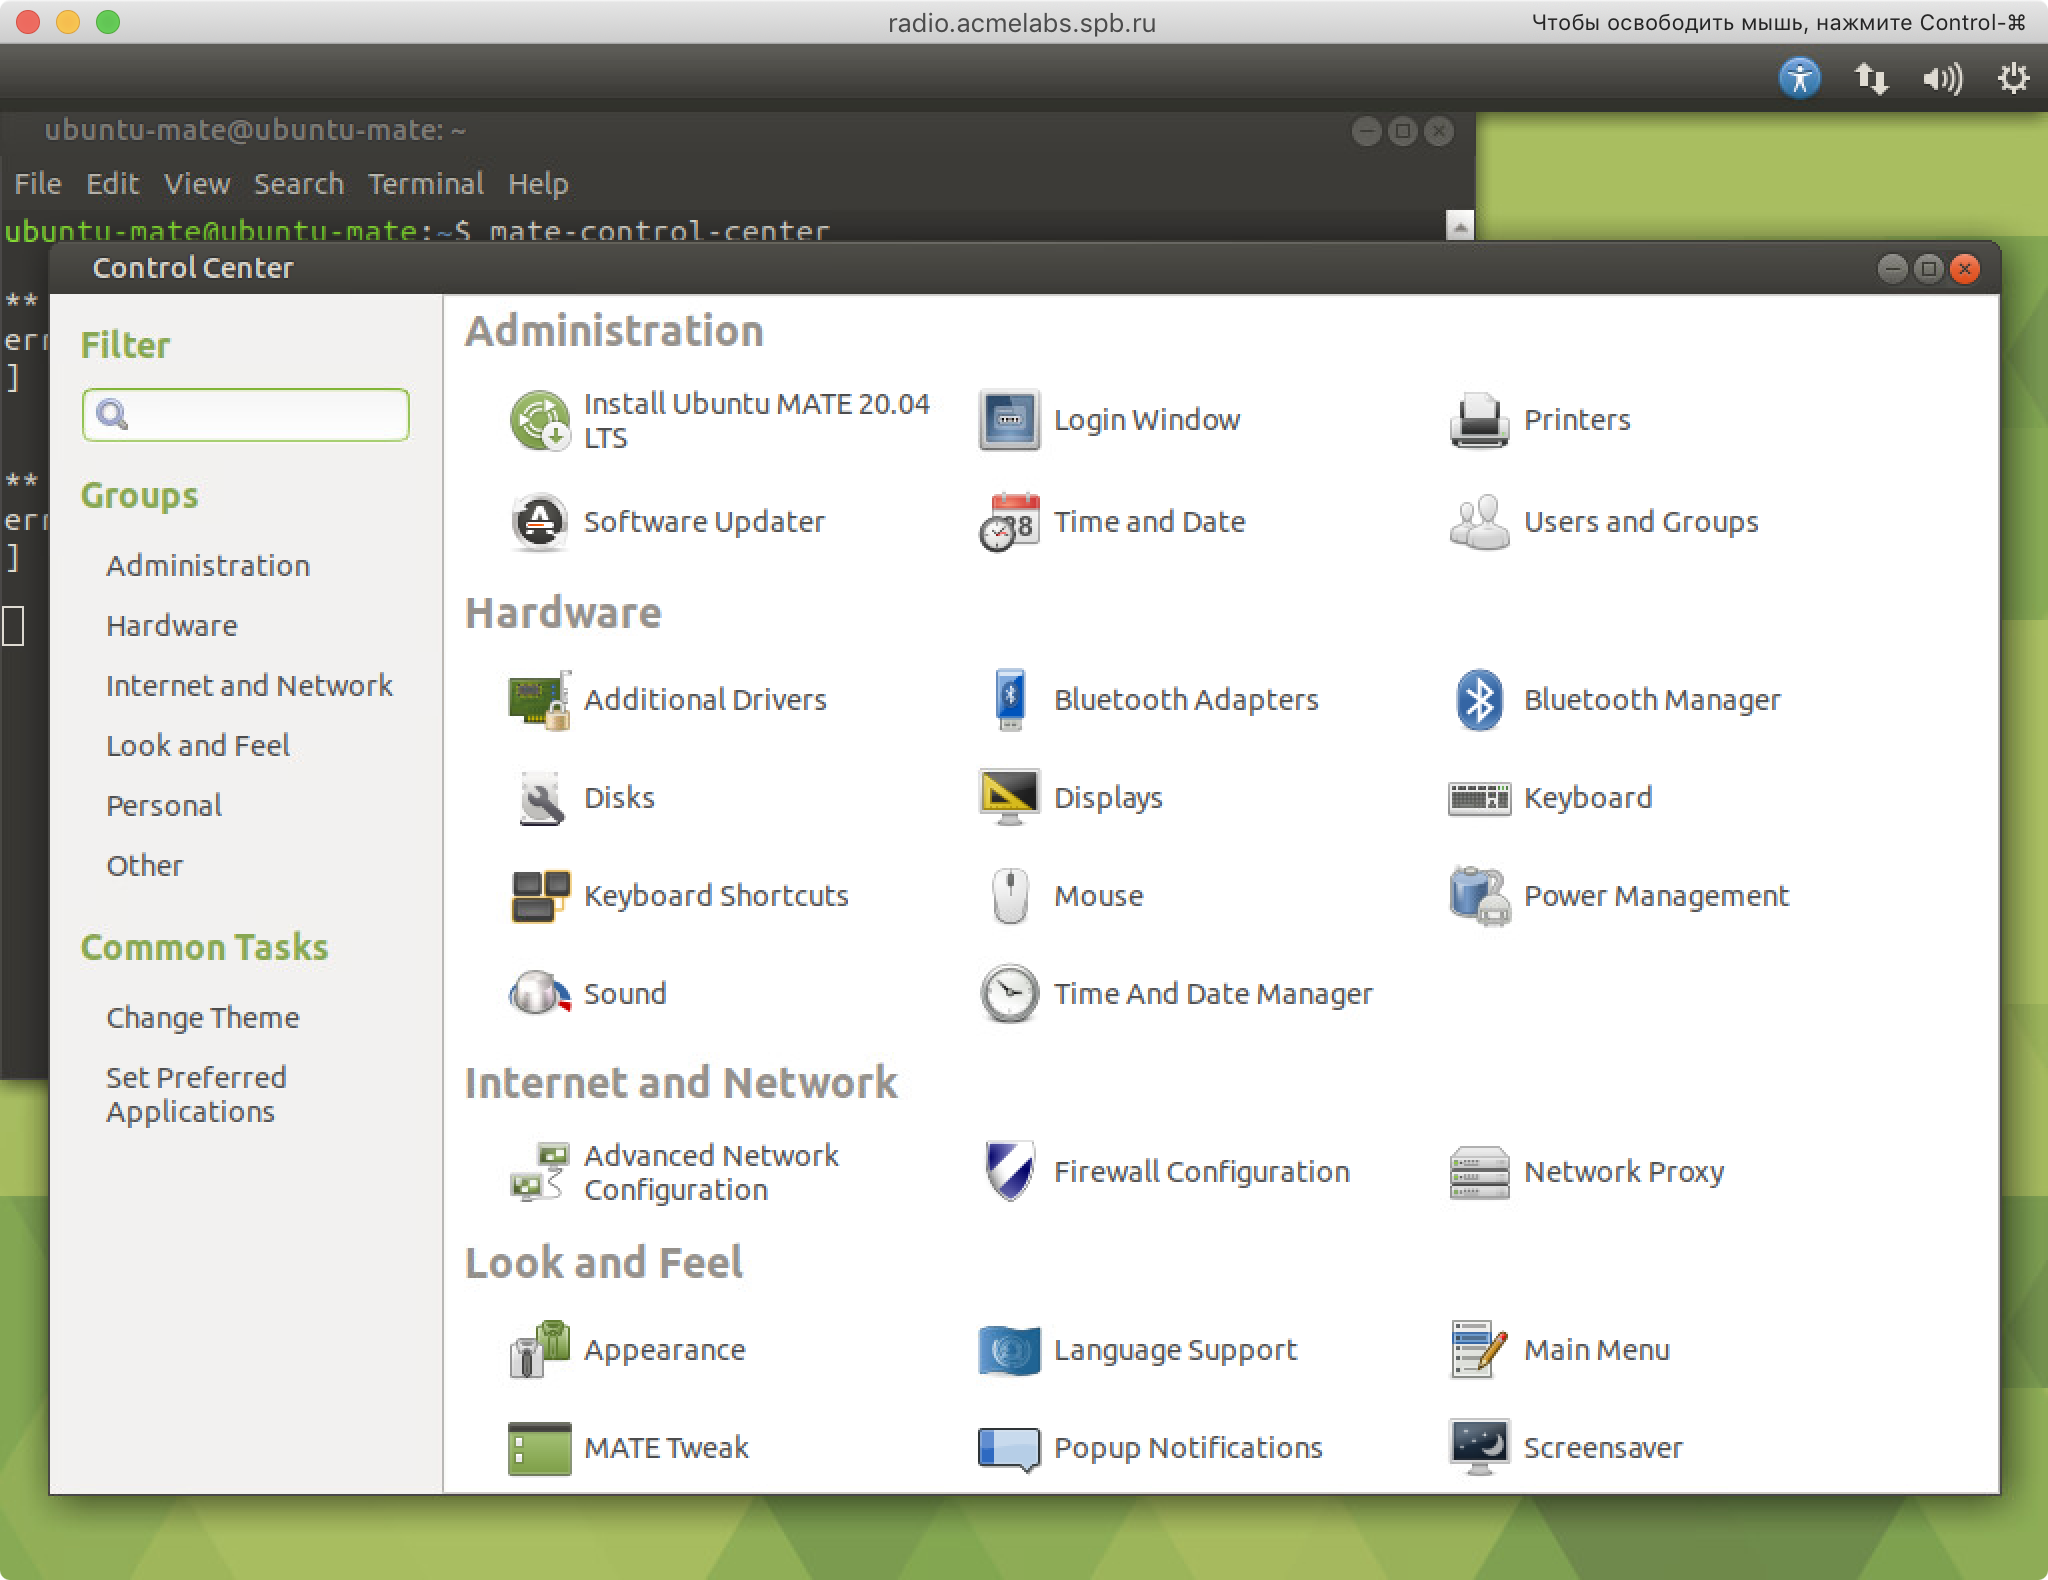
In the control panel, in the Hardware section, select Displays. Then either you will be lucky or you will not be lucky. In the case of Parallels Desktop, only two resolutions are available: 1400x1050 and 800x600. in the case of VMware ESXi, a whole range of different resolutions is available for selection. Select any one you like and click on the Apply button, and then in the dialog box that appears, click on the Keep This Configuration button.

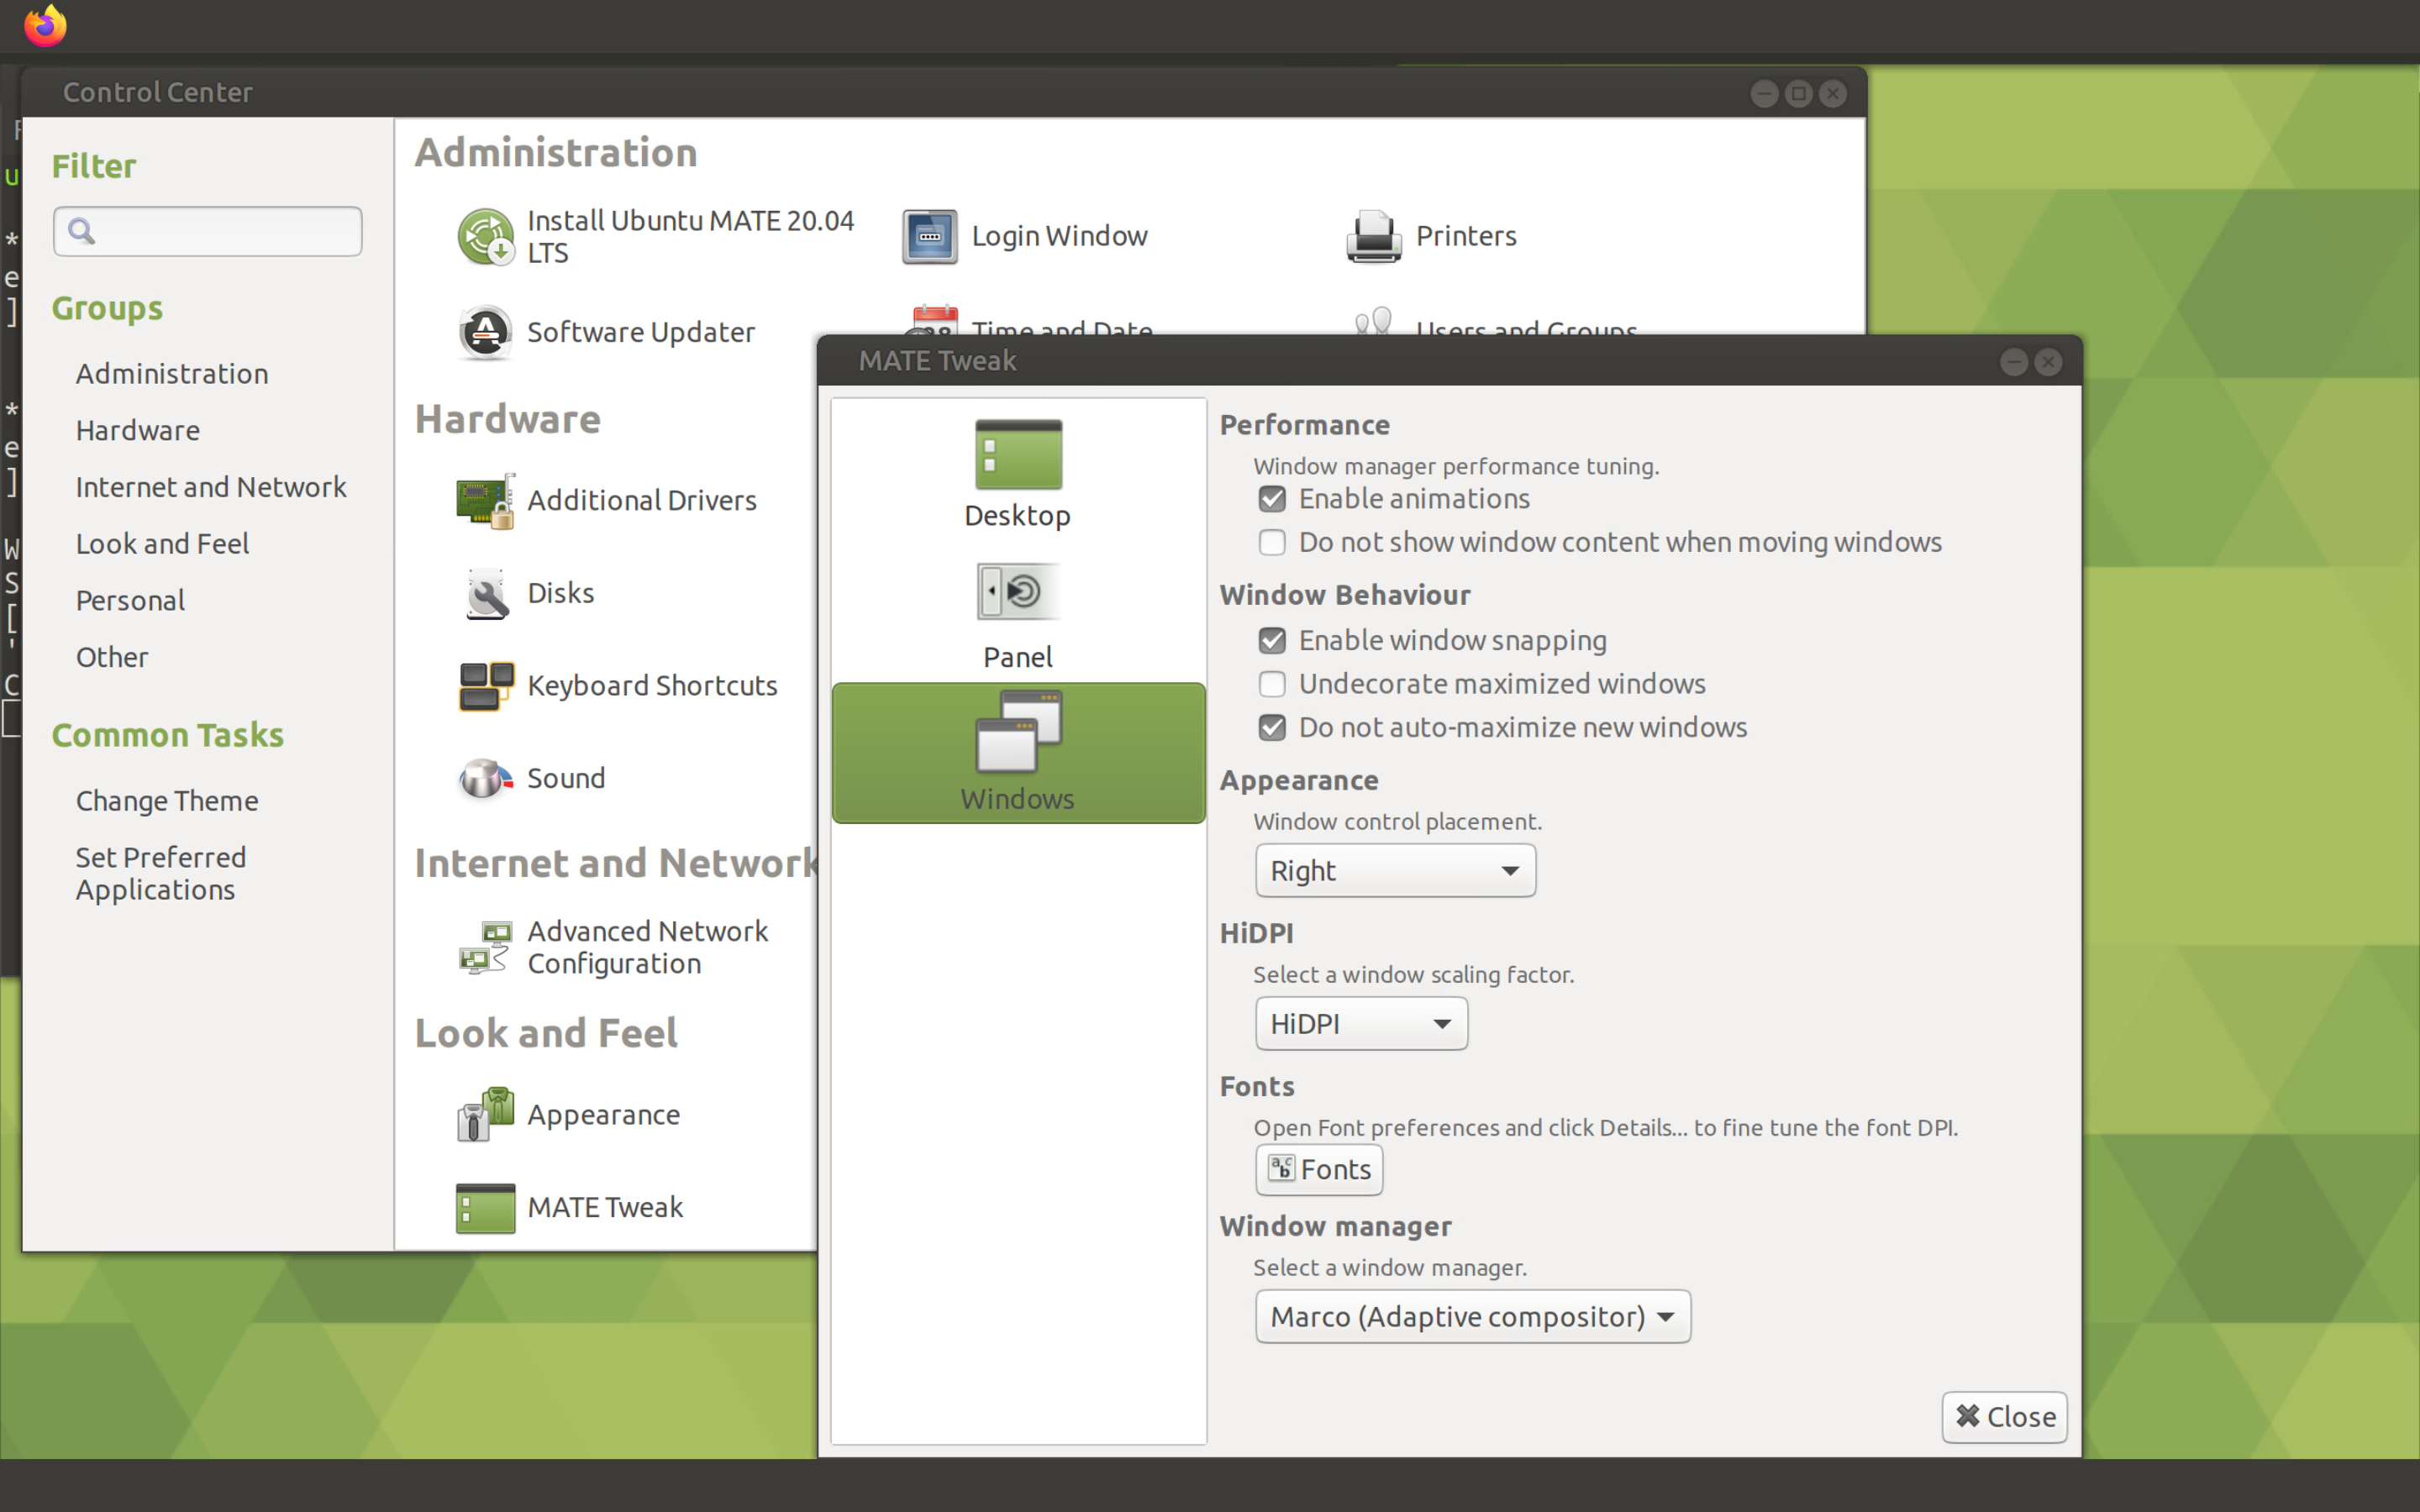
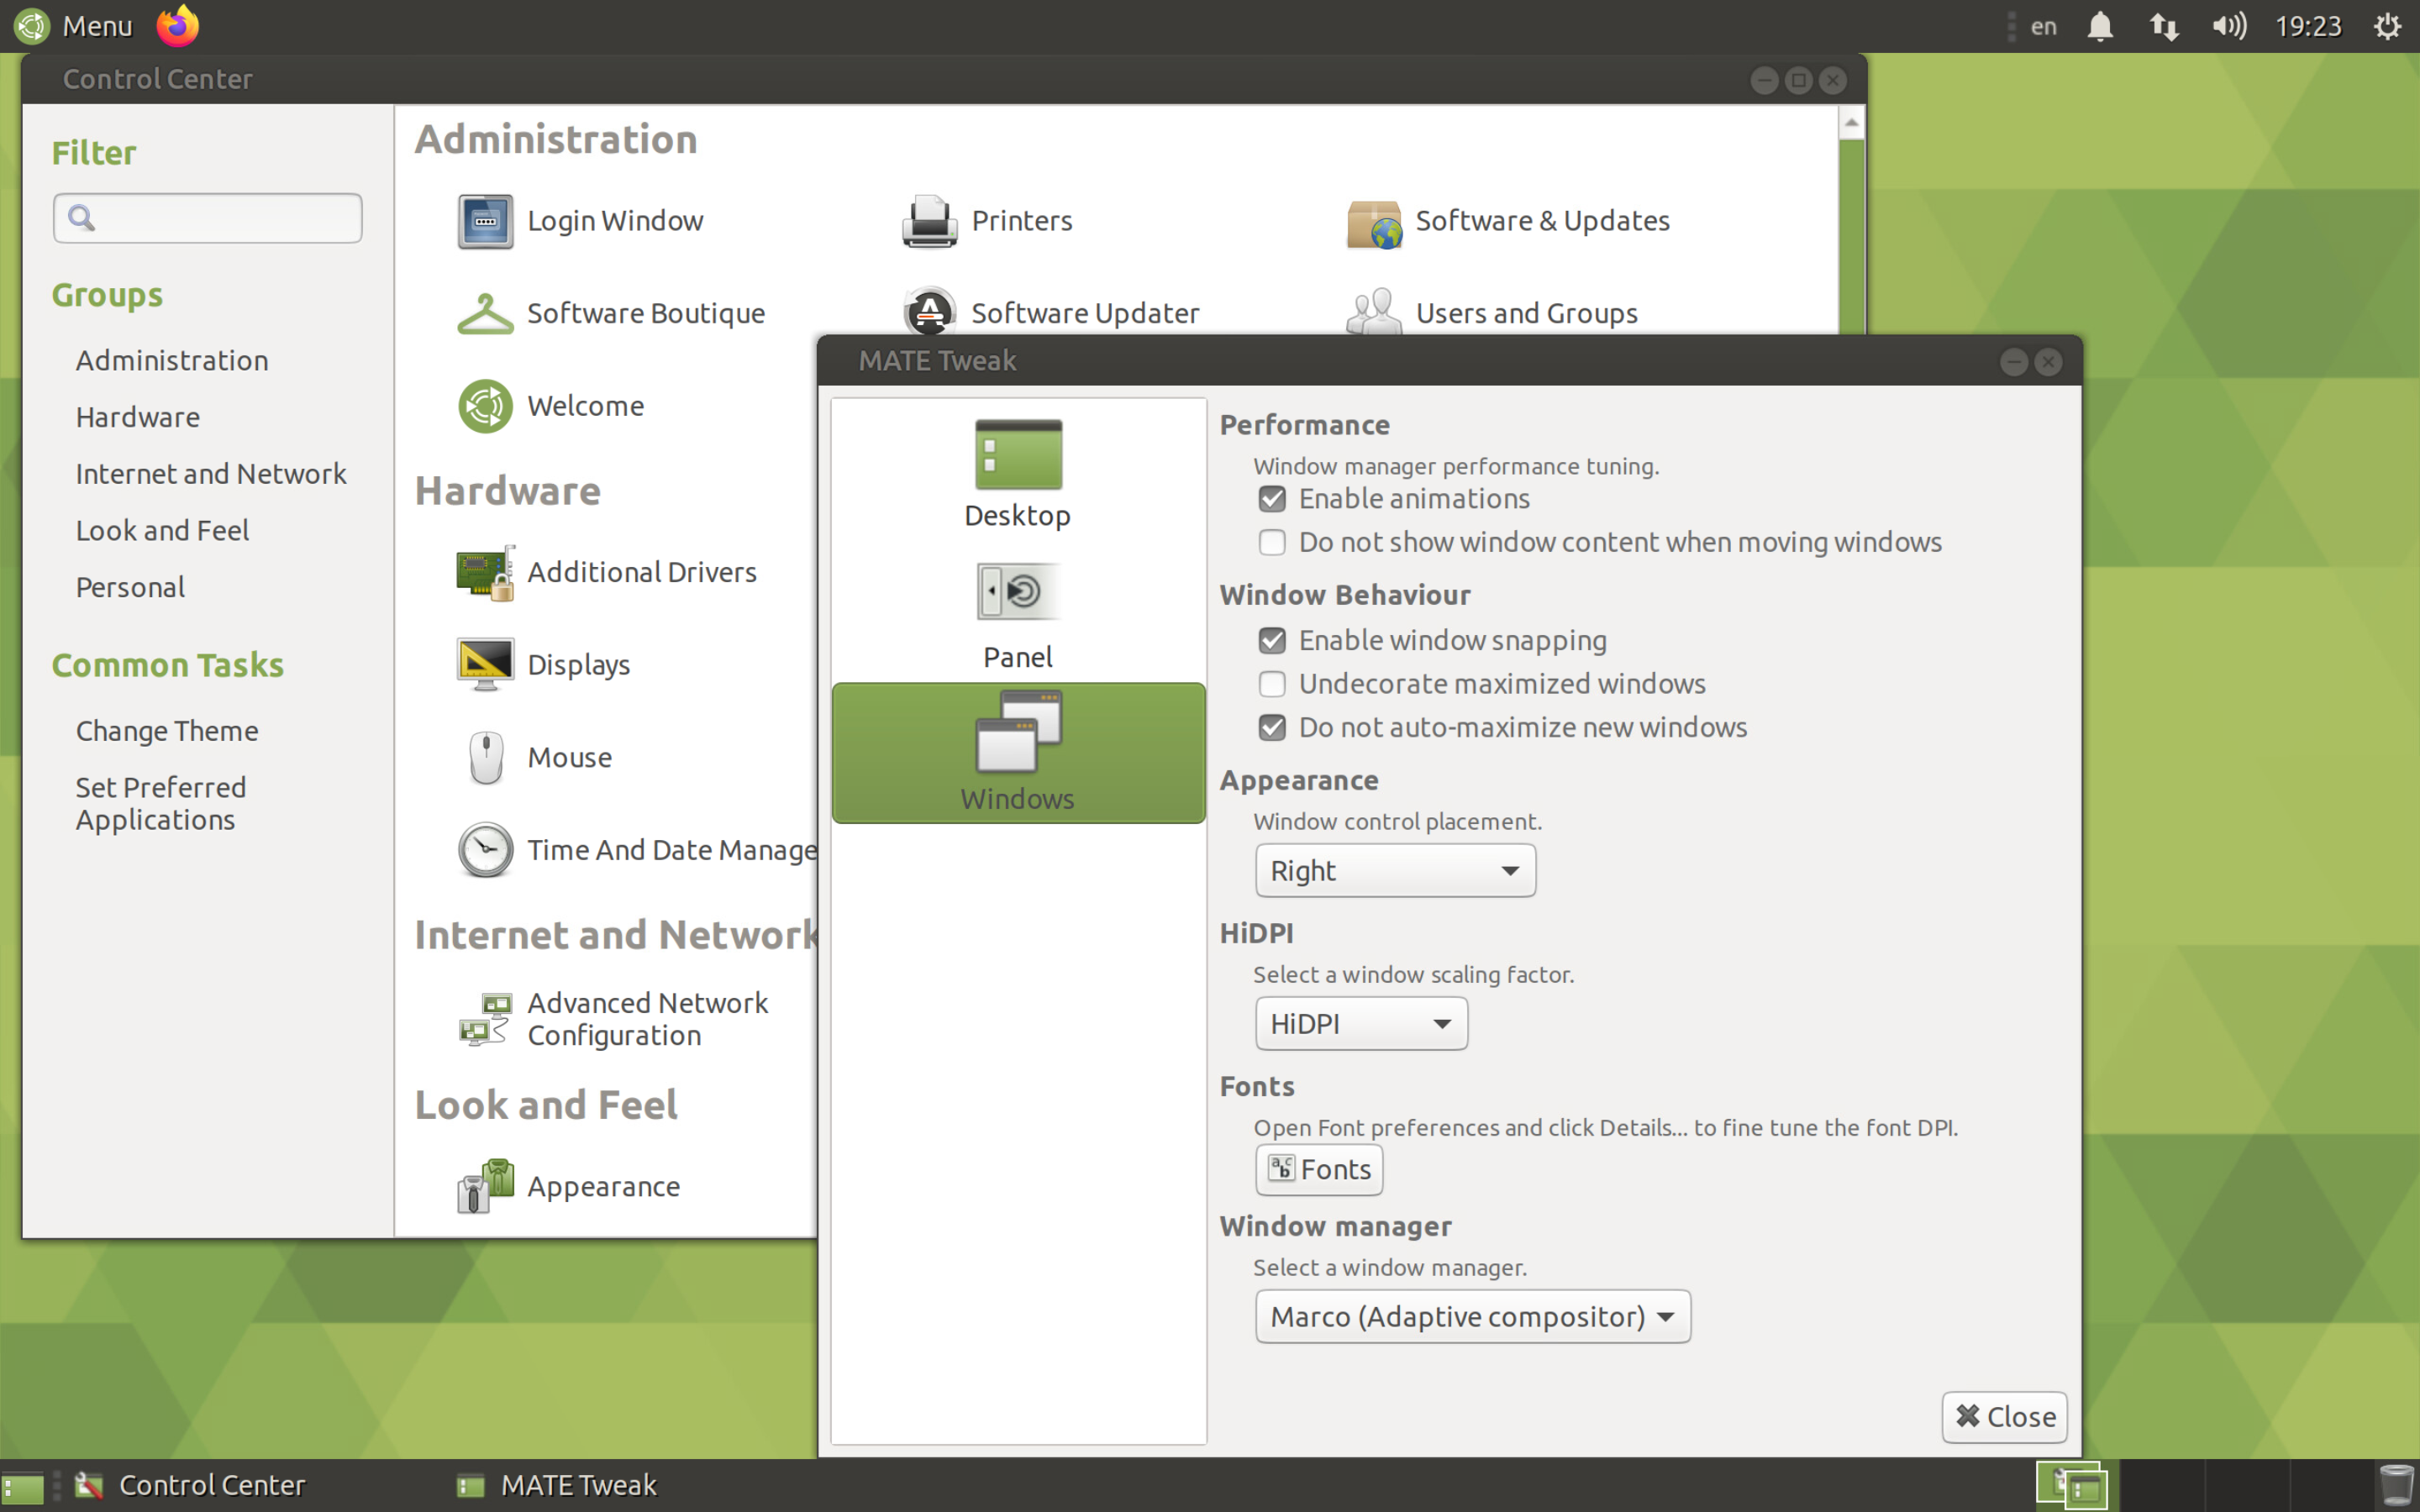
If you need to enable HiDPI mode, select the MATE Tweak item in the Look and Feel section of the control center. Then go to the Windows tab and select HiDPI value in the HiDPI combobox.
After changing the resolution, close the display settings, the terminal and return to the installer.
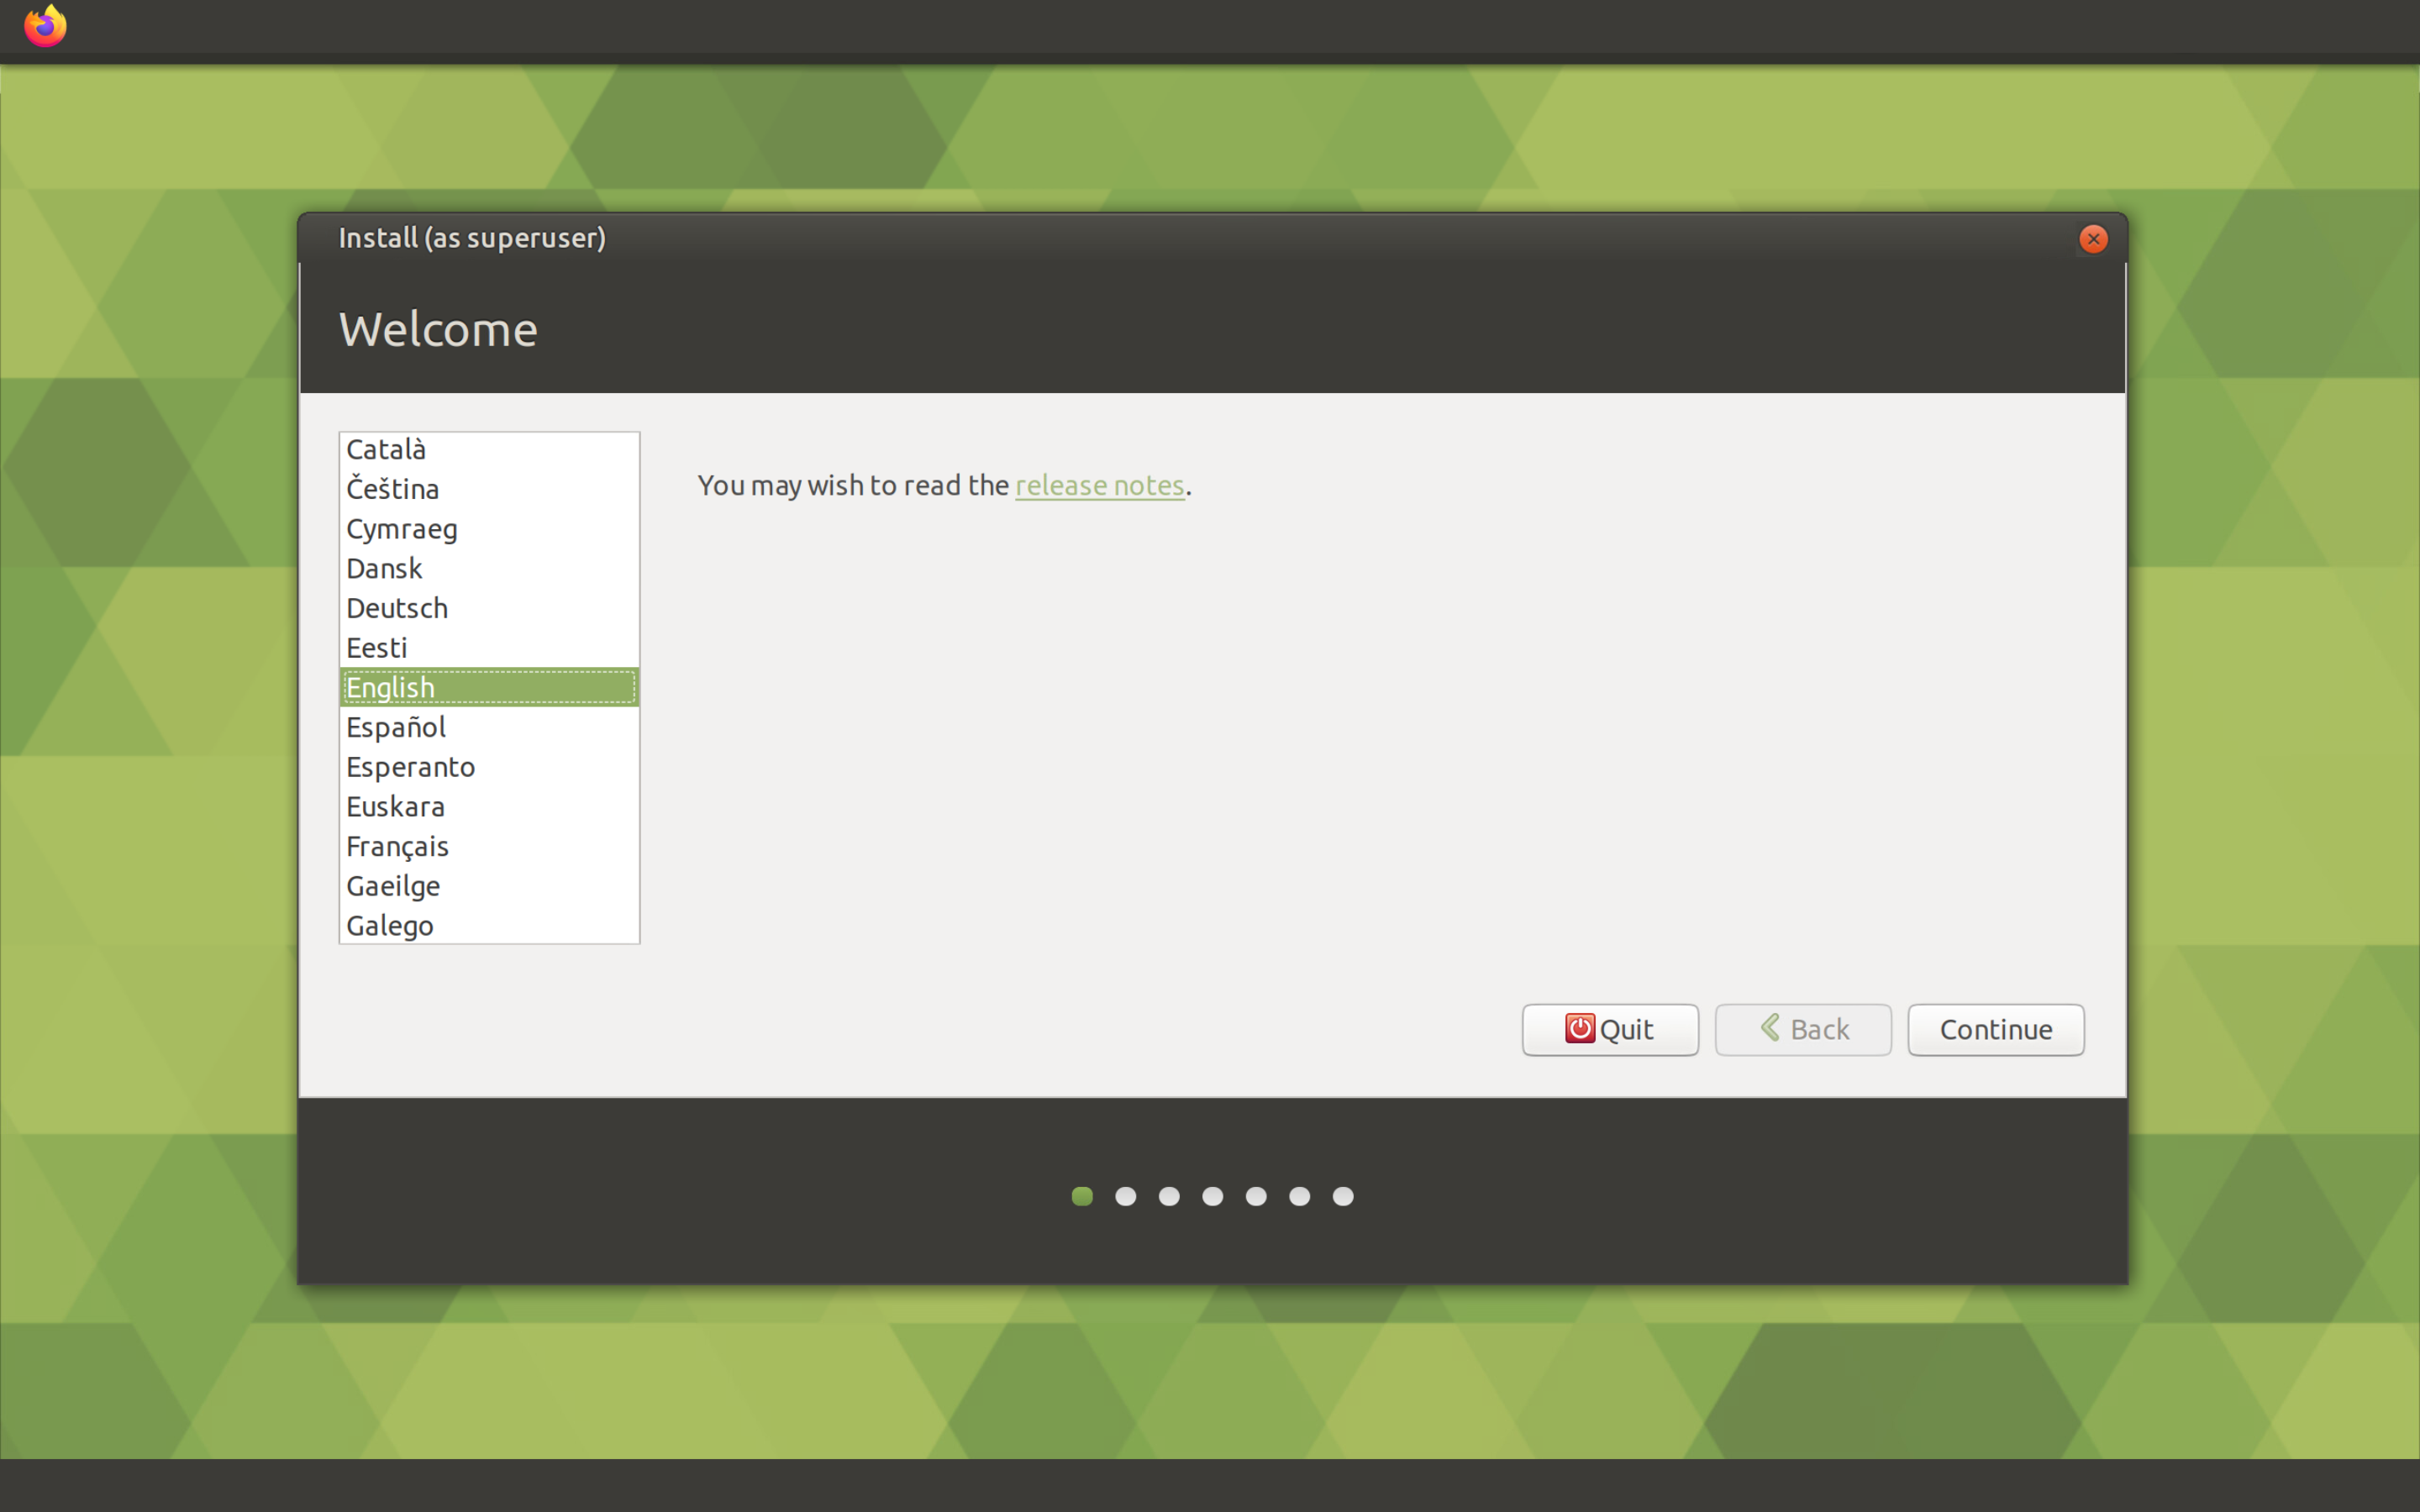
Leave the selected language English and click on the Continue button.
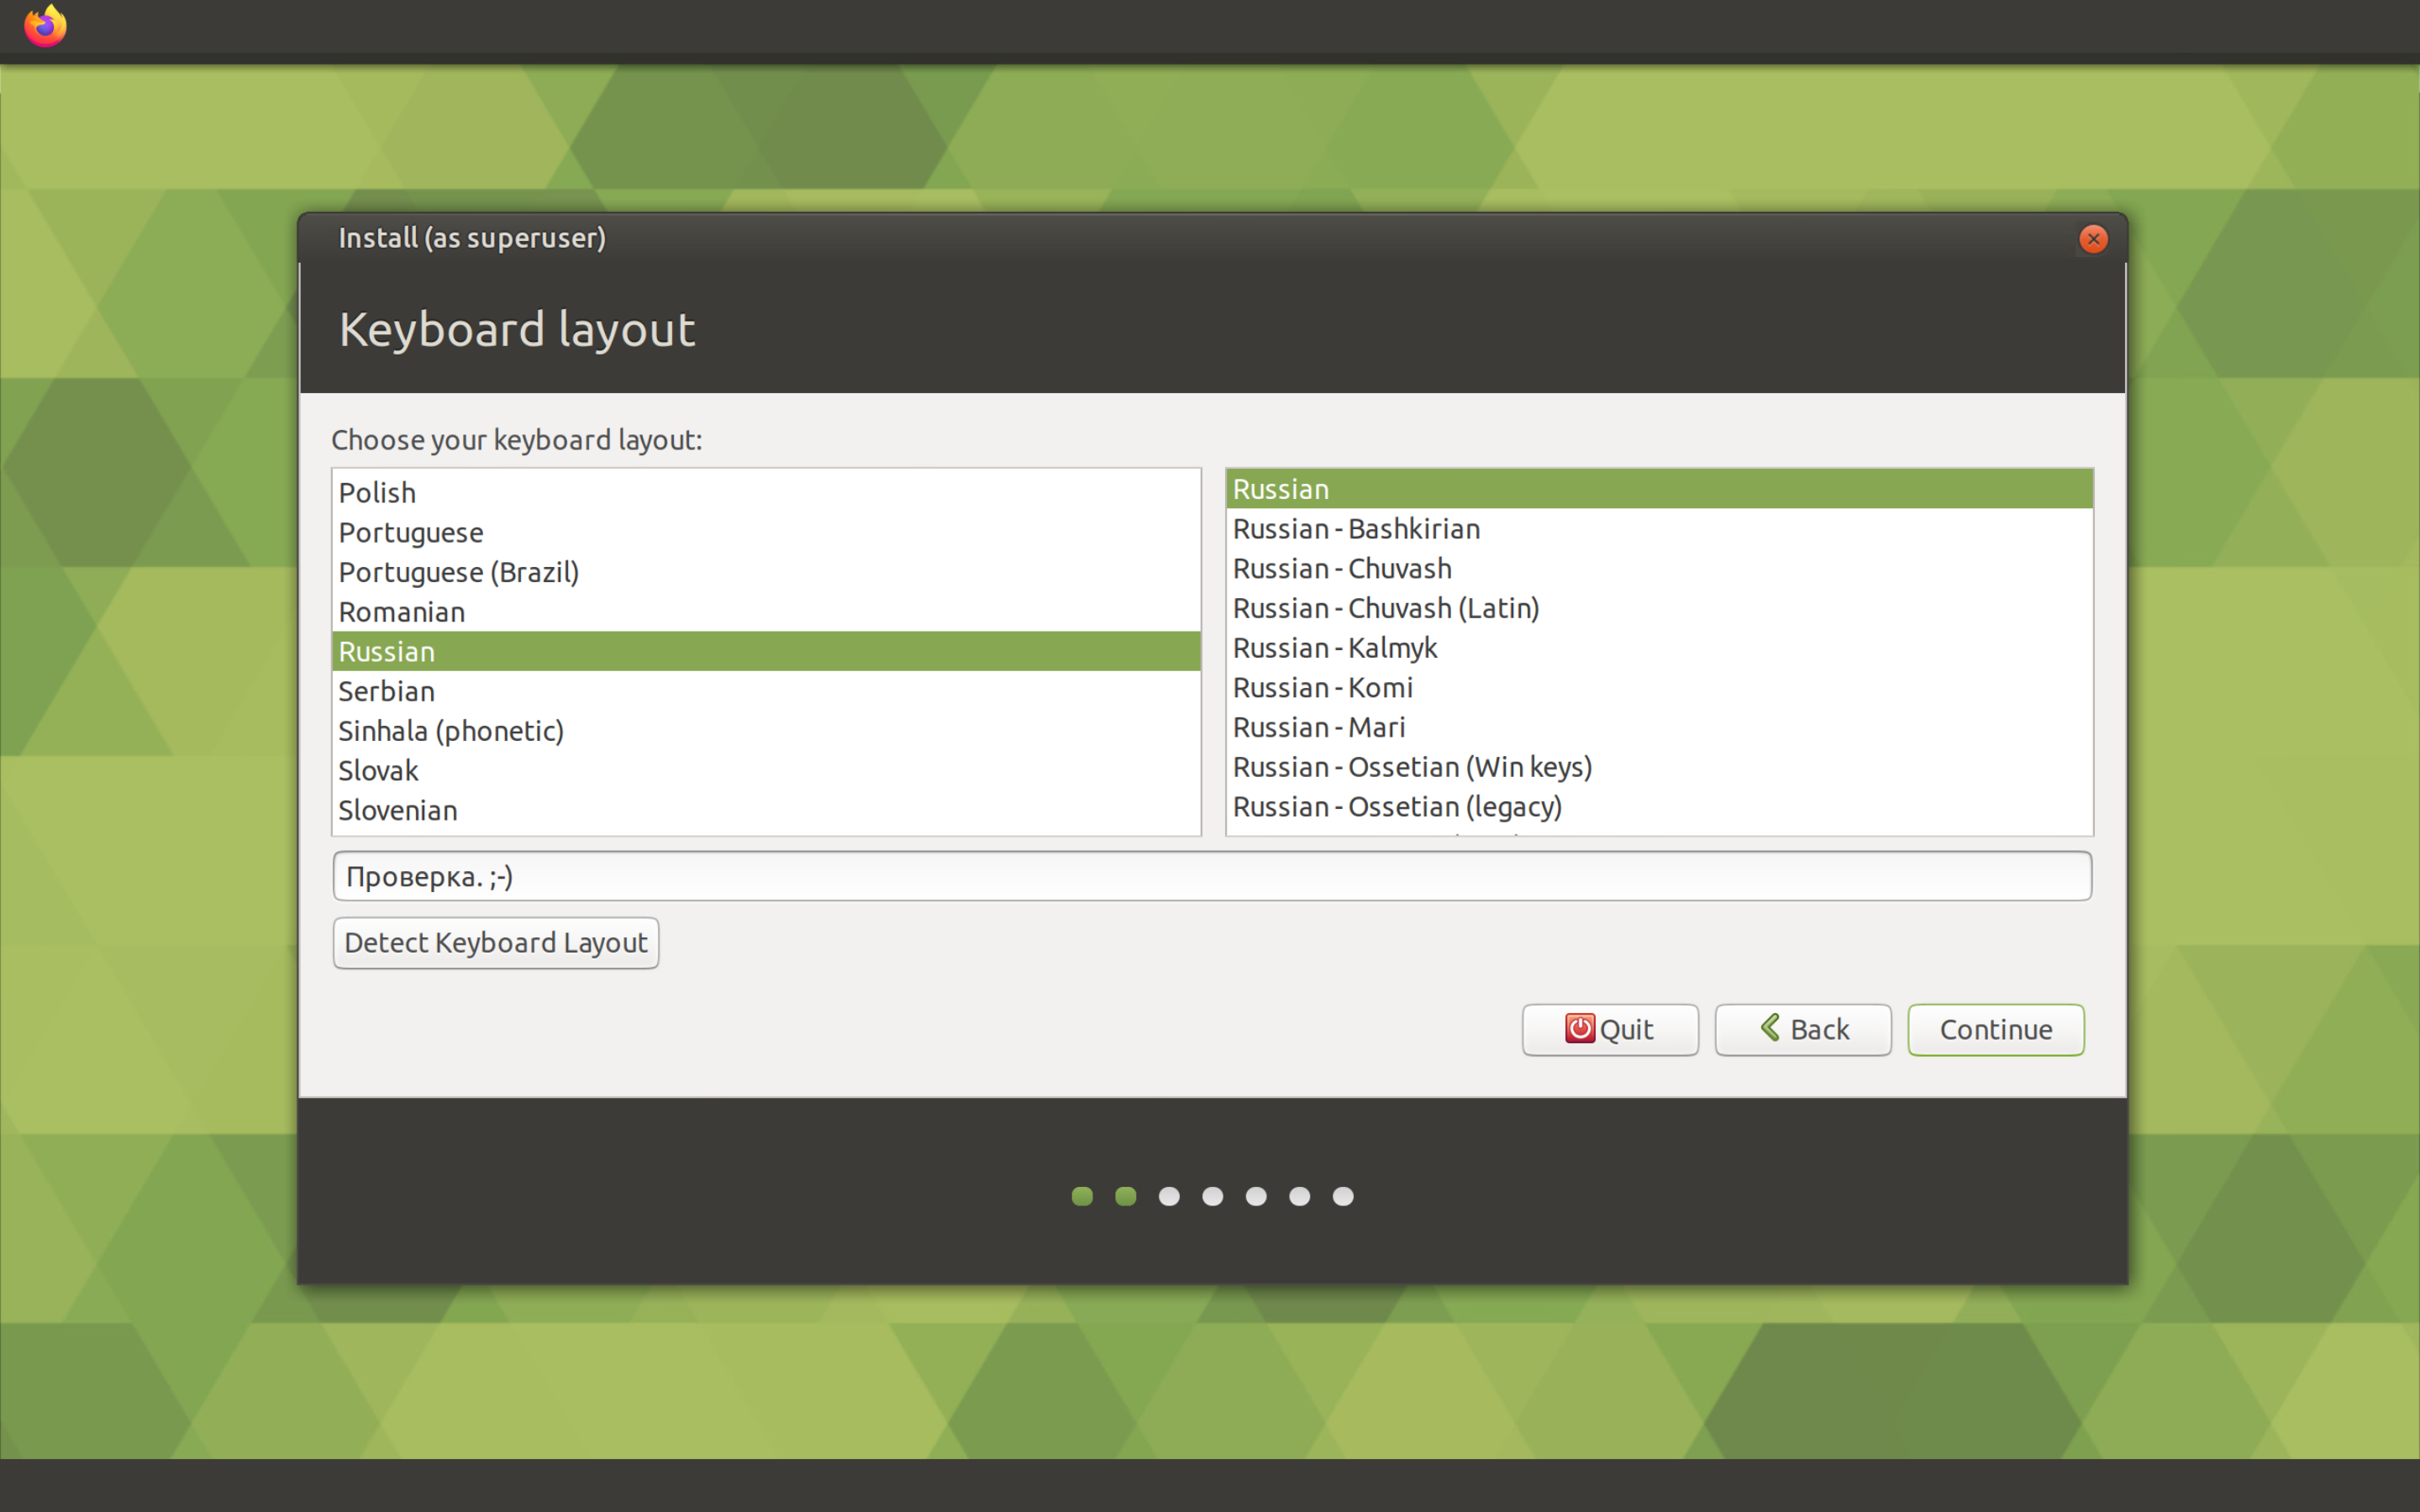
Next, select the keyboard layout. Here you can already select Russian in both the left and right lists of languages, then click on the Continue button.
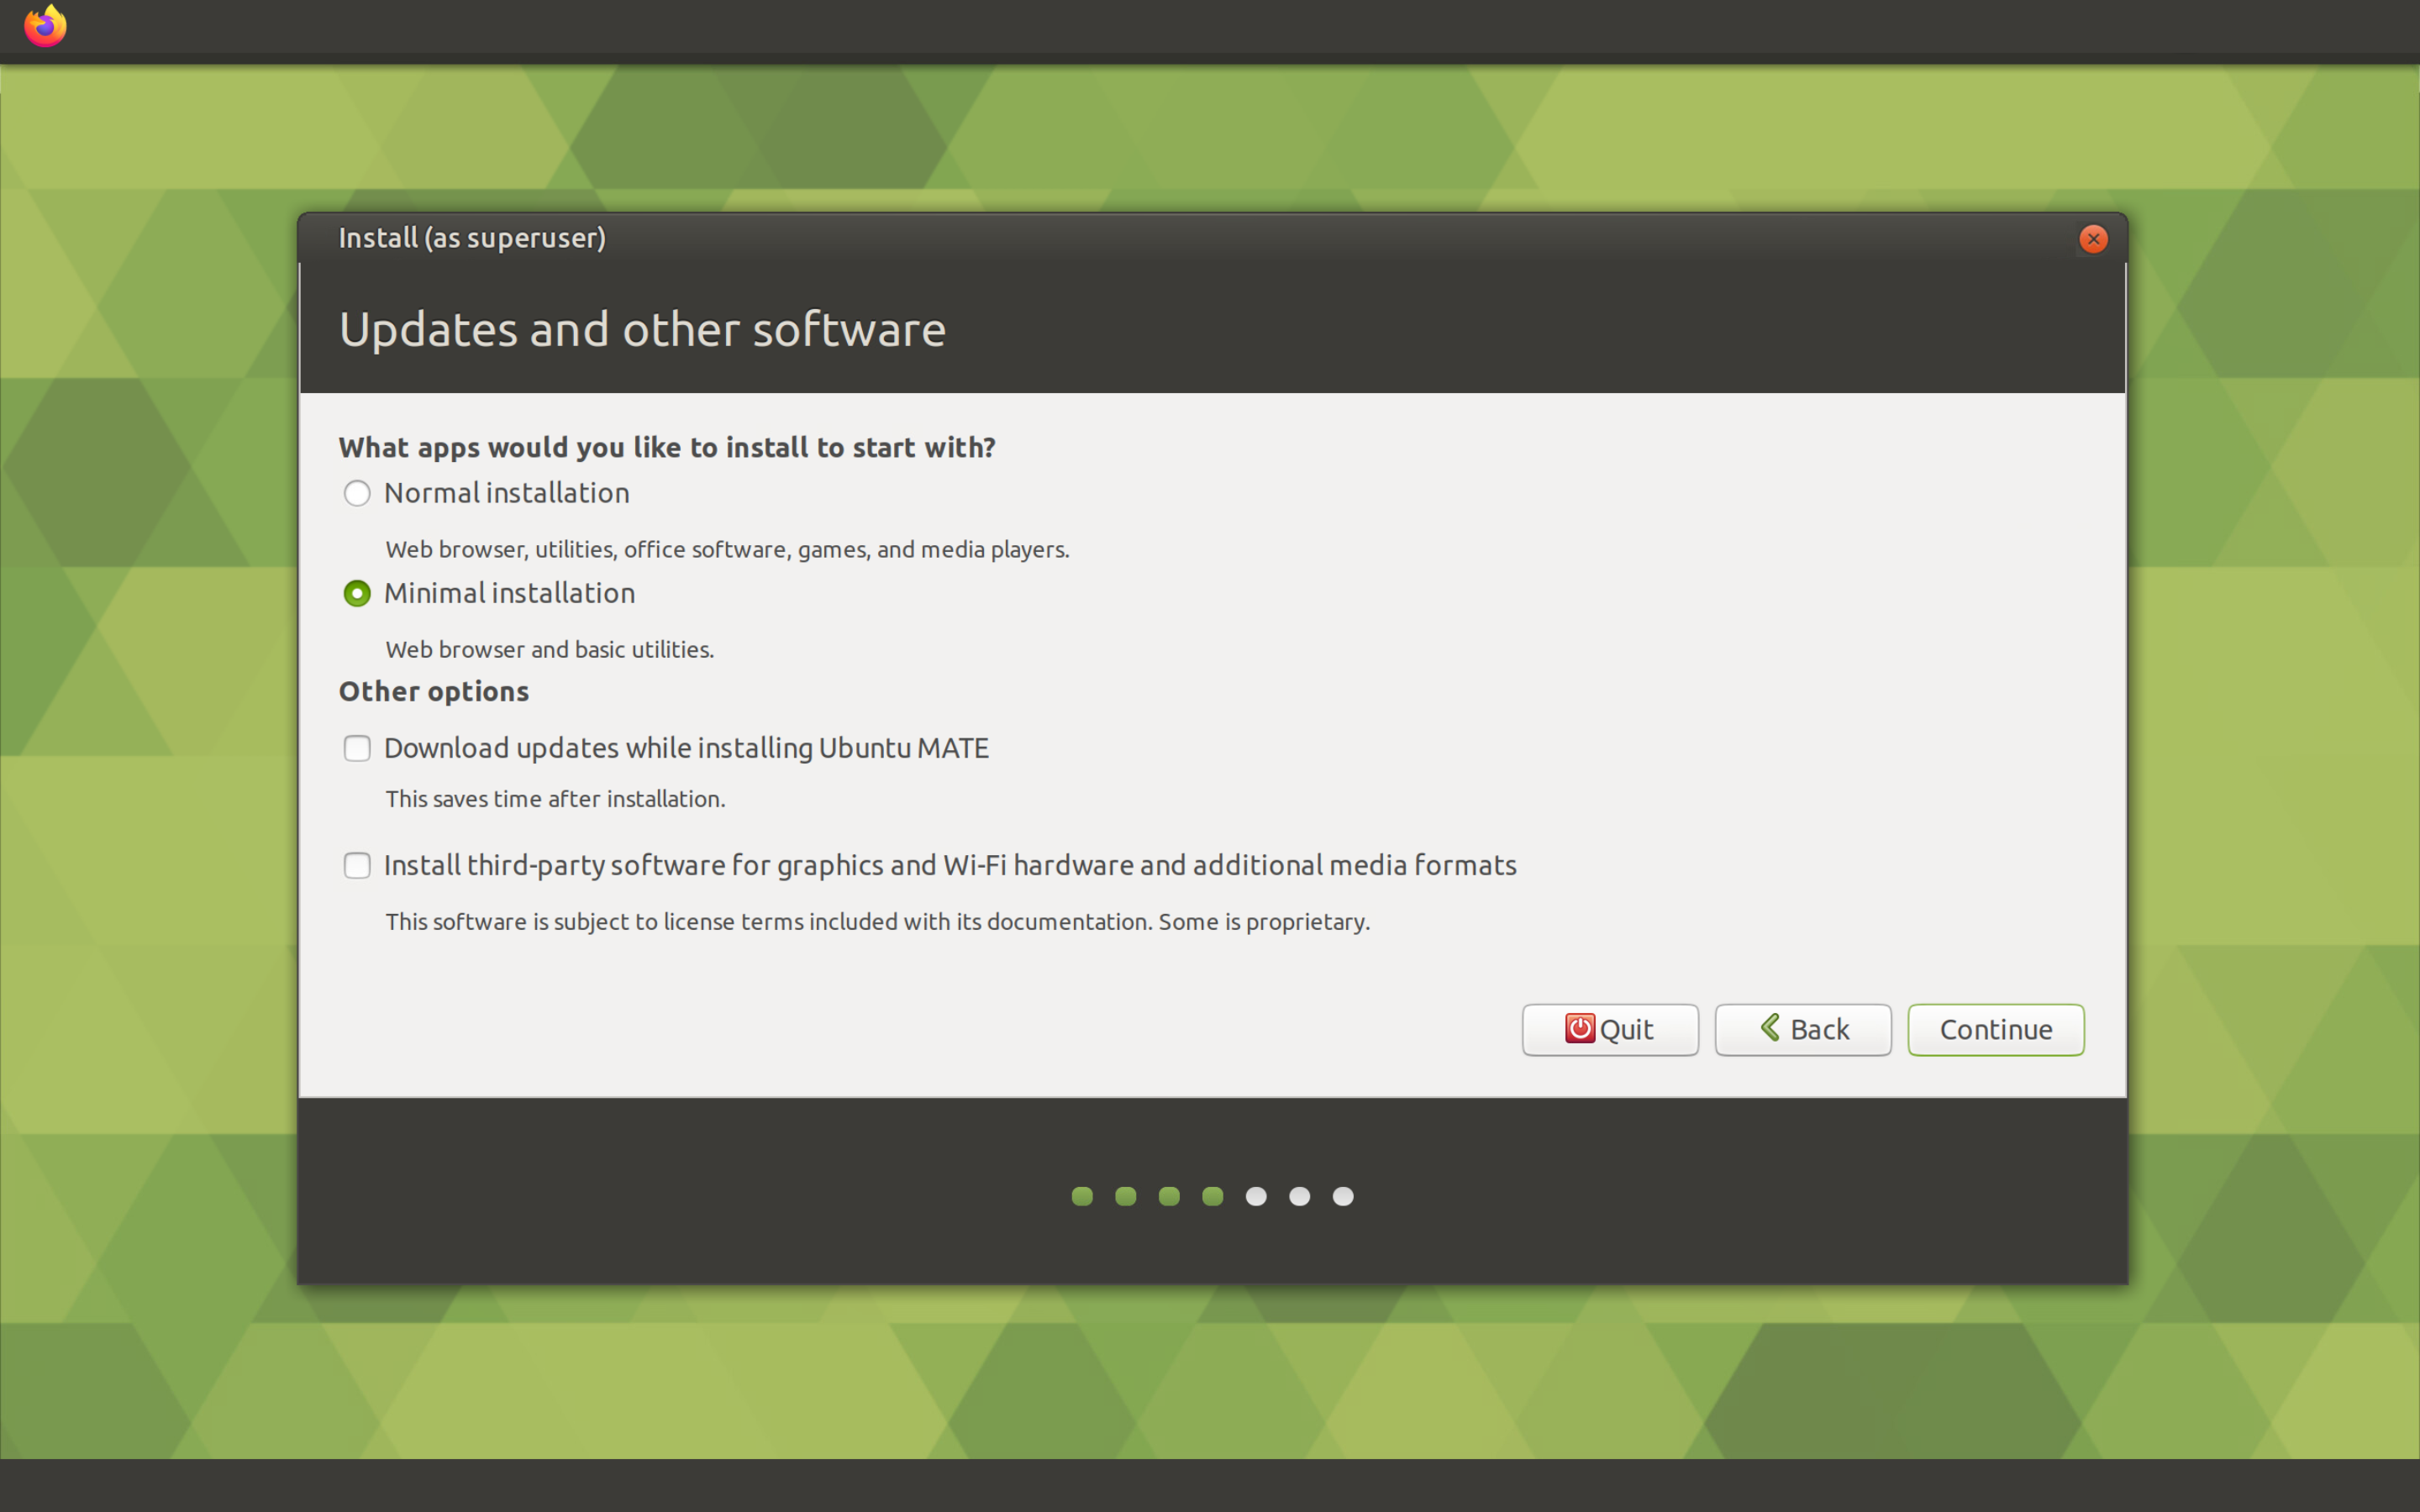
Now you need to choose the installation option – normal or minimum, and a couple of options. Select the Minimal installation item for the minimum installation, remove the check mark from the Download updates while installing Ubuntu MATE item (since this will not save us time, and immediately after installation, you will still need to update the system). Then click on the Continue button.
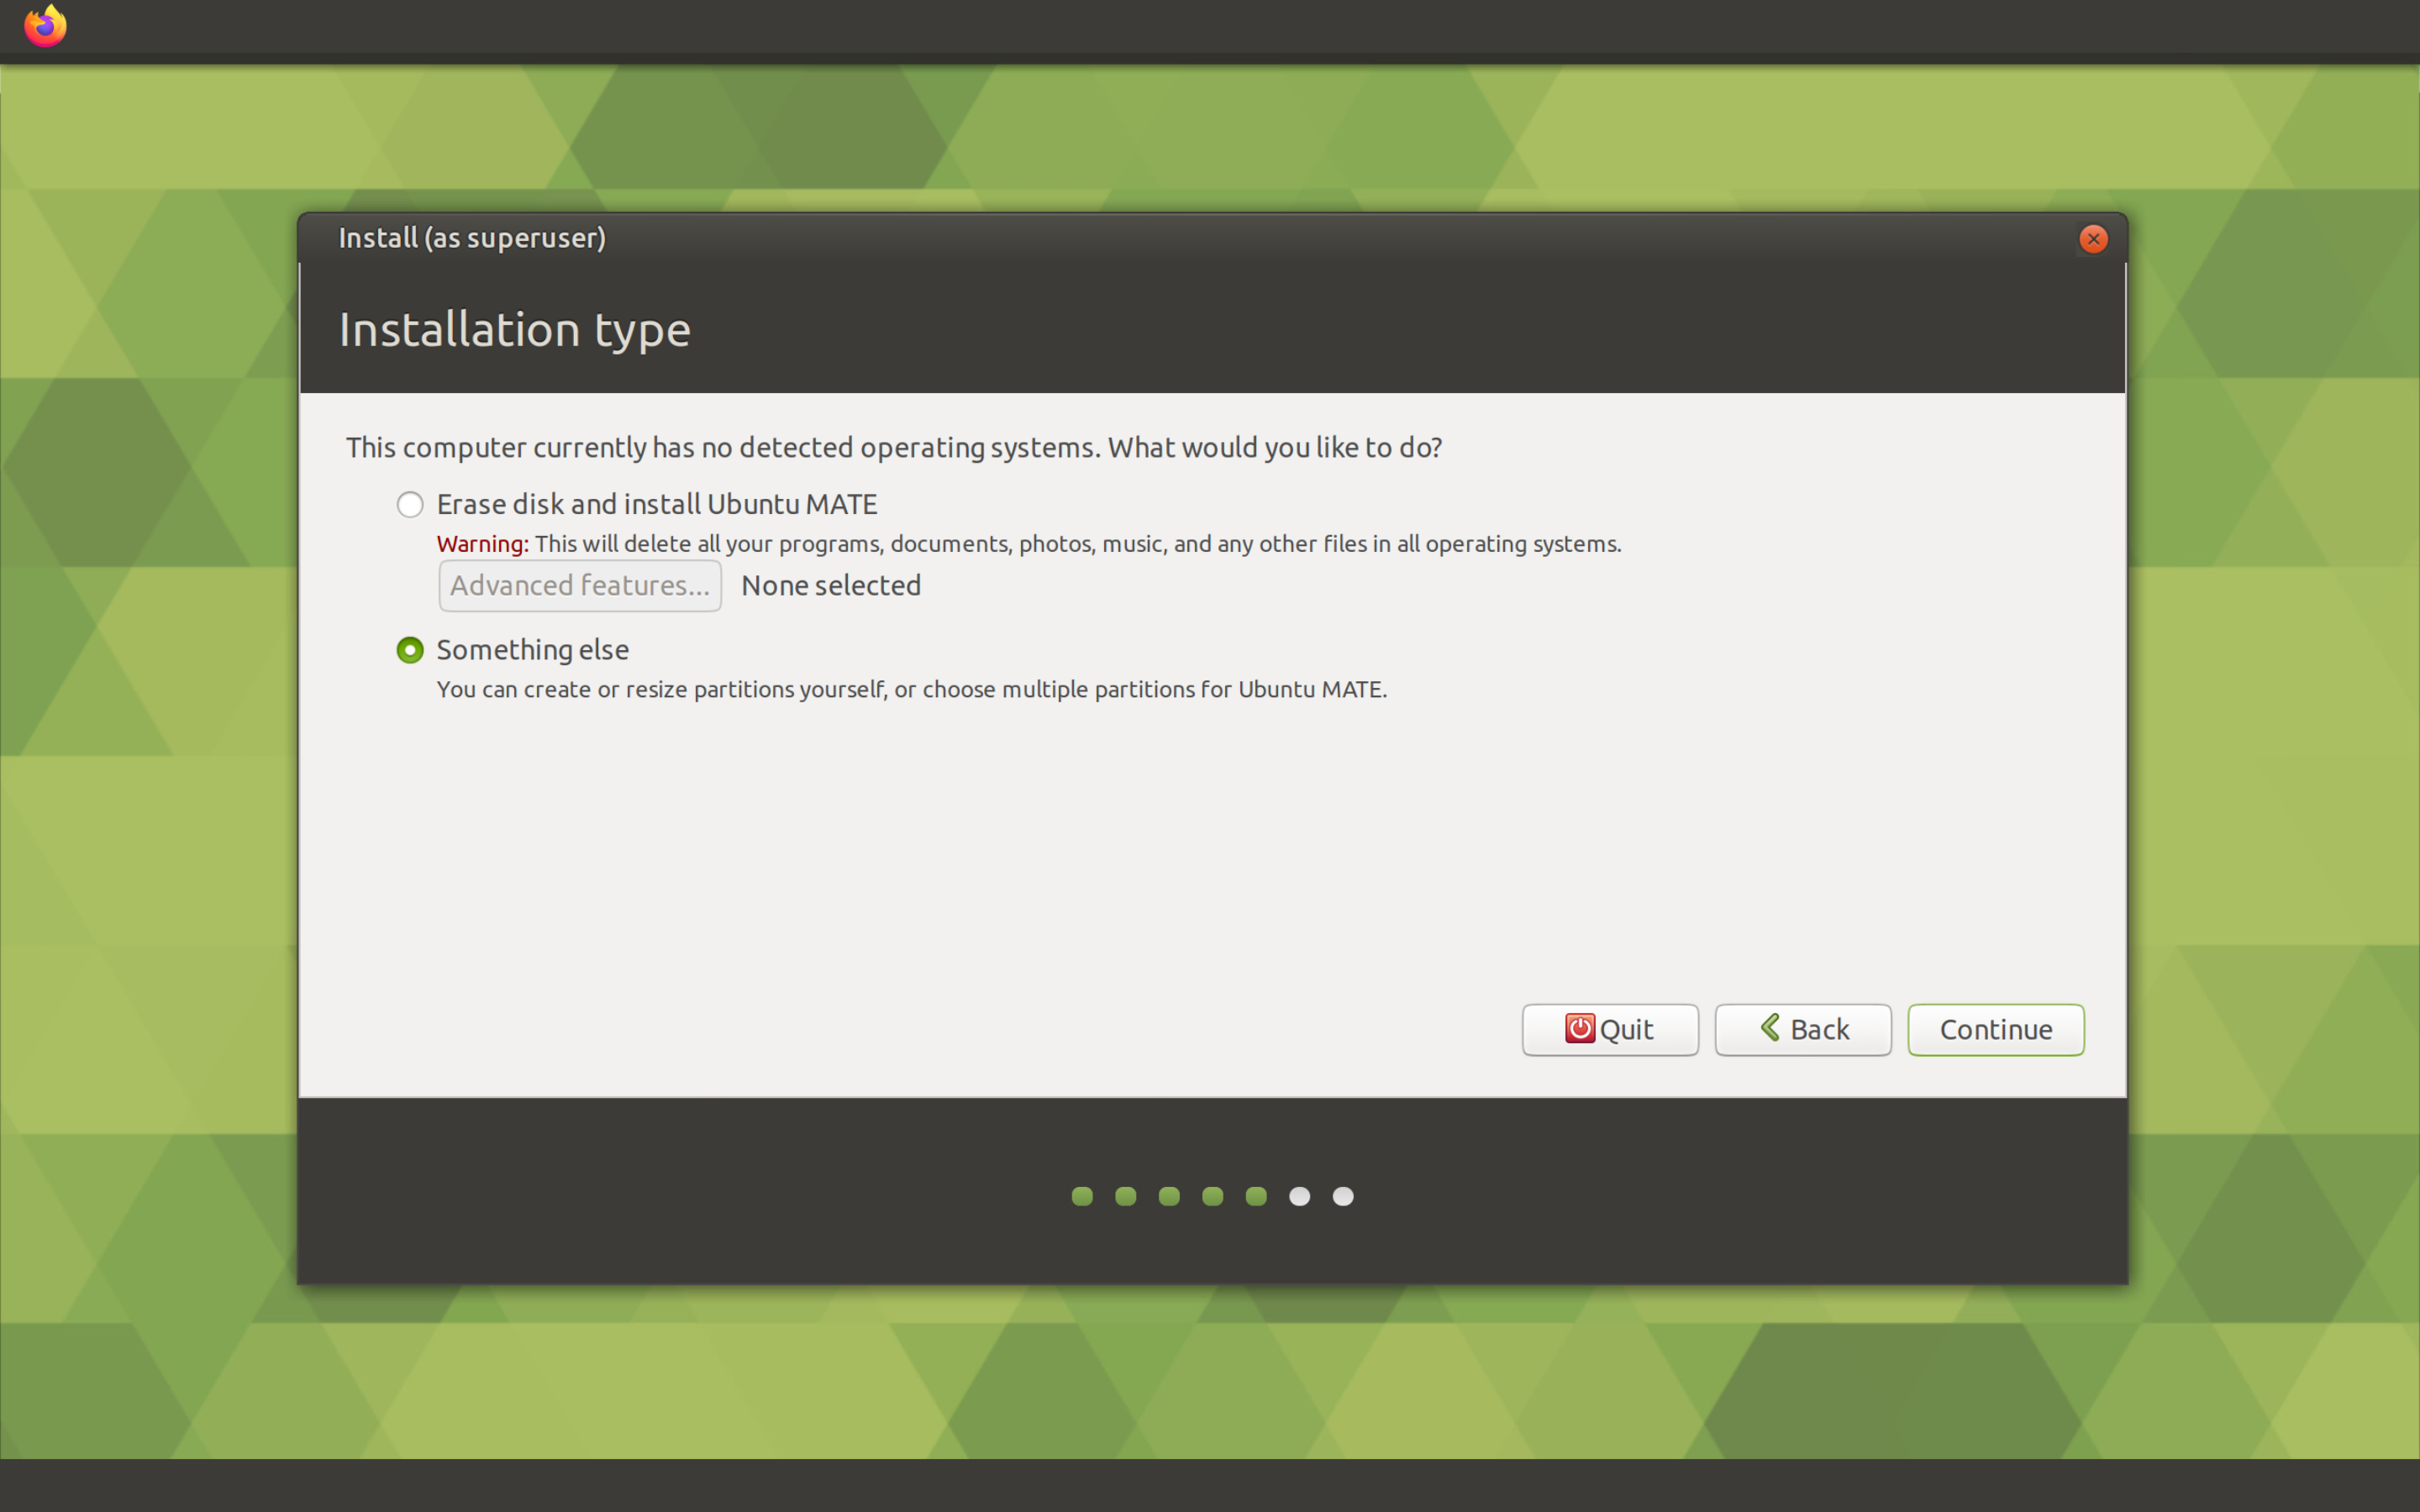
Now you need to choose the option of partition our disk. The Erase disk and install Ubuntu MATE item will simply create several partitions on the disk (root partition, /boot partition, and swap partition). The Use LVM with new Ubuntu MATE installation item will do the same, but using LVM. You could choose this option, but unfortunately, the Volume Group in this case will be called ubuntu-mate-vg, and this contradicts my concept of Feng Shui. First, the presence of dashes in the name of the Volume Group is an evil in itself, and secondly, when executing the df -h command, the path to the section will be indicated on the left half of the screen.
Last time I made sure that it doesn't make sense to partition the disk using the installer, because you can't configure LVM. Therefore, we will partition the disk manually. To start the console, press Ctrl+Alt+T.
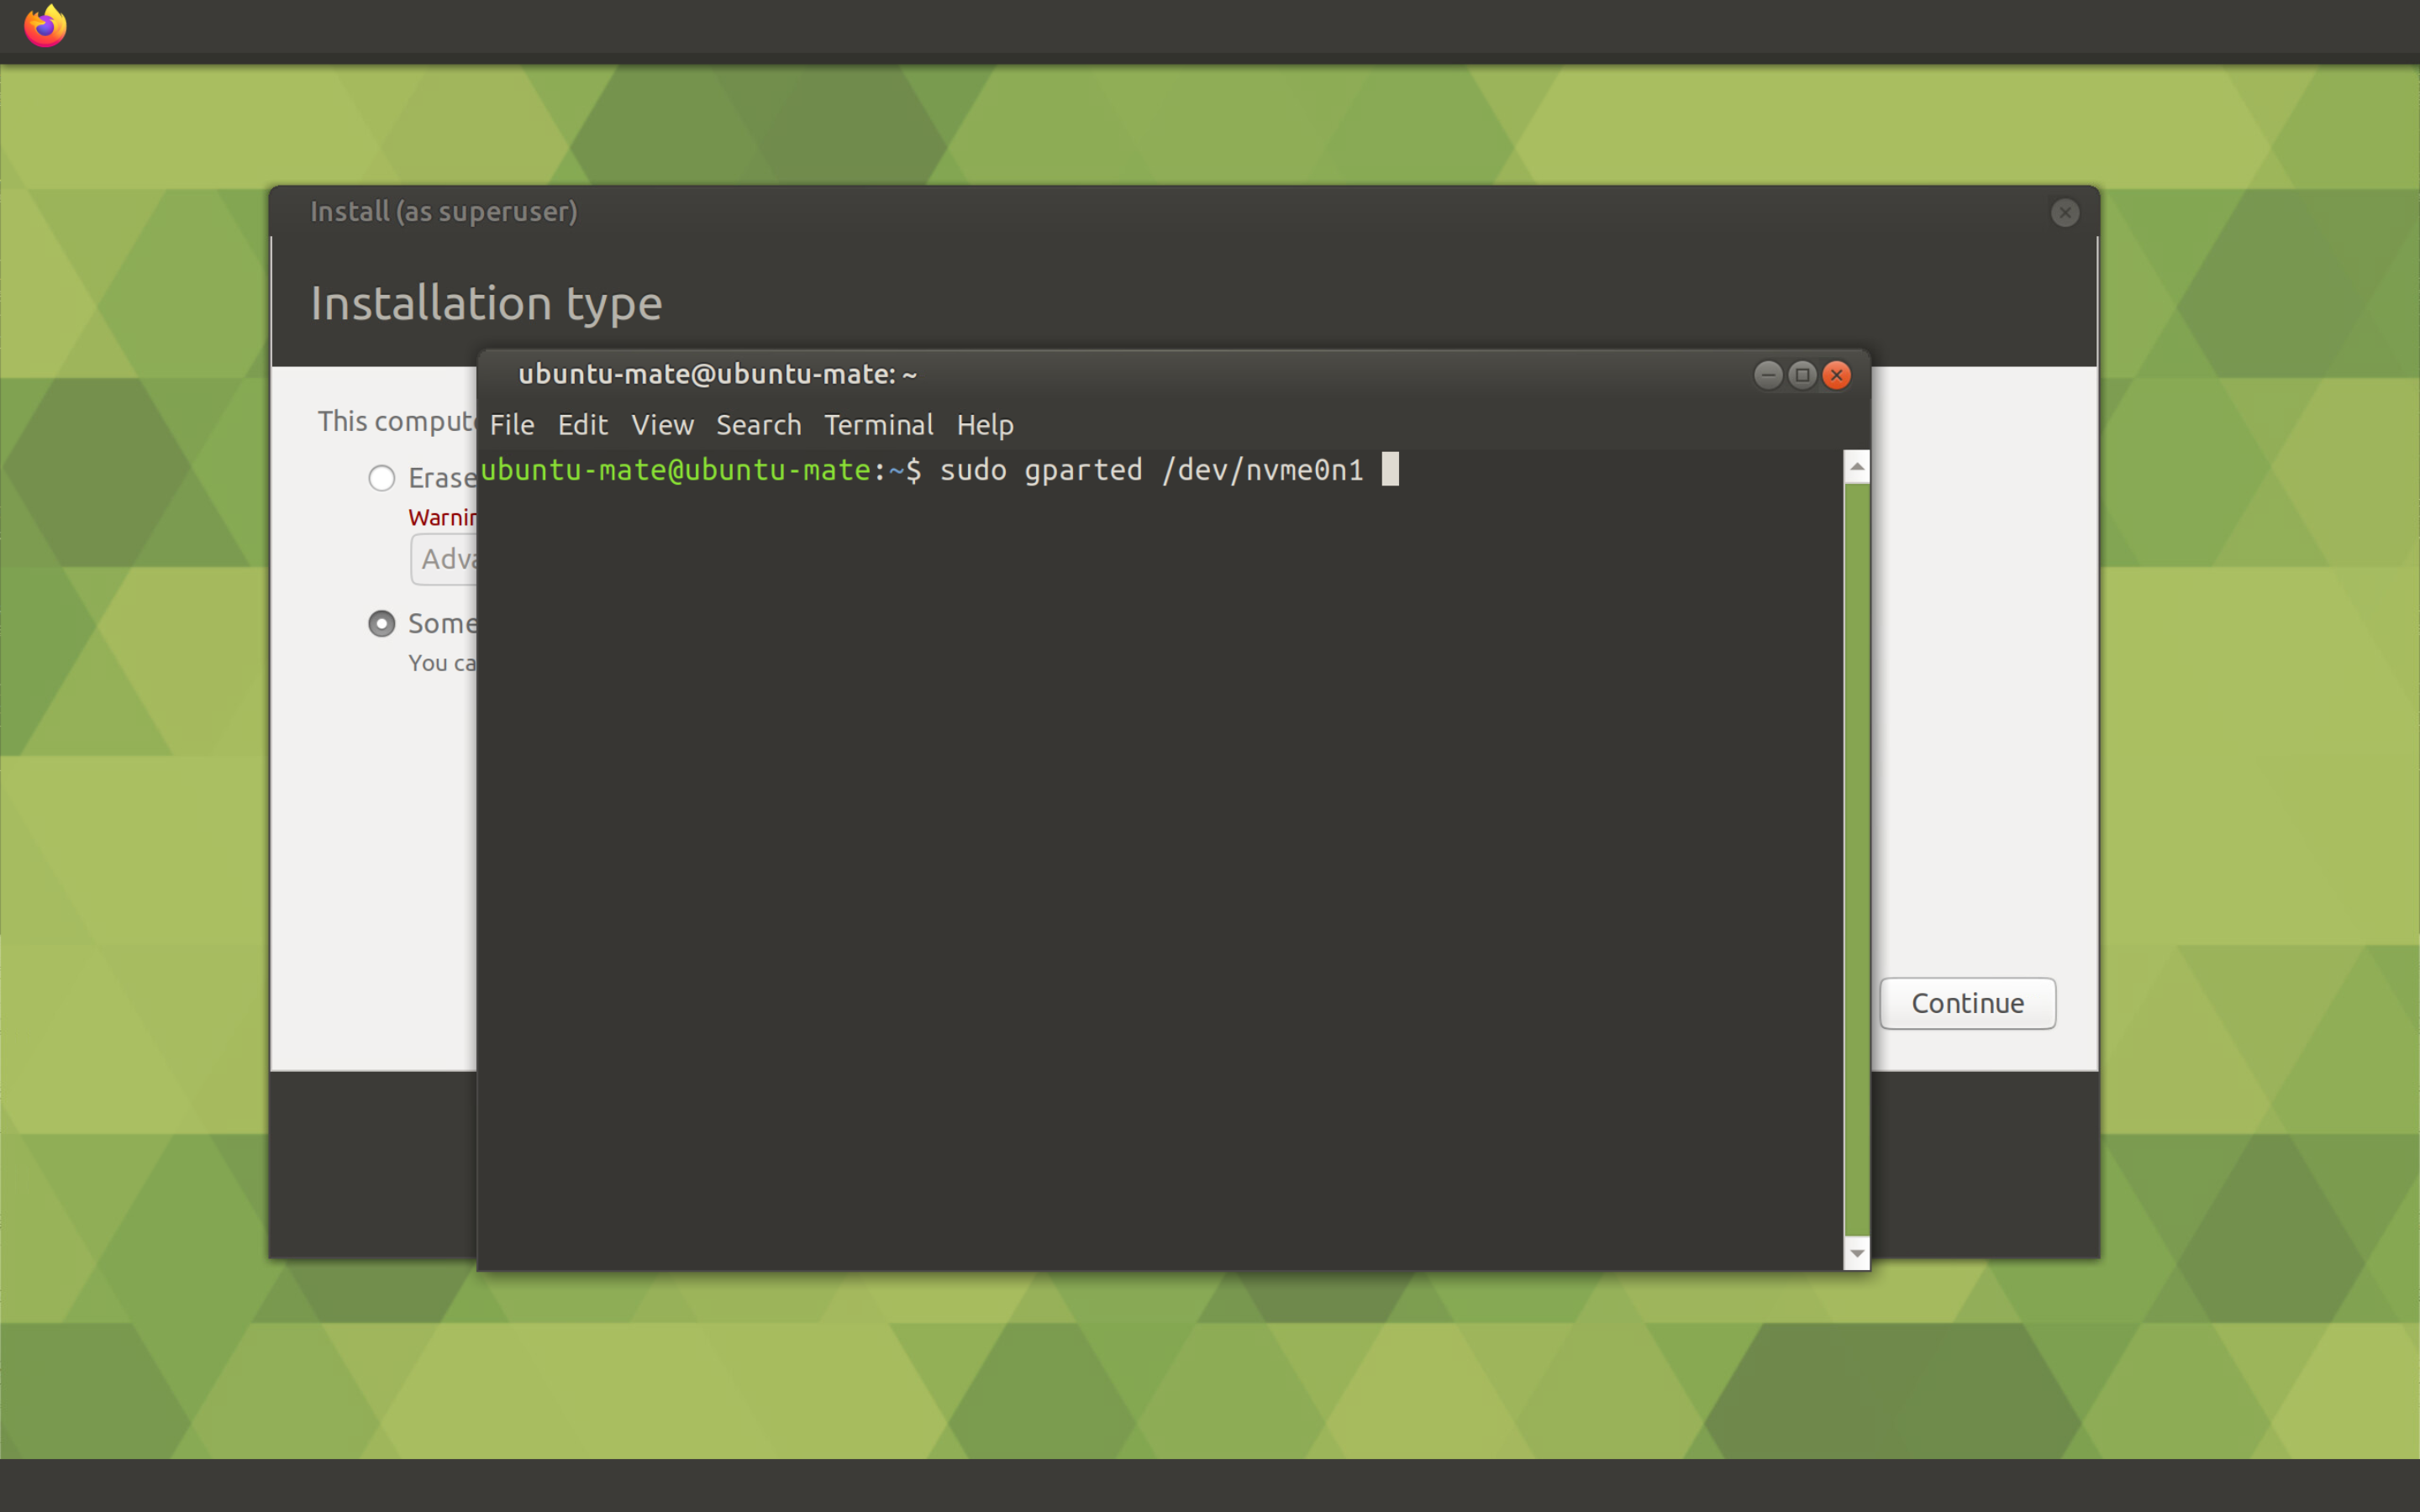
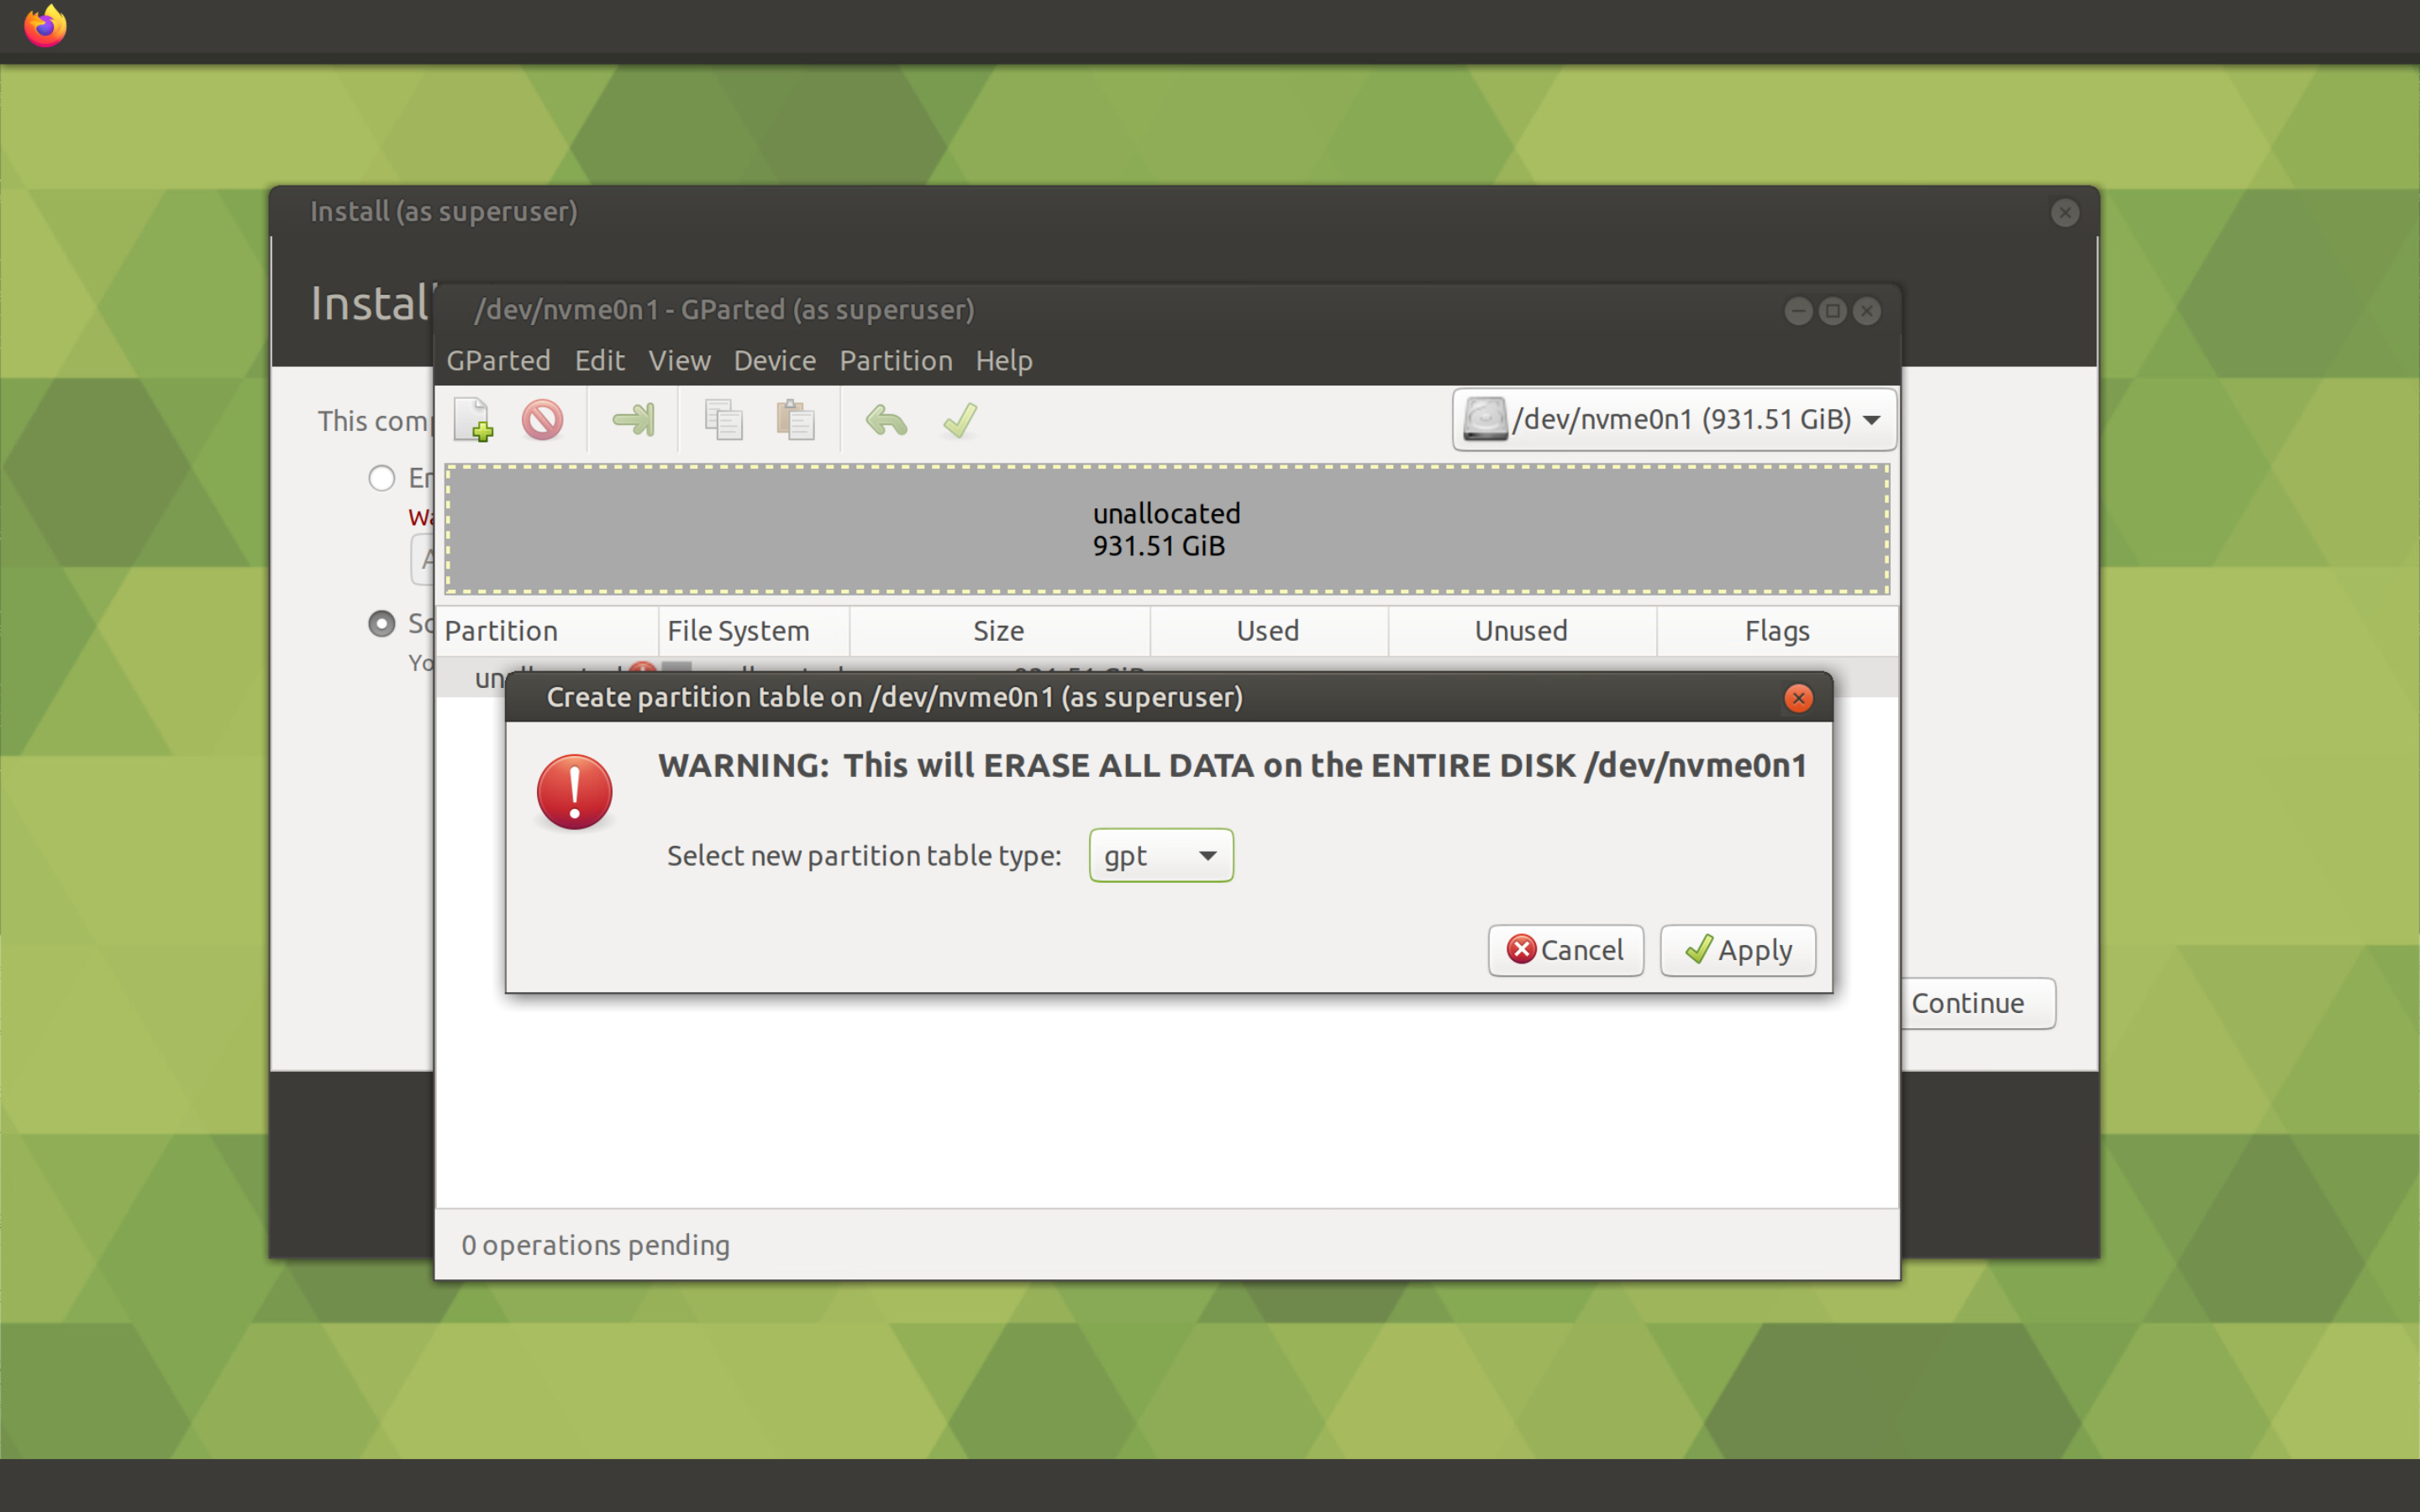
Then enter the command sudo gparted /dev/nvme0n1 (if you have a normal HDD or SSD, and not NVMe – instead of /dev/nvme0n1 you need to write /dev/sda).
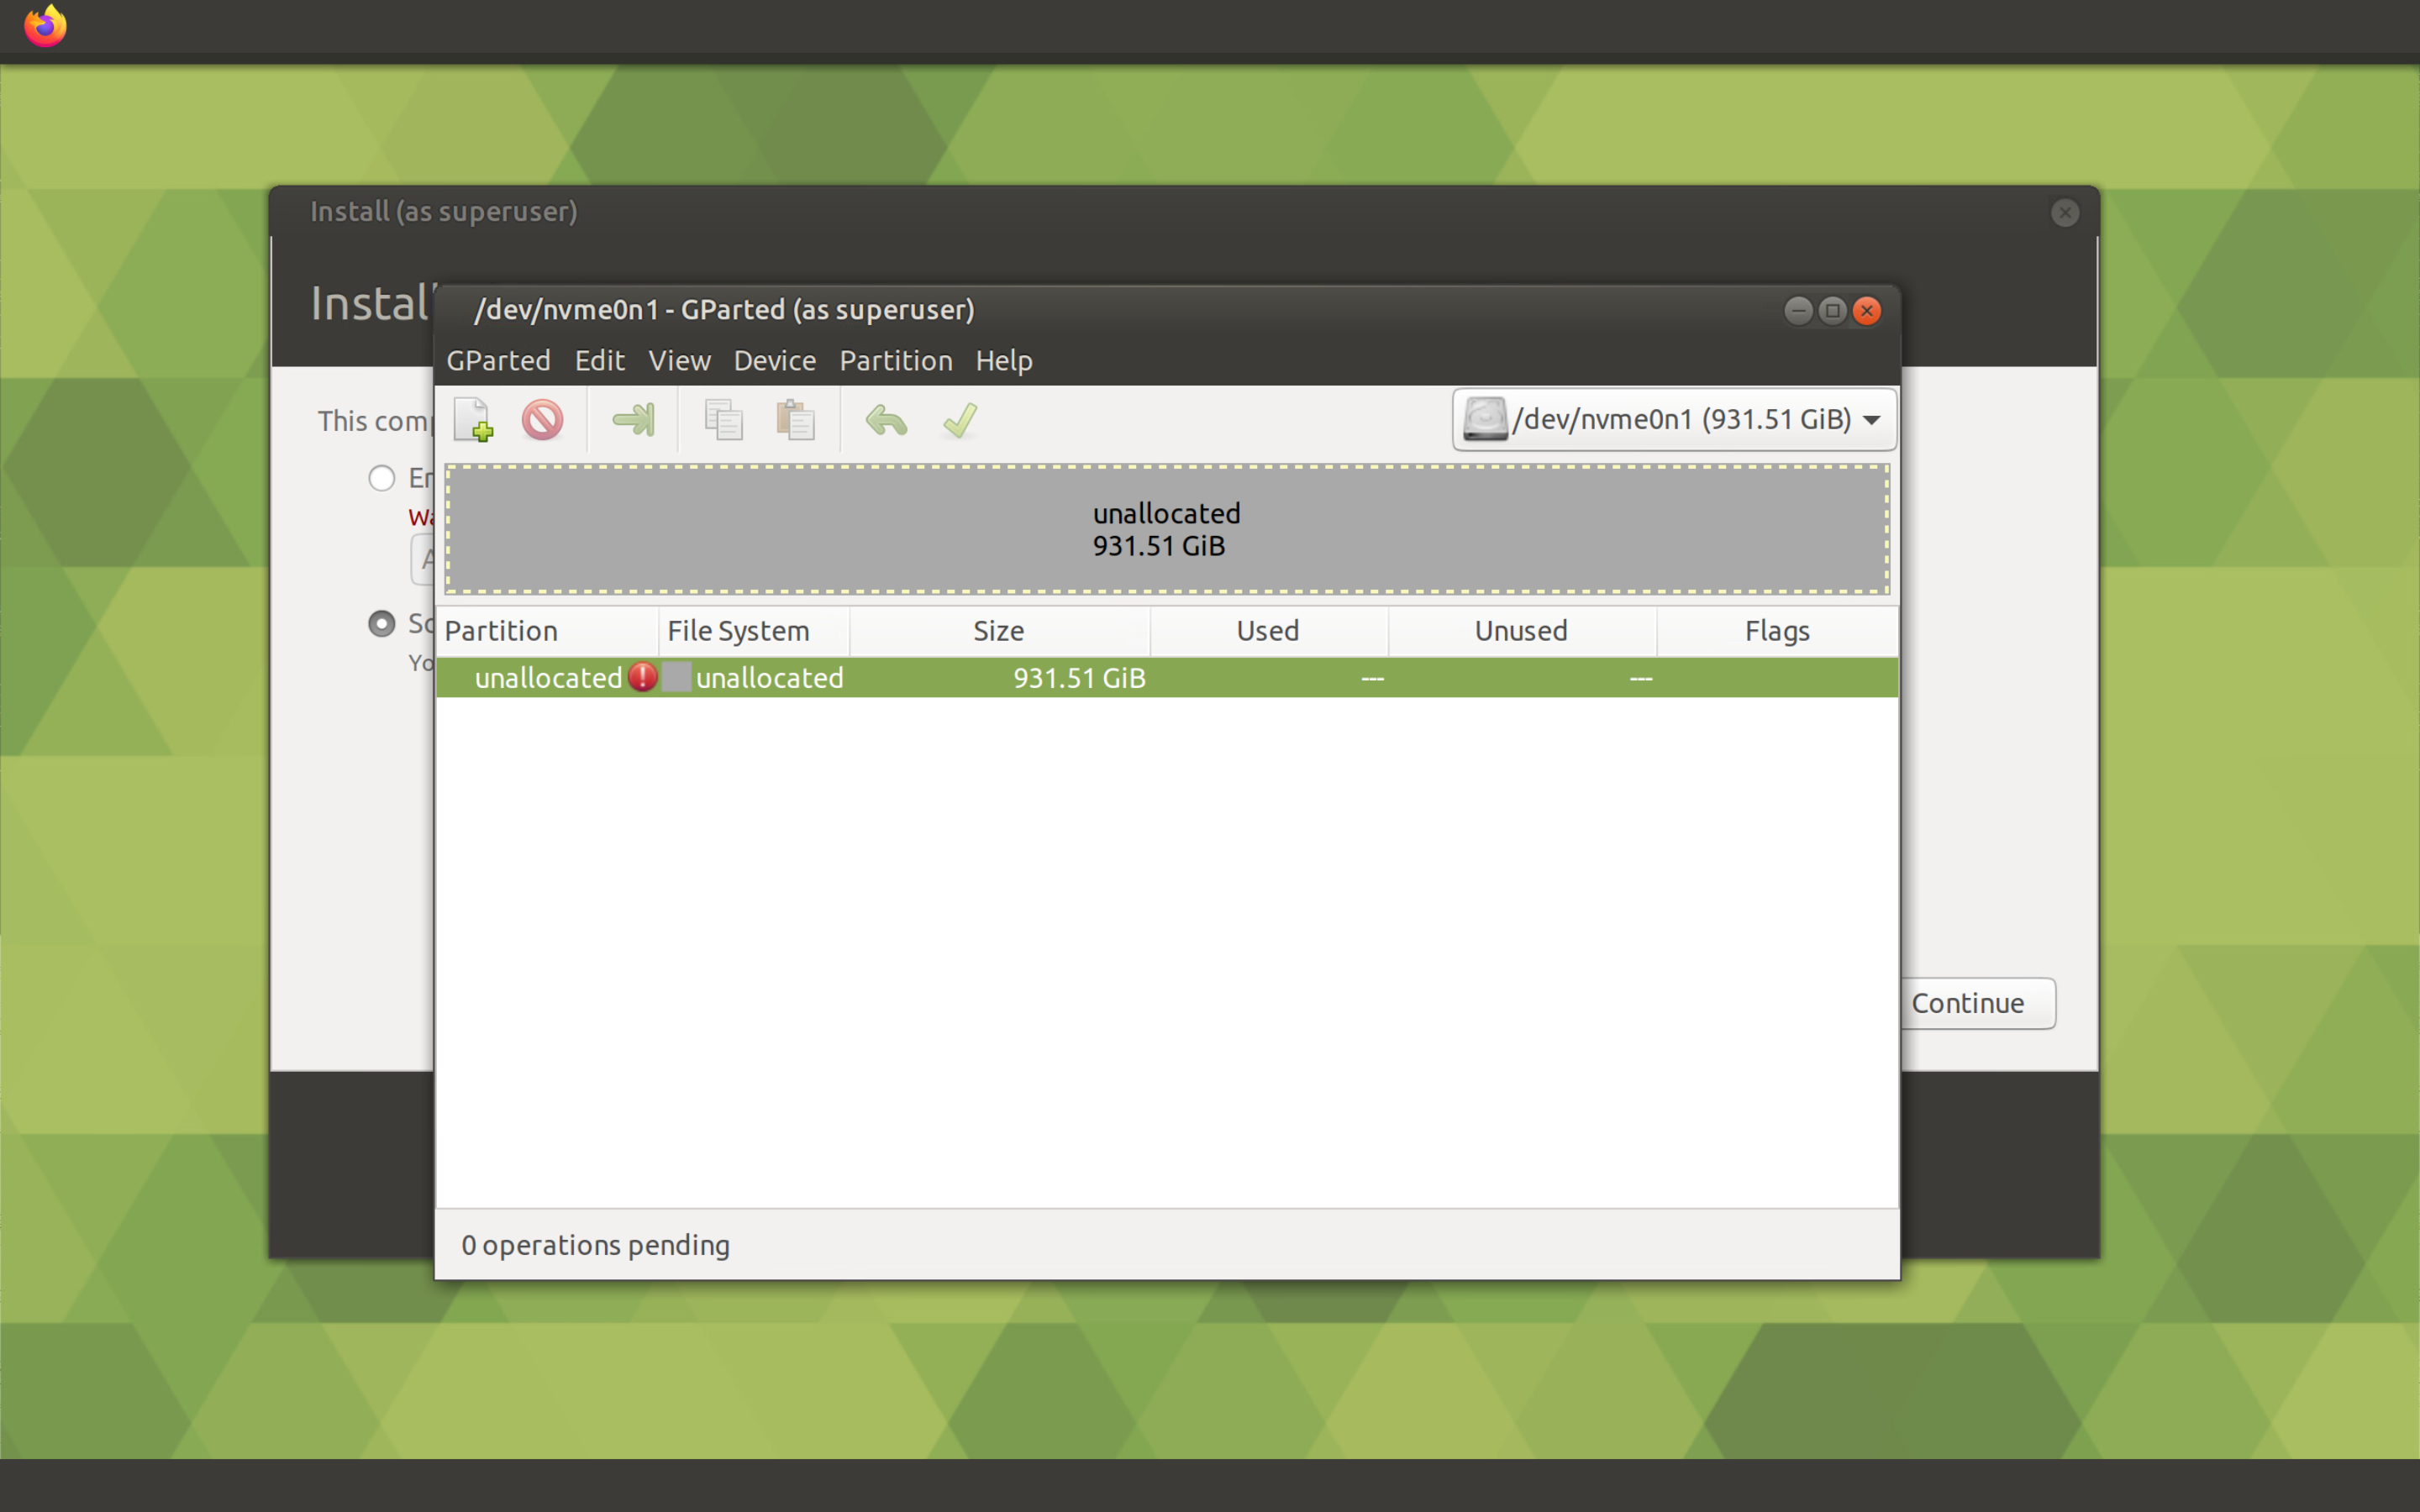
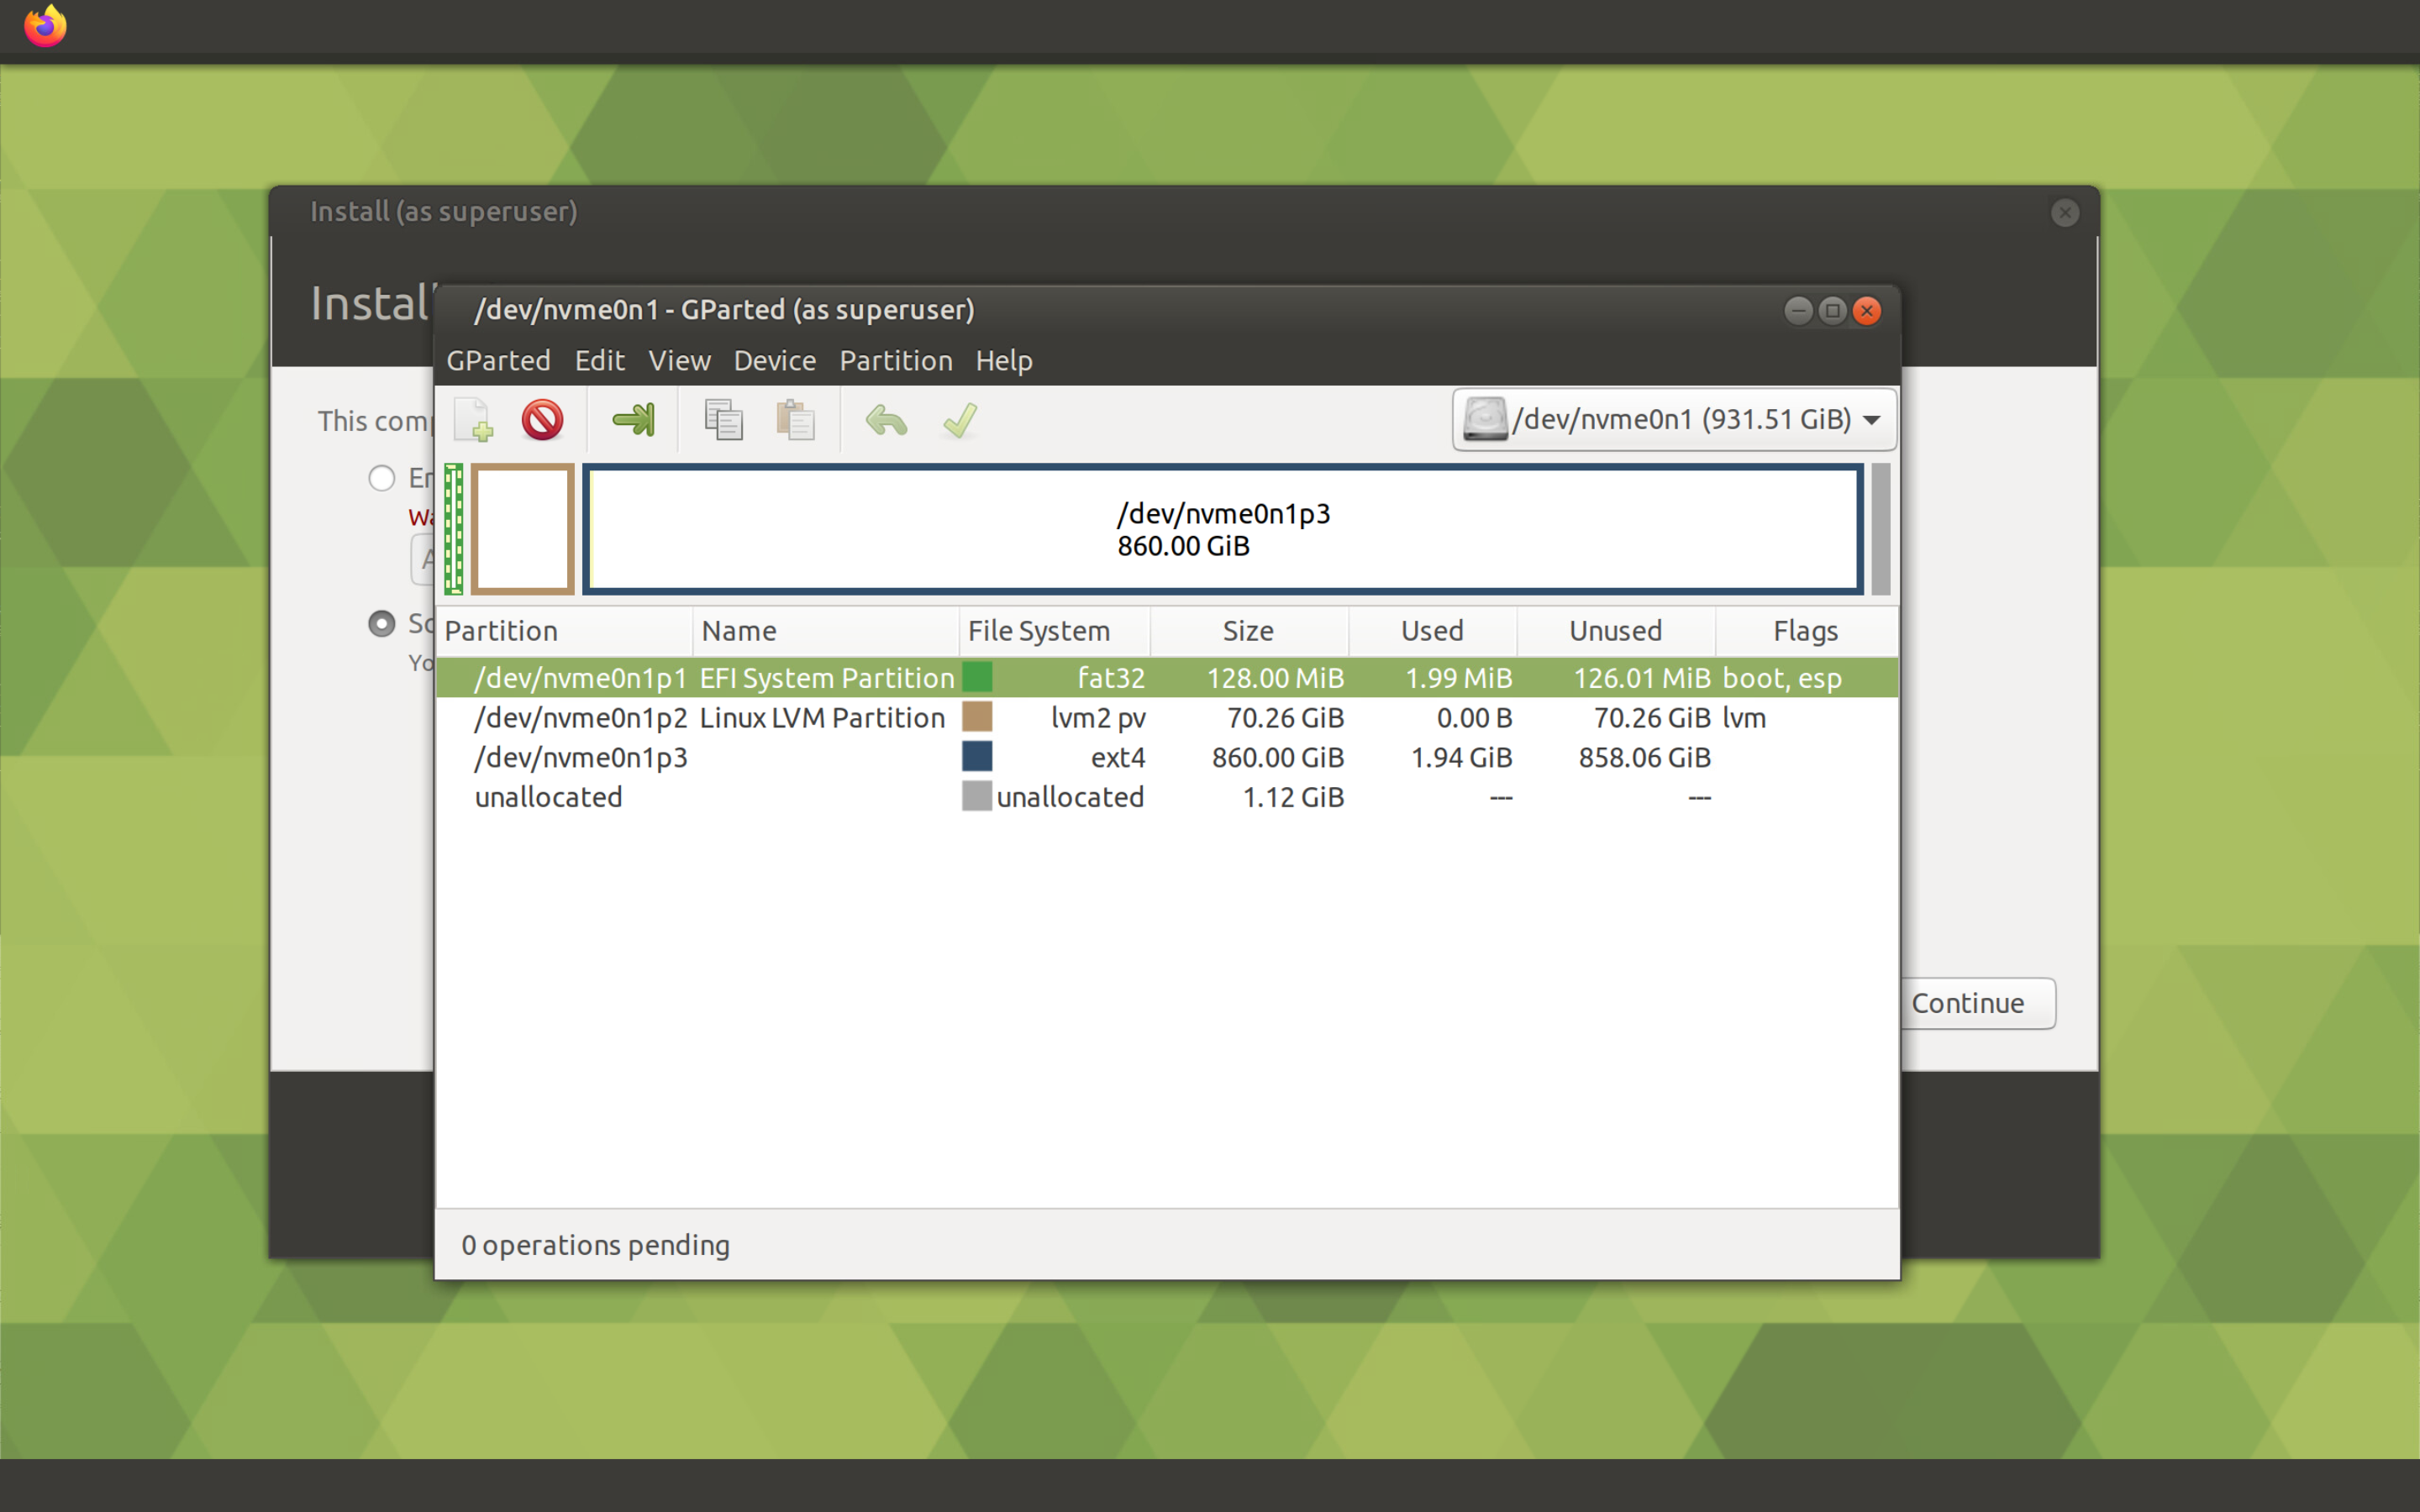
Since the disk is completely empty, the first step is to create a partition table. To do this, select the Create Partition Table... item in the Device menu. Select the gpt type and click the Apply button.
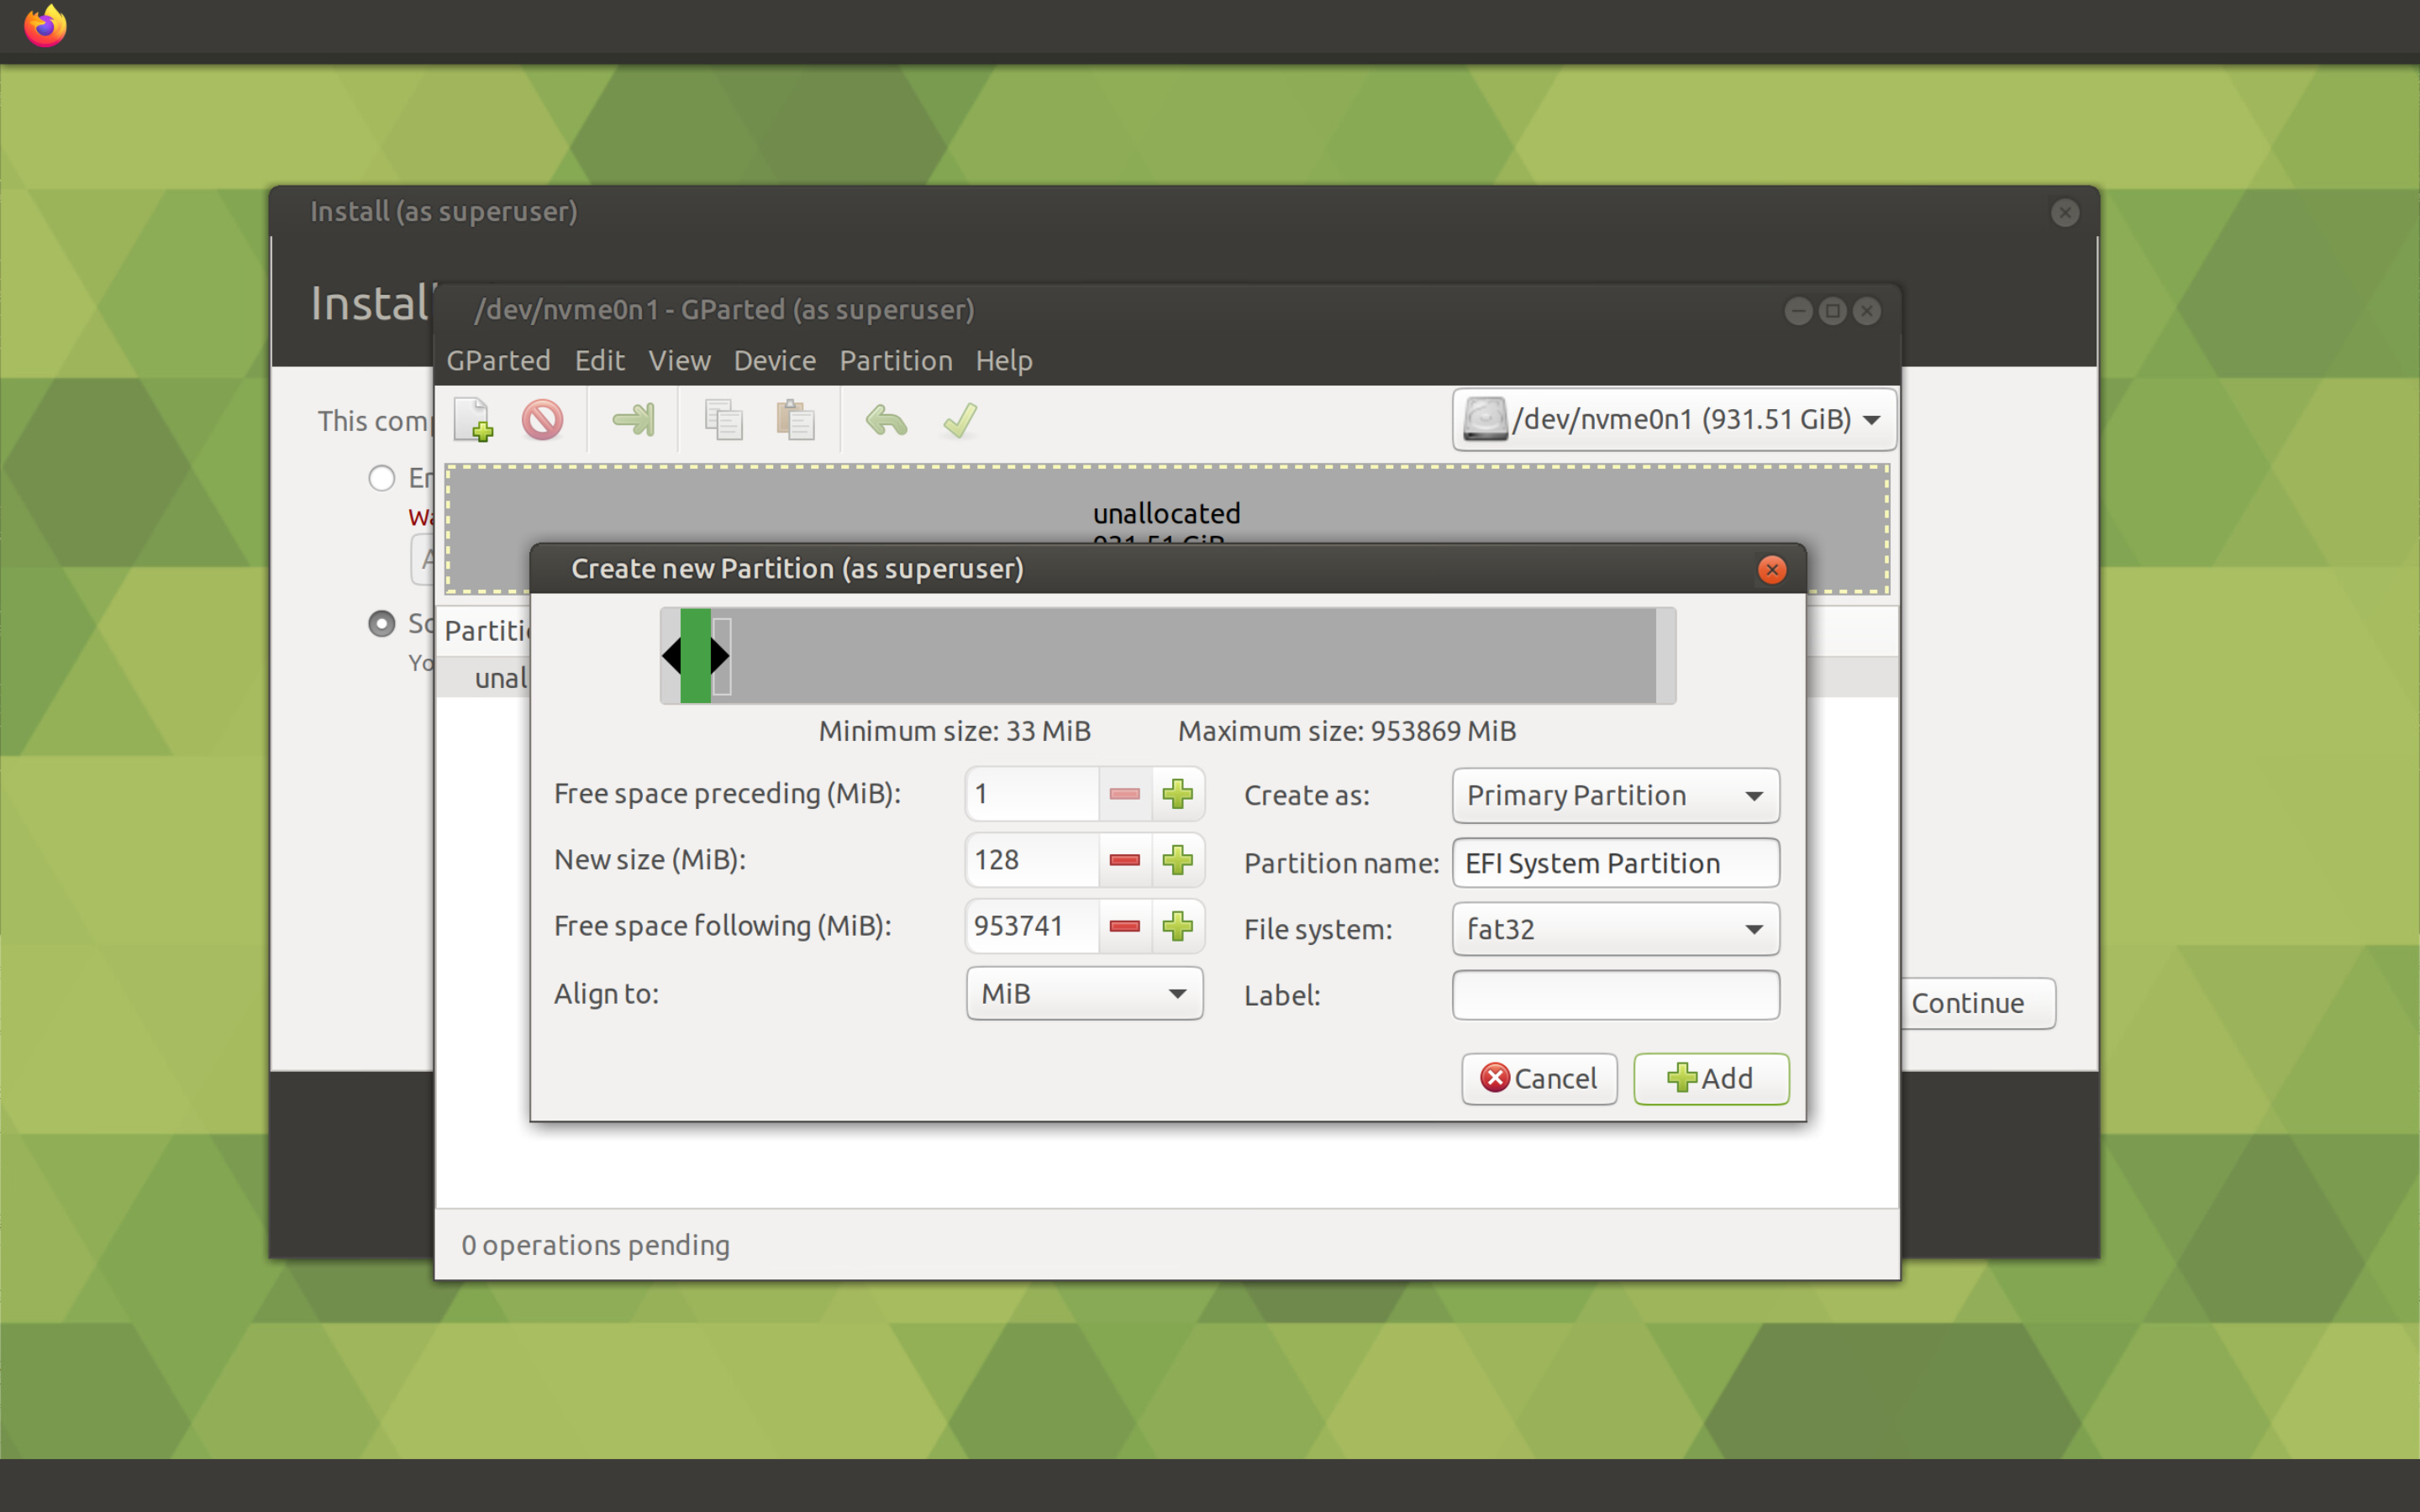
Create a small system partition for the boot loader and EFI. To do this, right-click on the unallocated area of the disk and select New. Specify the size of the 128 MiB partition, select the fat32 file system type the EFI System Partition in partition name, then click the Add button.
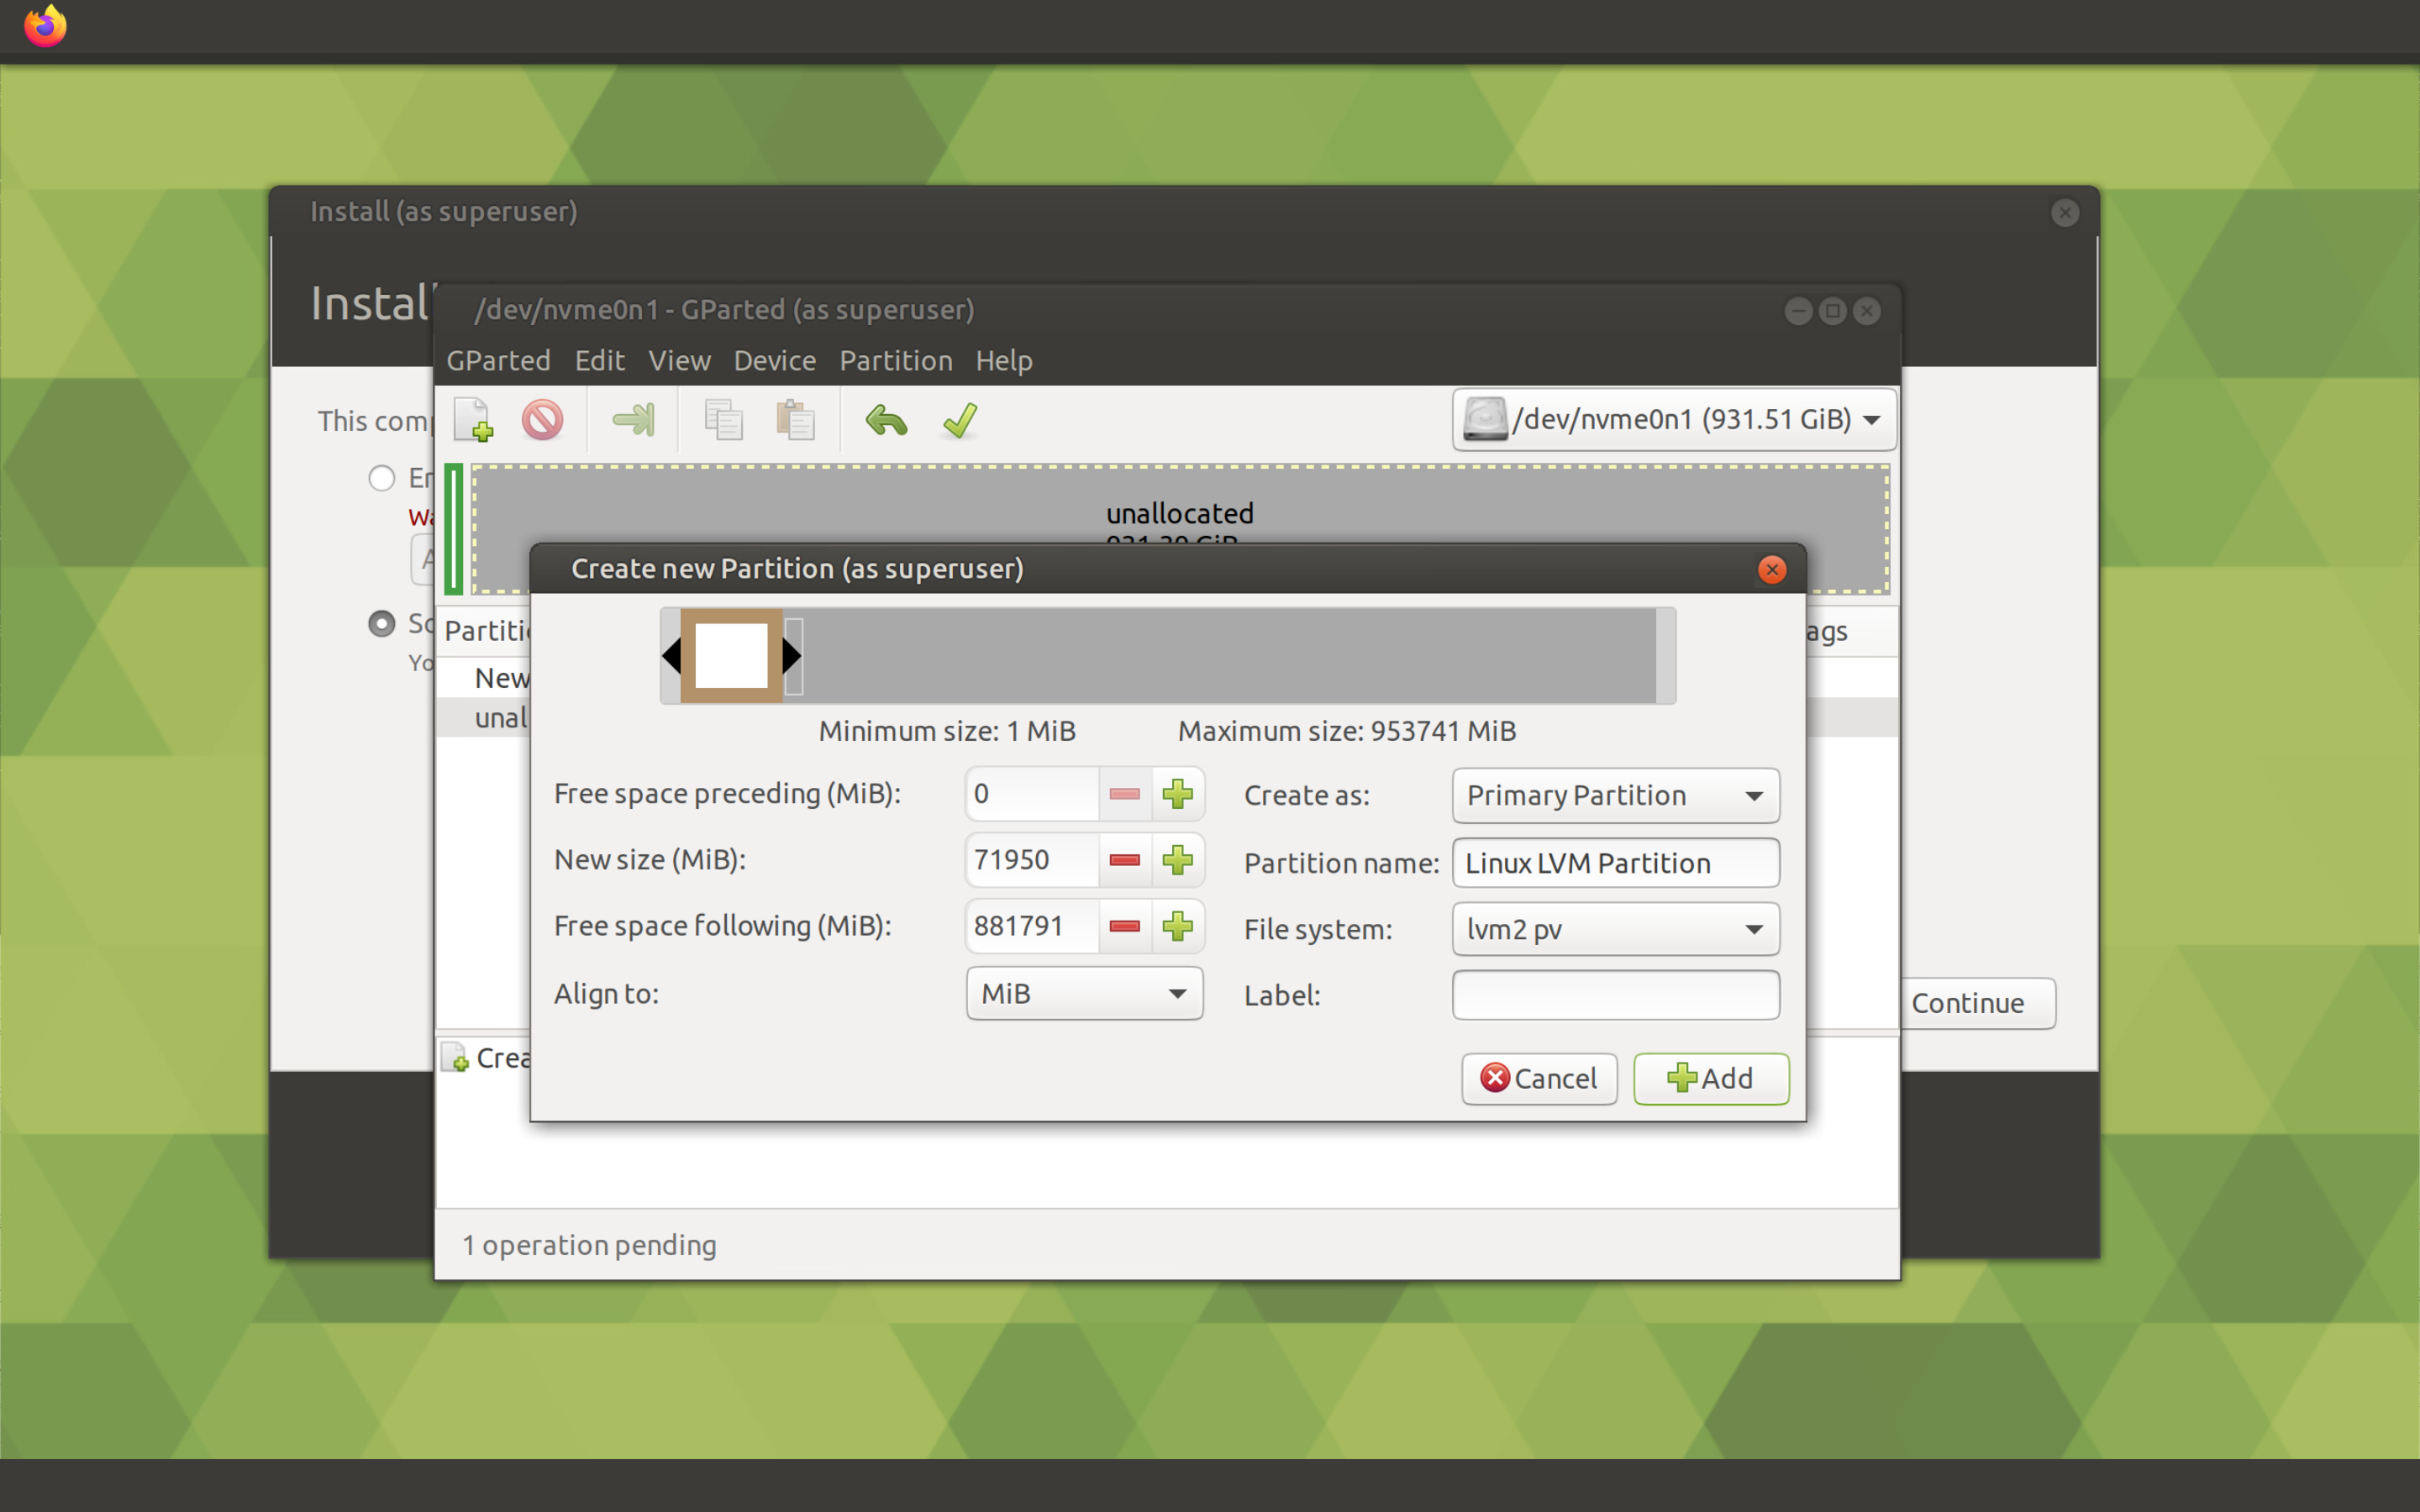
Now create a primary partition for Ubuntu to do this, click the right mouse button on the unallocated area of the disk and select New. Specify the size of the 71950 MiB partition, select the lvm2 pv file system type and enter the Linux LVM Partition to partition name field, then click the Add button.
The size of
71950 MiBdoes not seem logical or even, but this size will allow you to create LVM and partitions whose size will be shown fairly even.60.0Gforrootand1.0Gforboot.
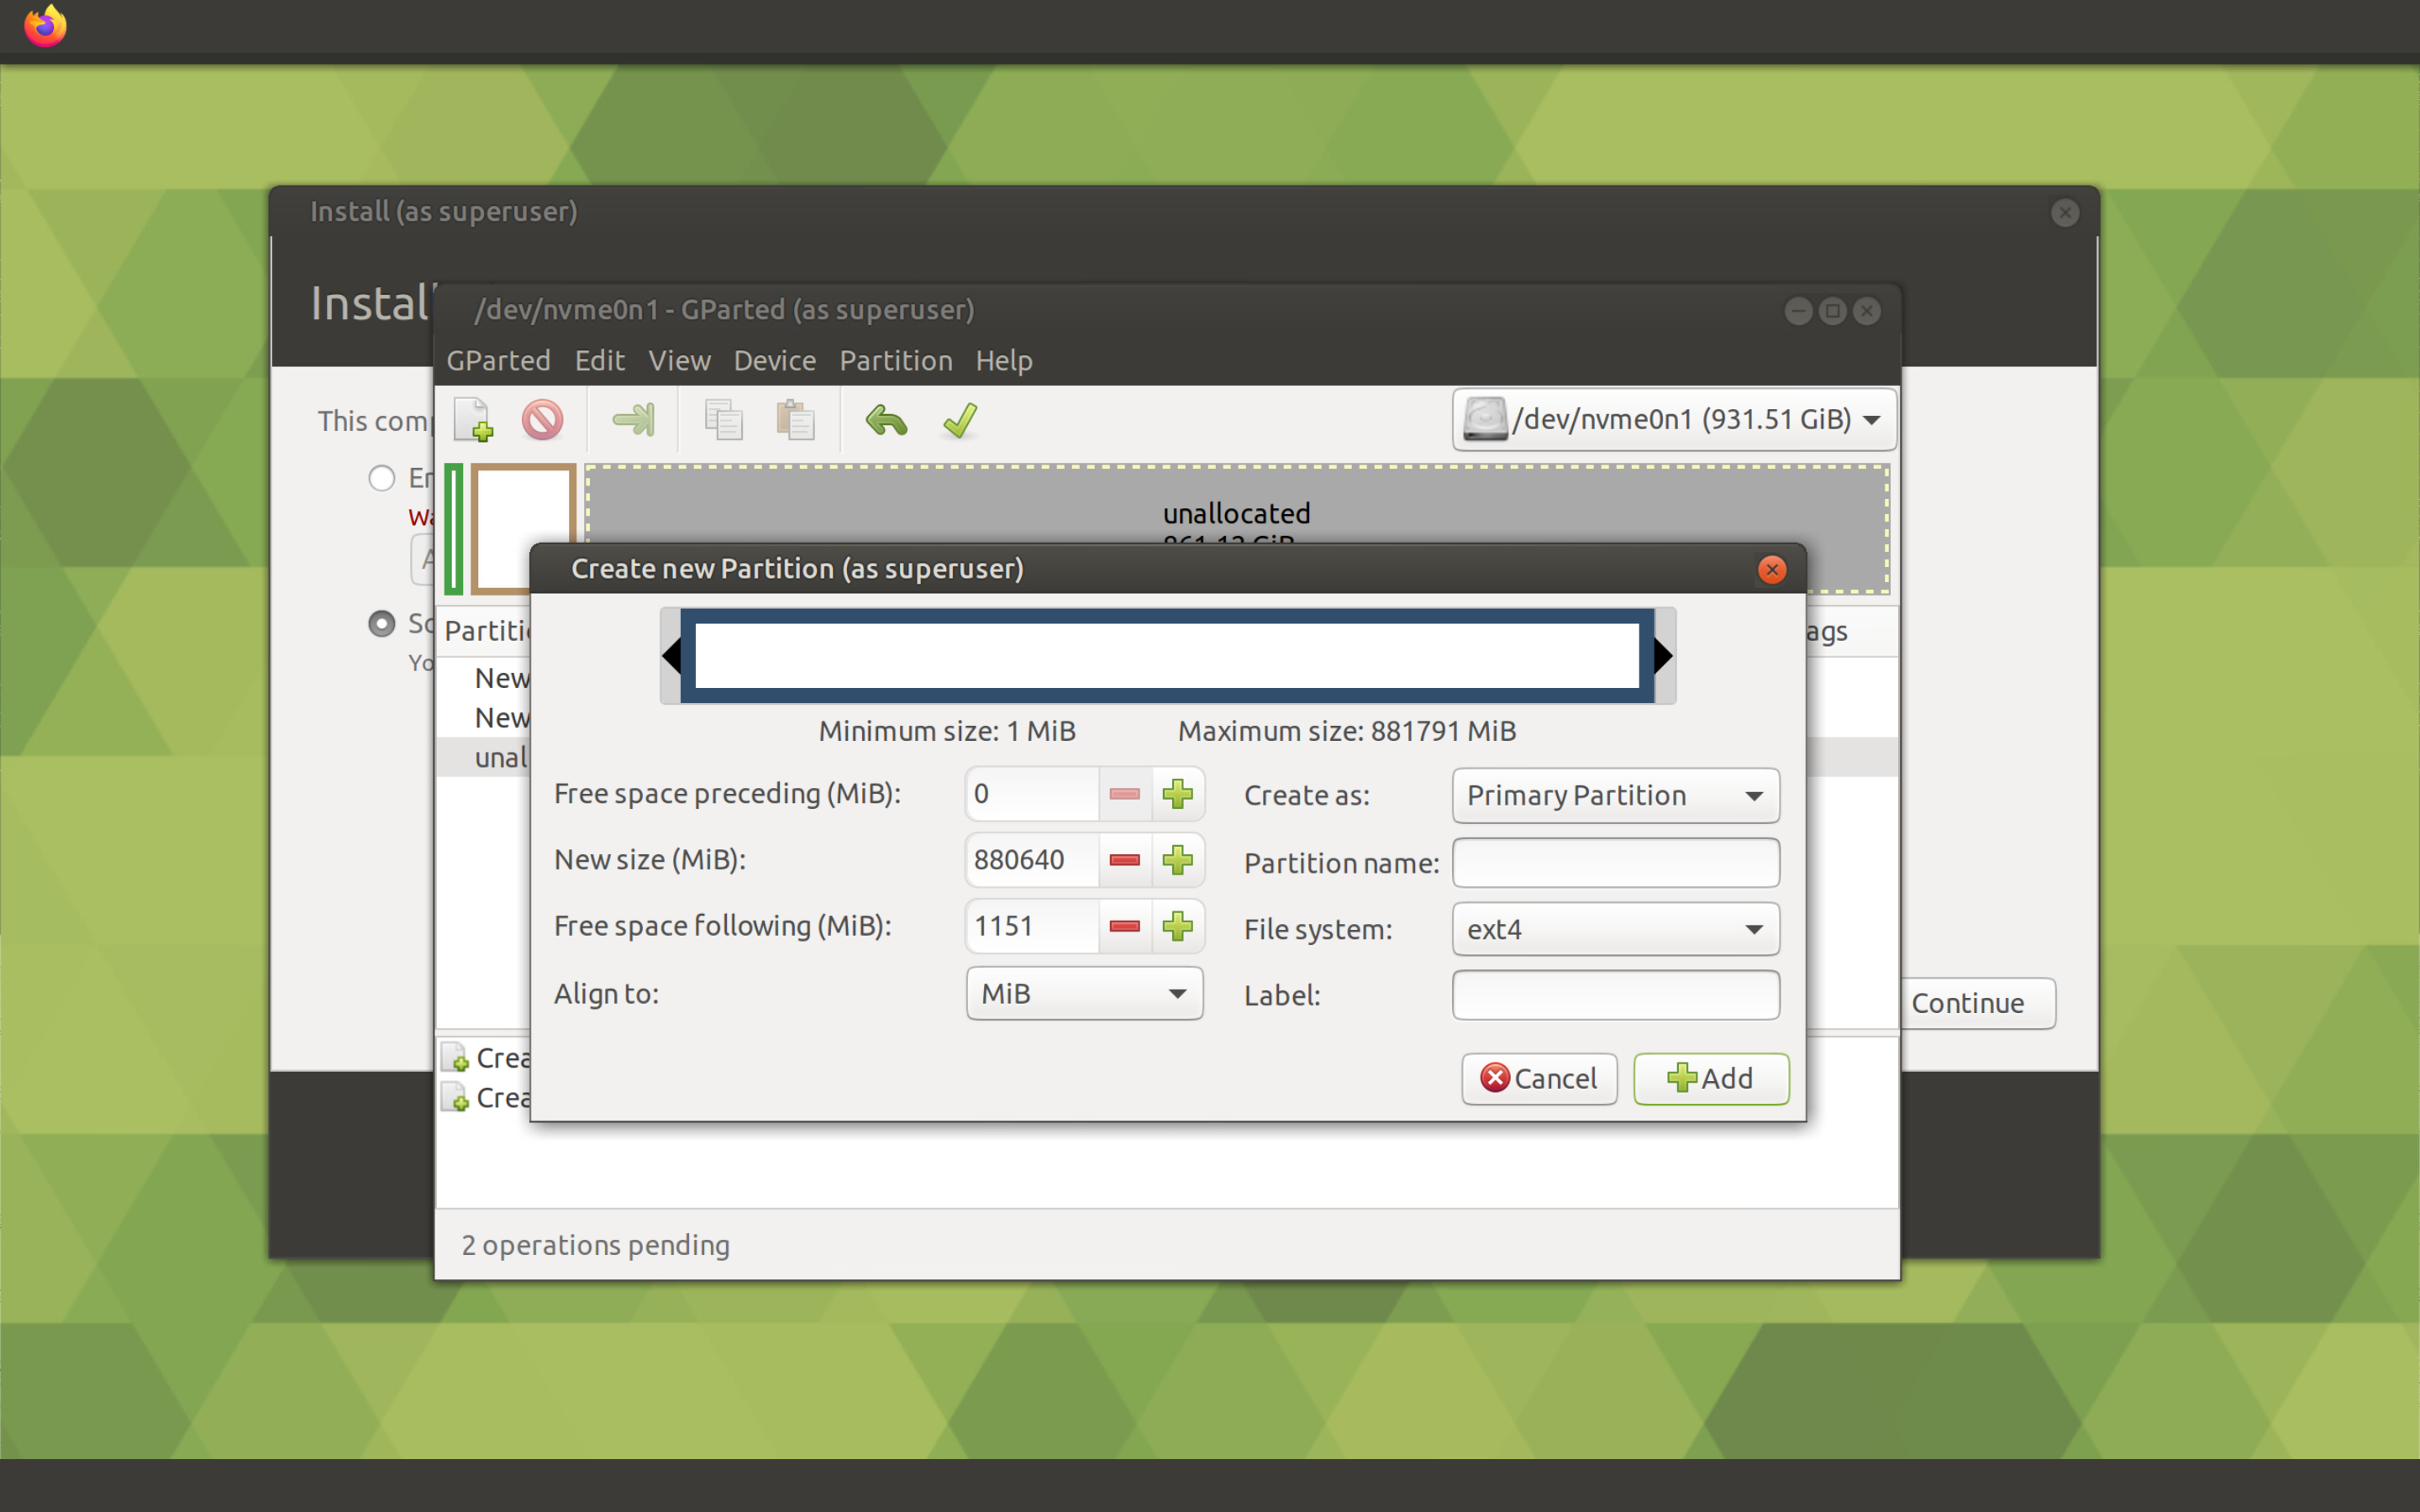
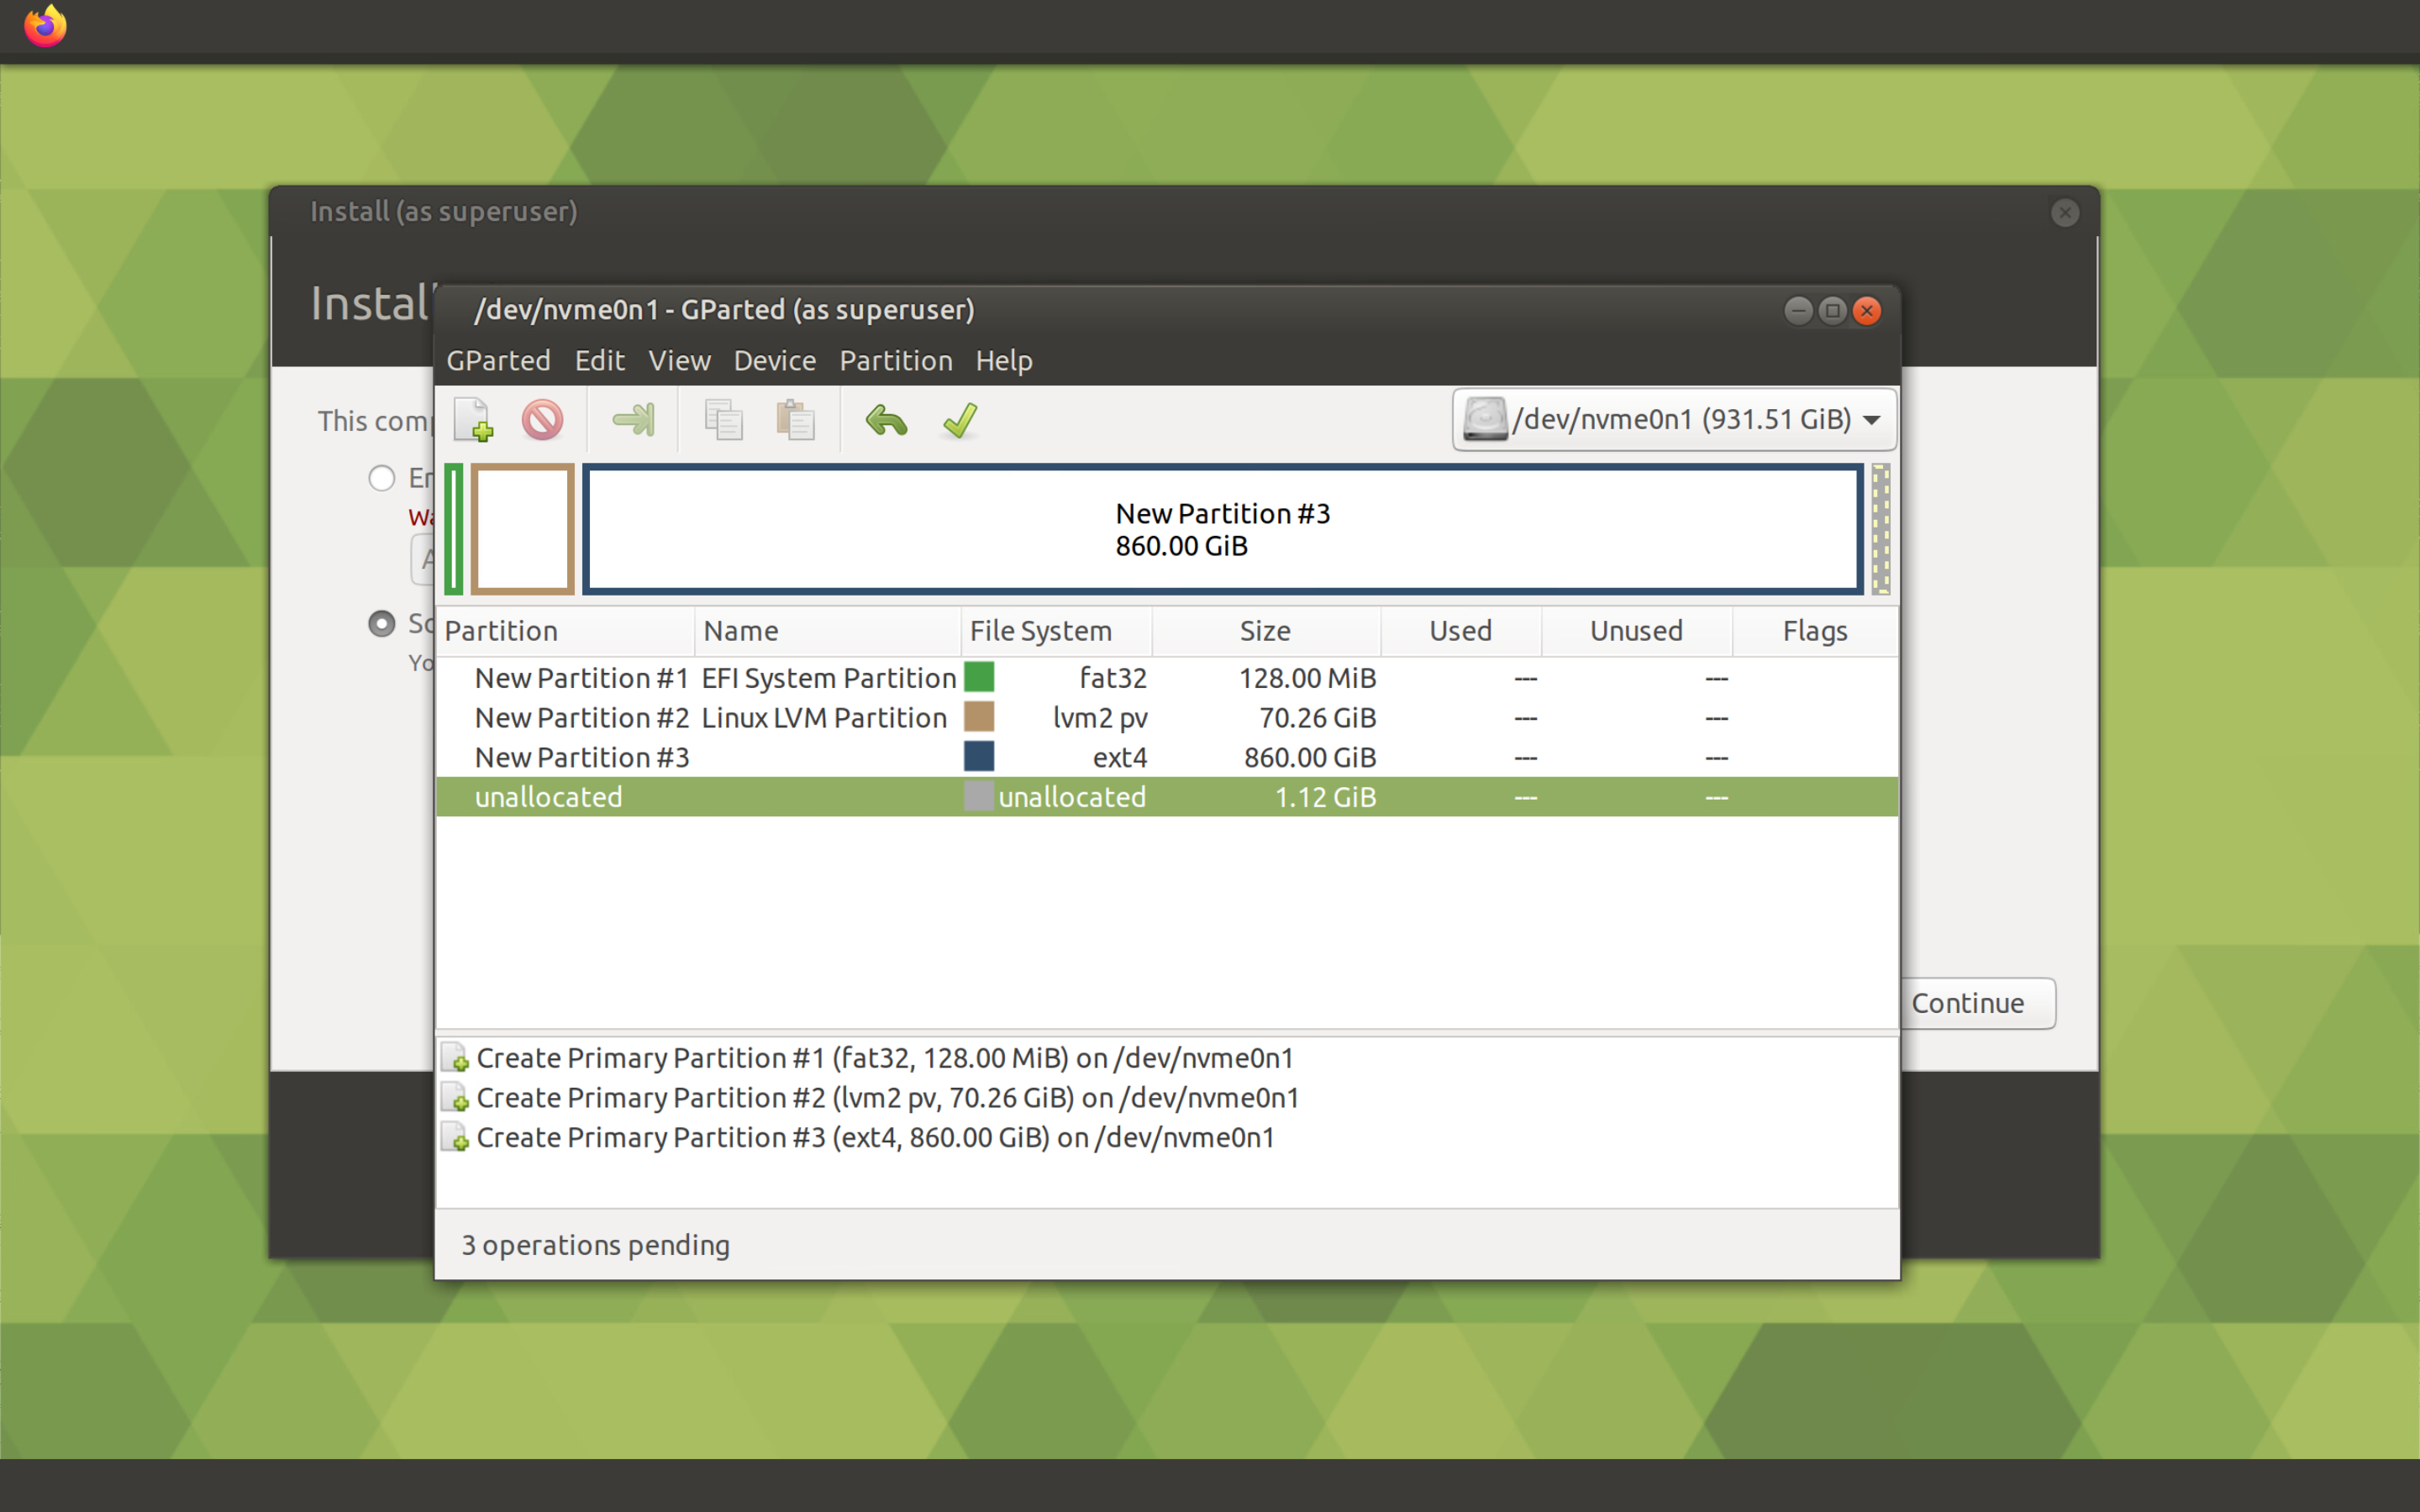
The first two partitions are already enough, but I will also create a third partition /srv, because it will be used for quite specific purposes on the road. The only thing I want to pay attention to is that in the case of SSD drives, they usually leave a little unallocated space at the end of the disk. This has a positive effect on disk performance and lifetime.
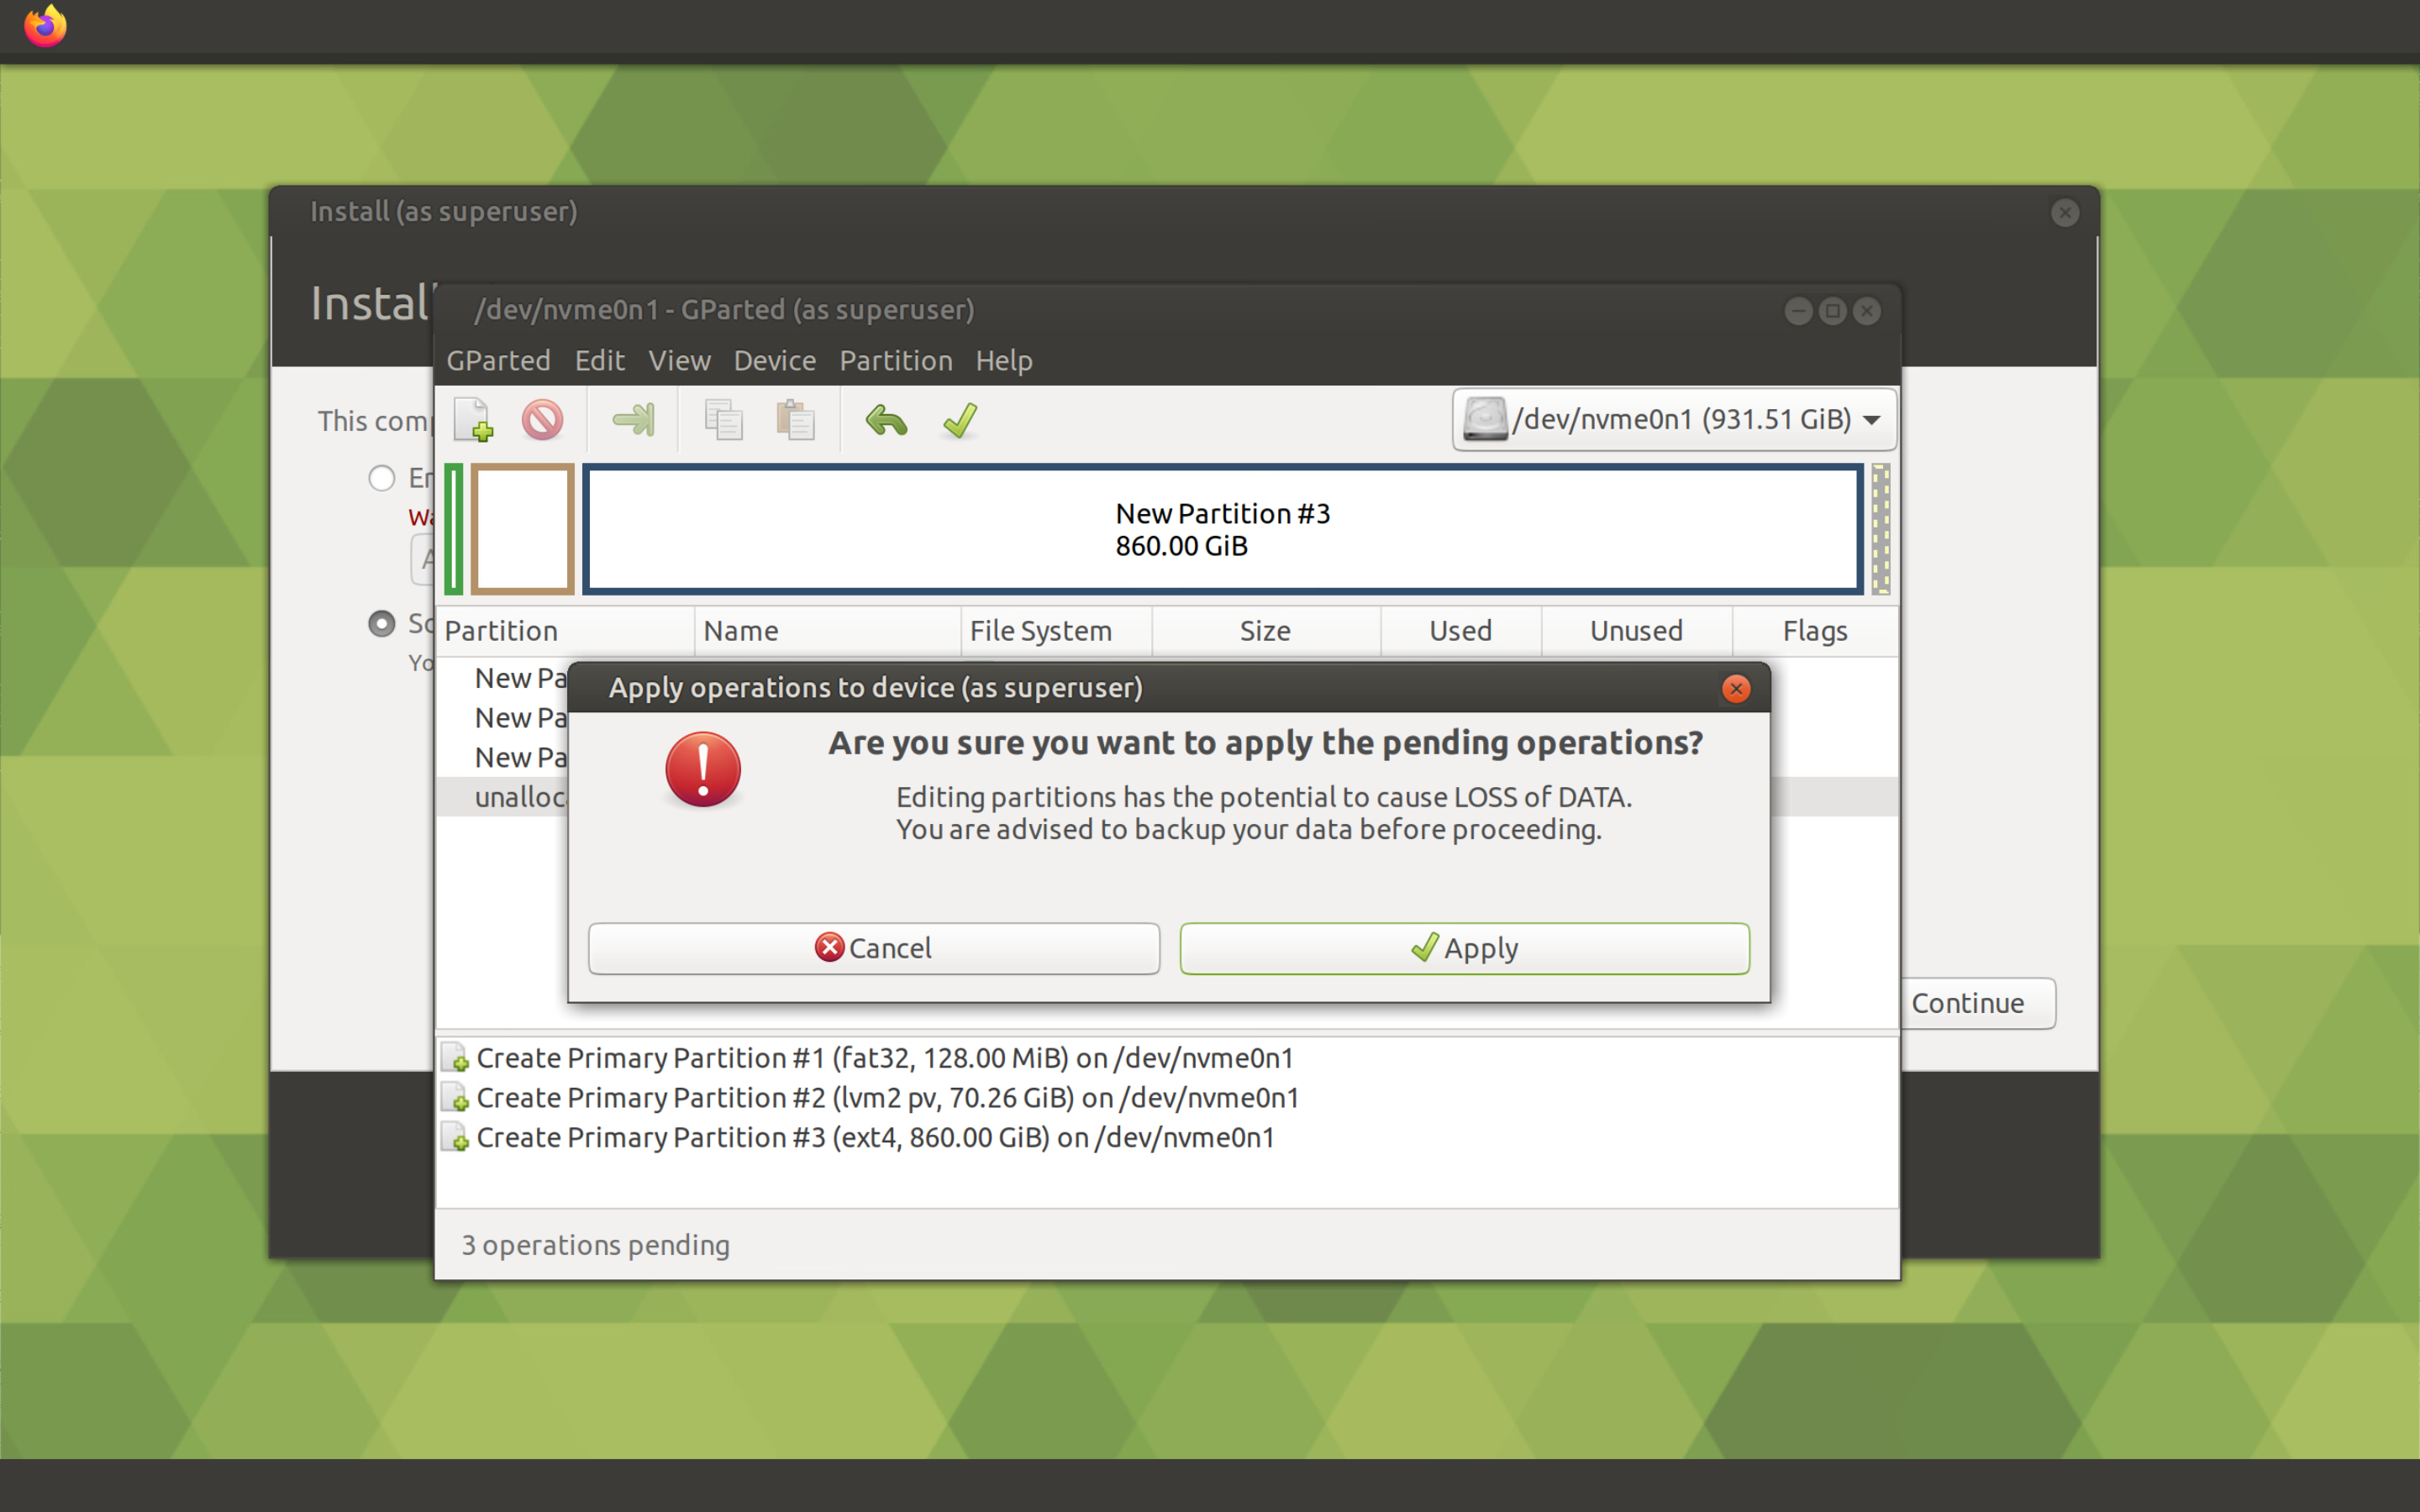
To write all changes to disk, select the Apply All Operations item in the Edit menu, and click the Apply button in the warning window that appears.
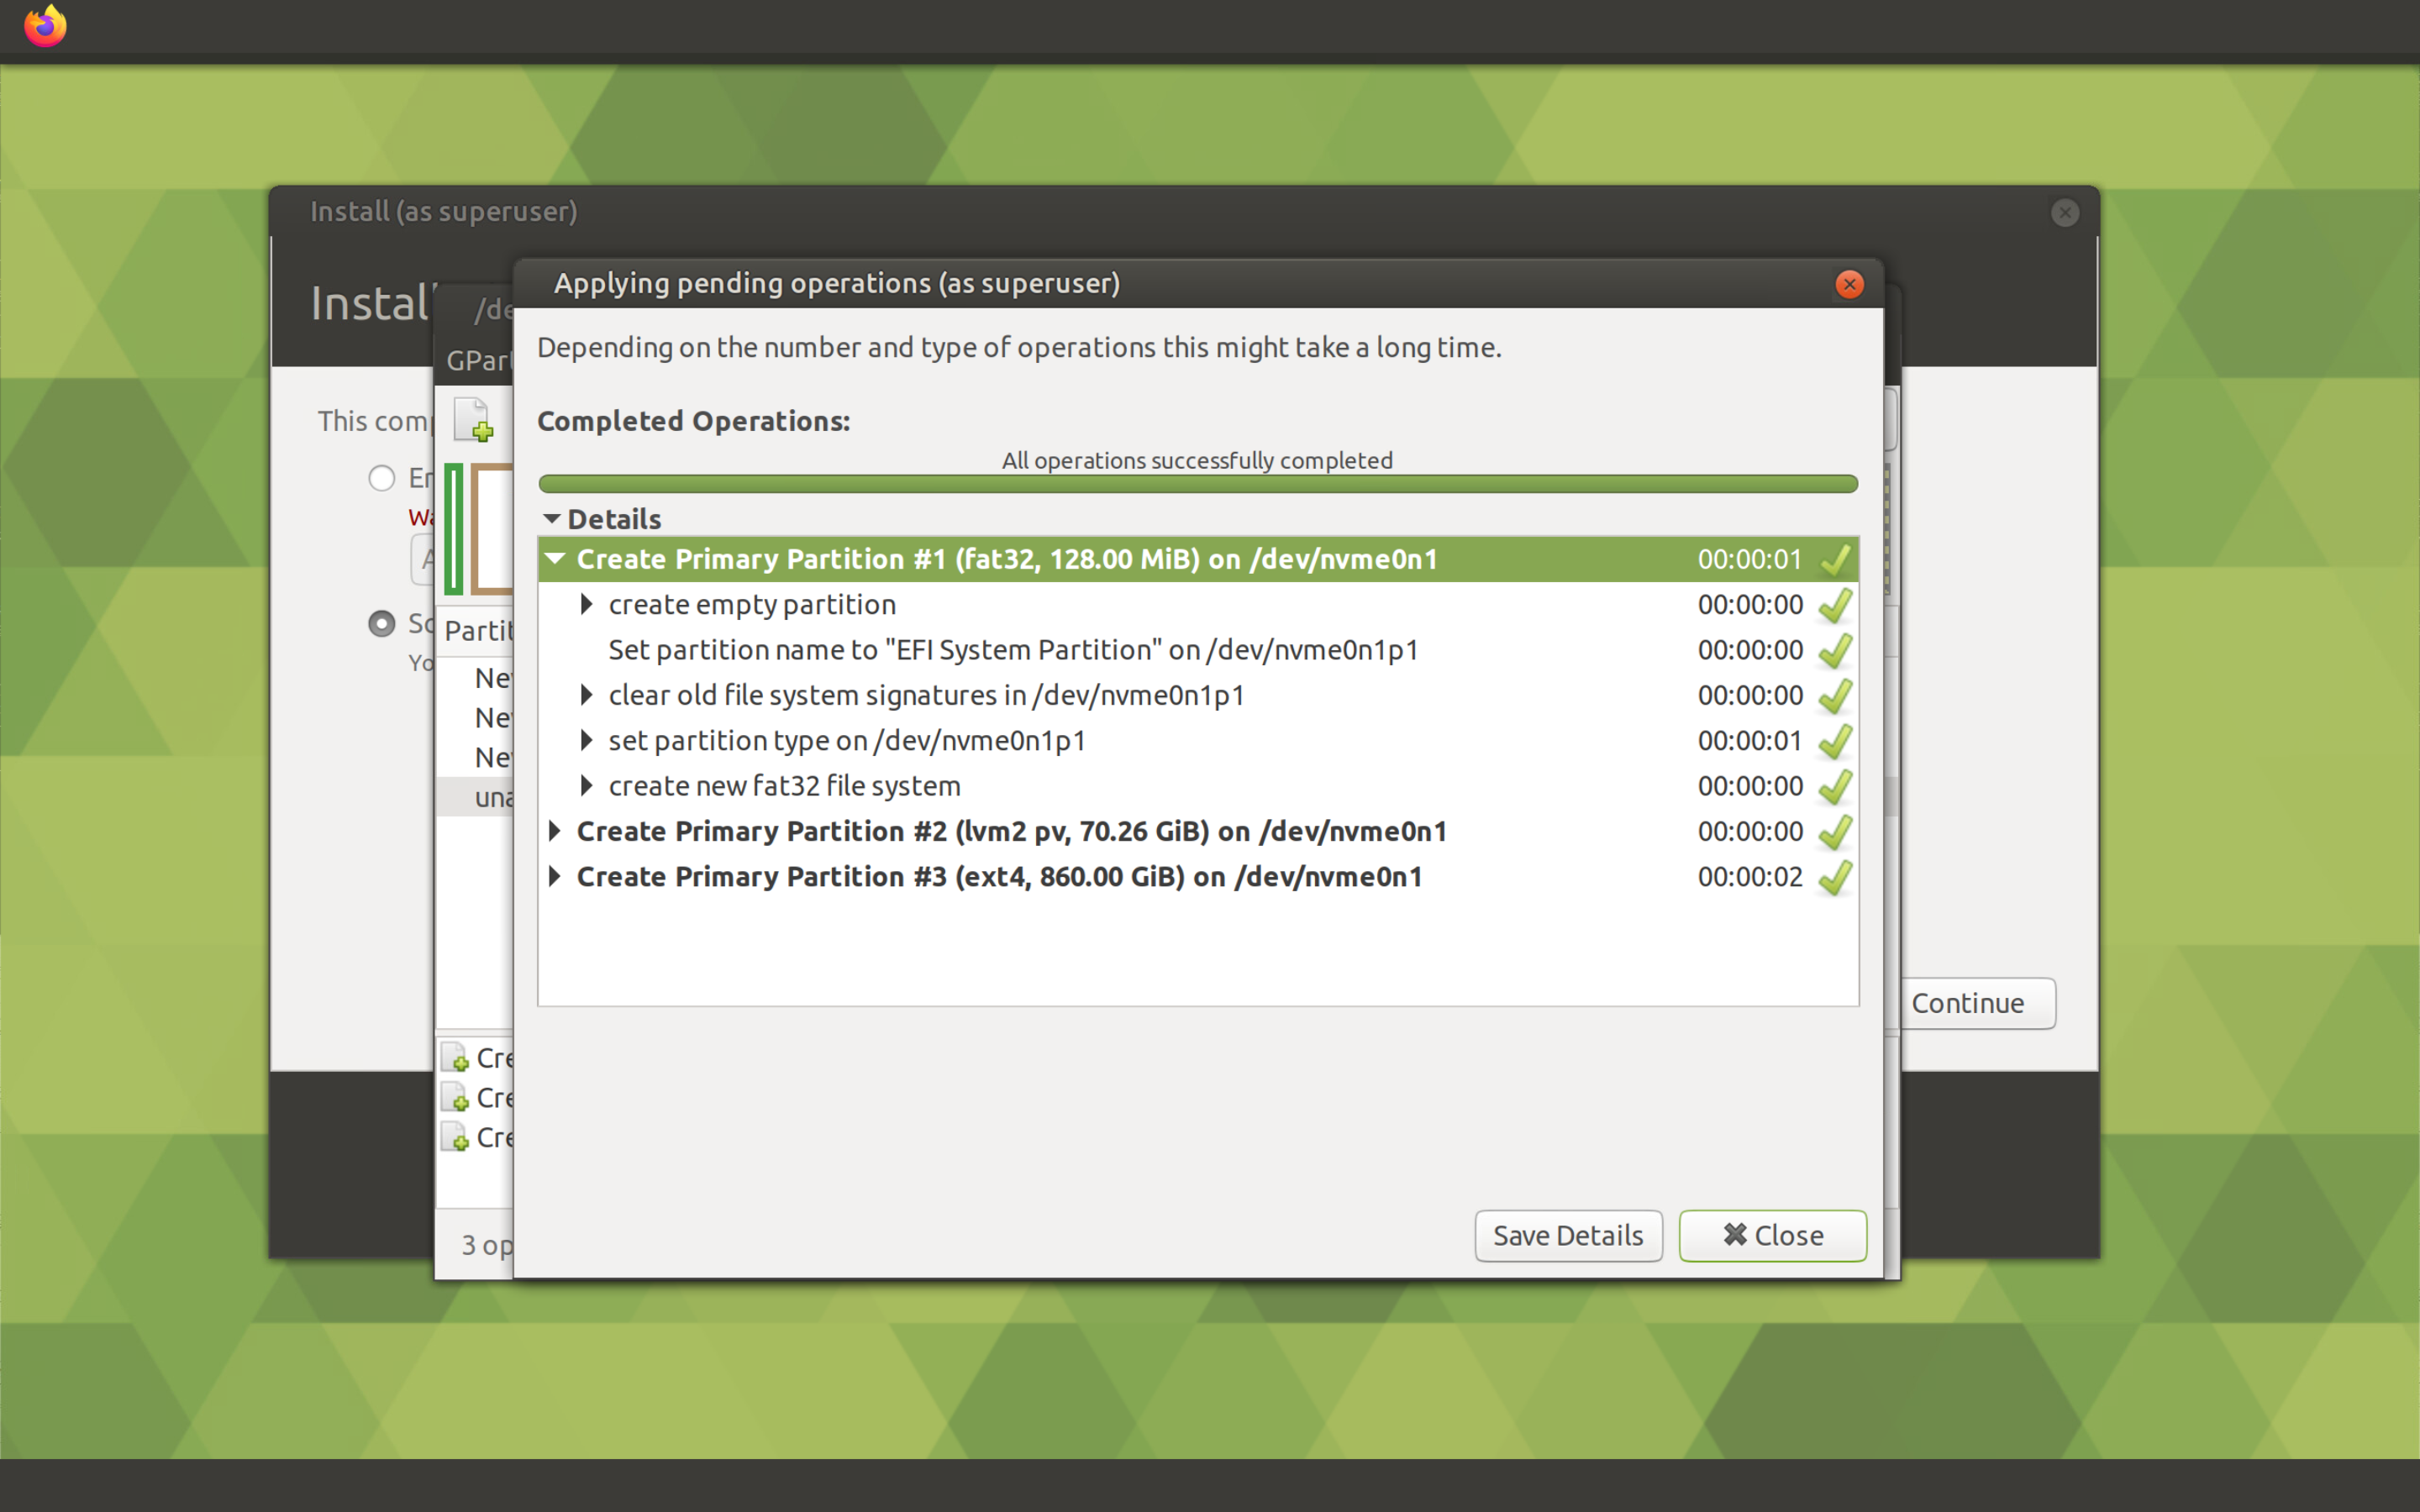
Then close the window with information about the completion of the operations.
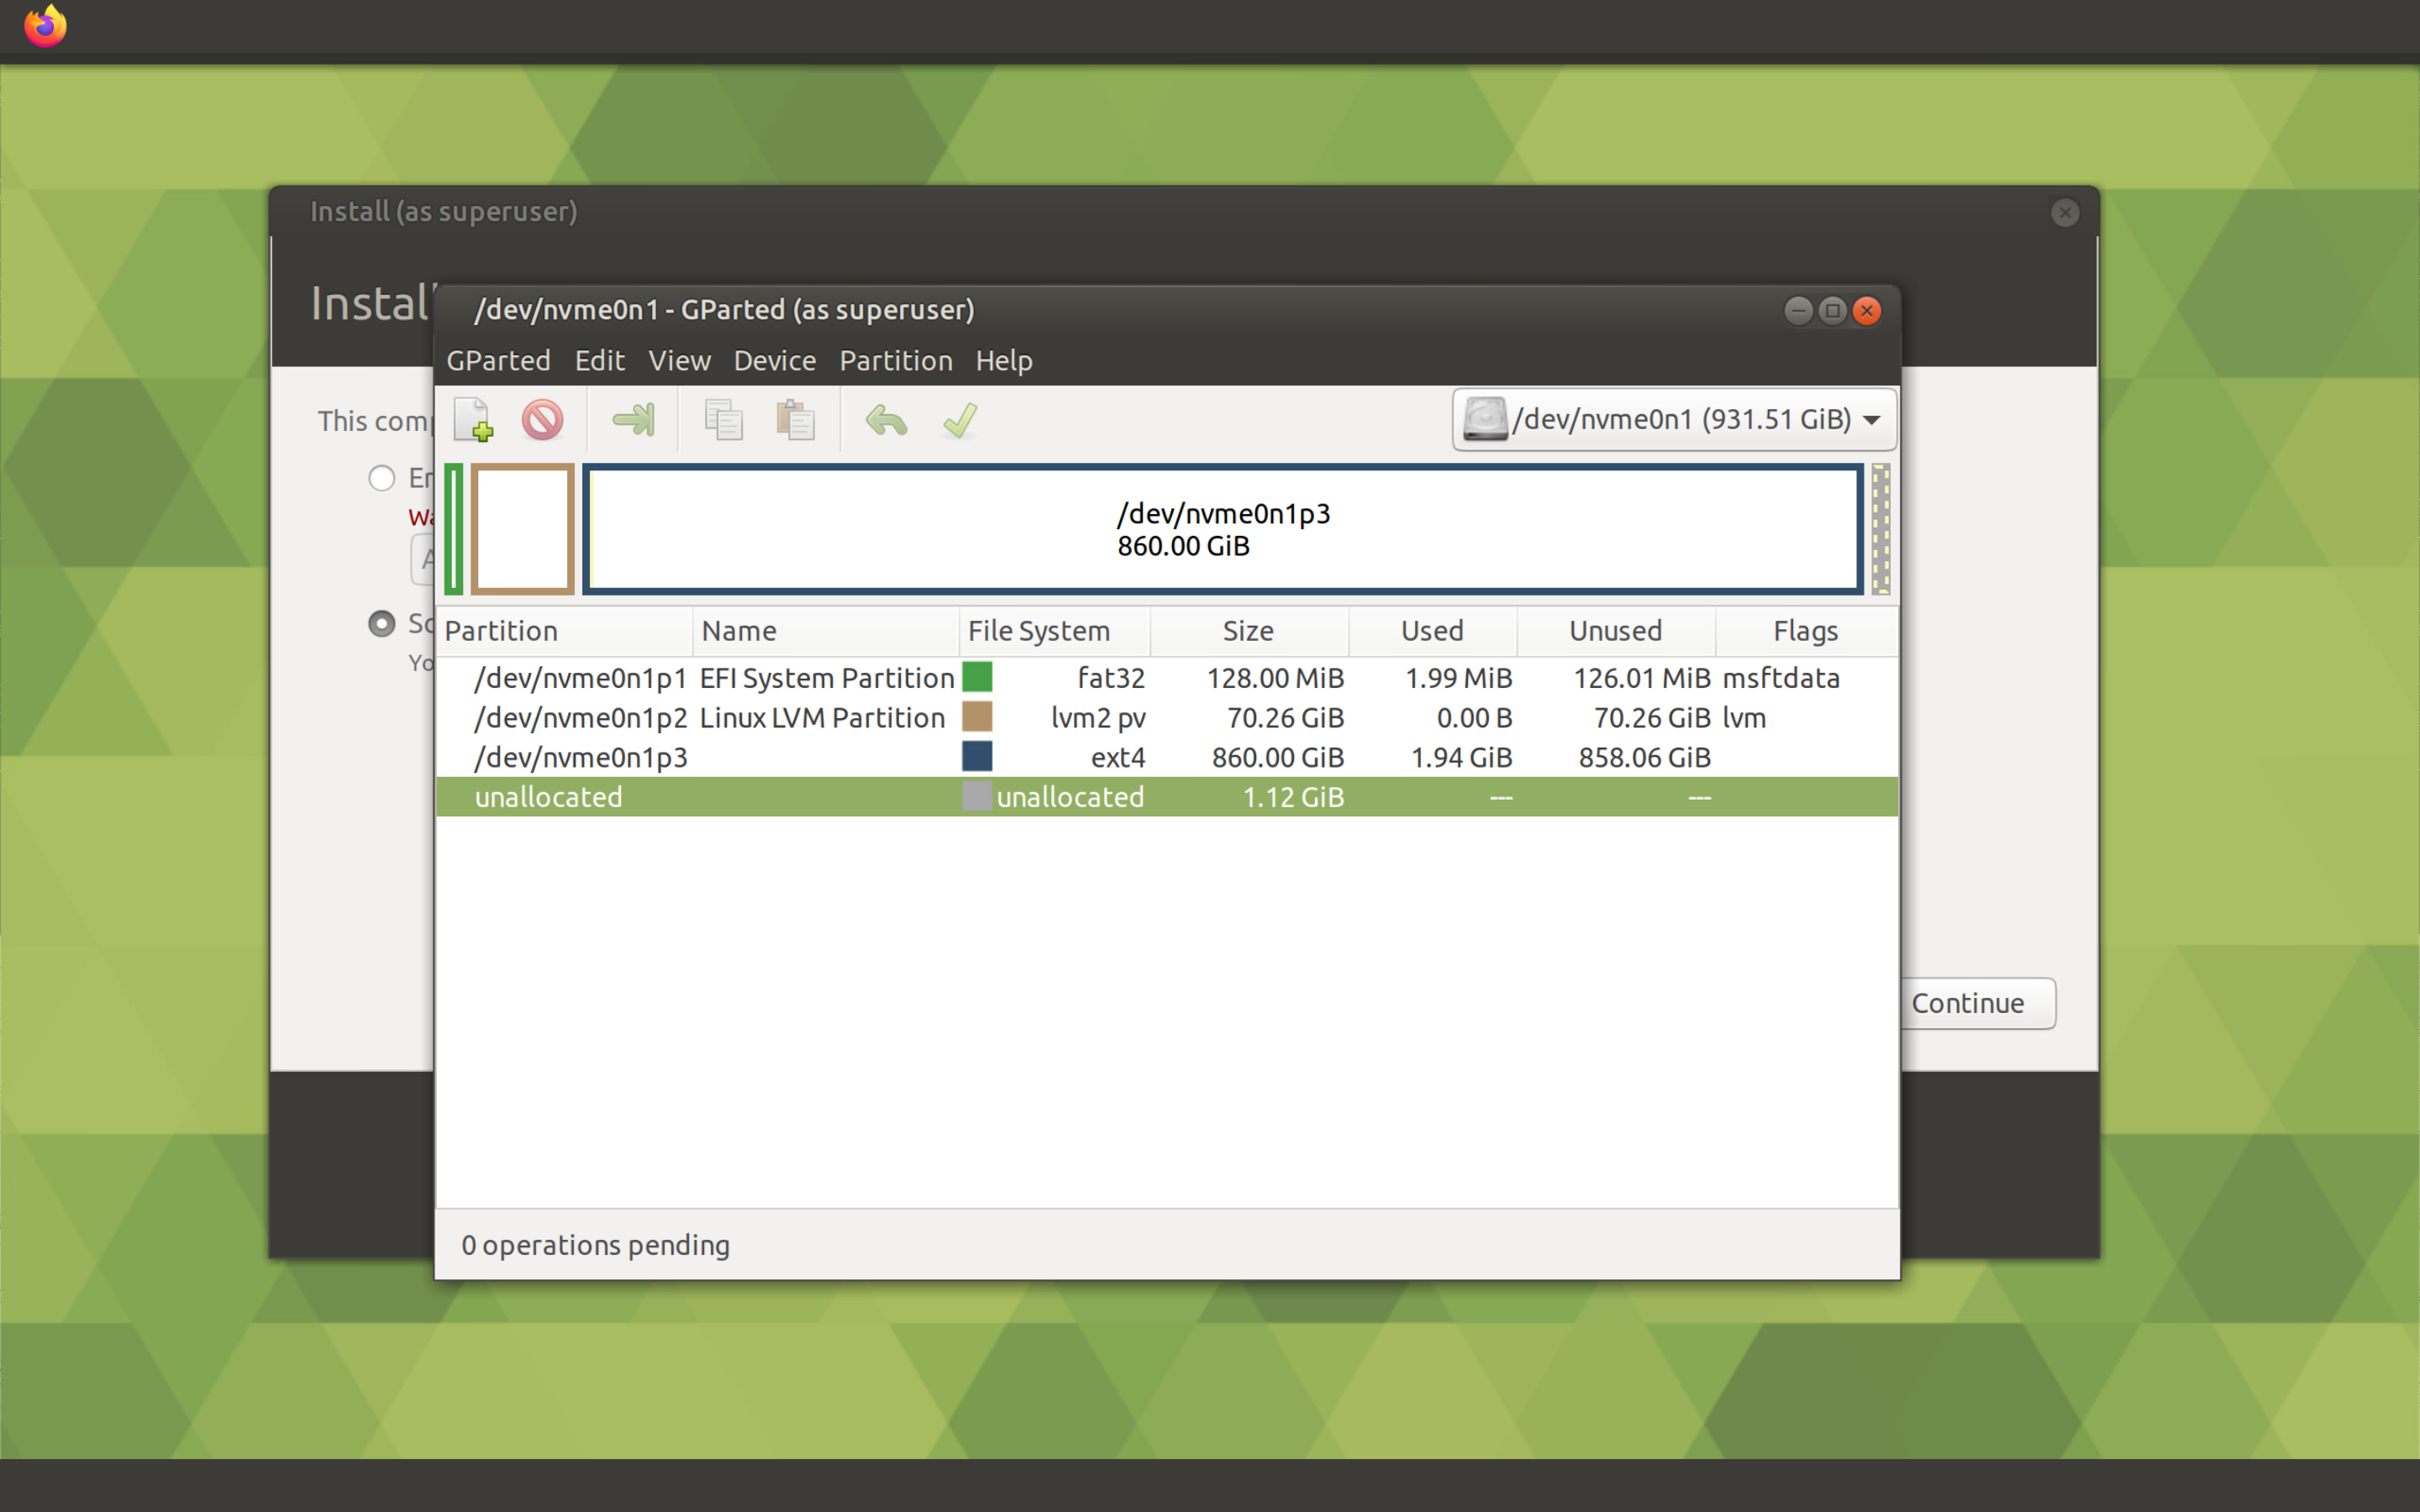
After actually creating partitions on the disk, select the first partition EFI System Partition, right-click on it and select Manage Flags.
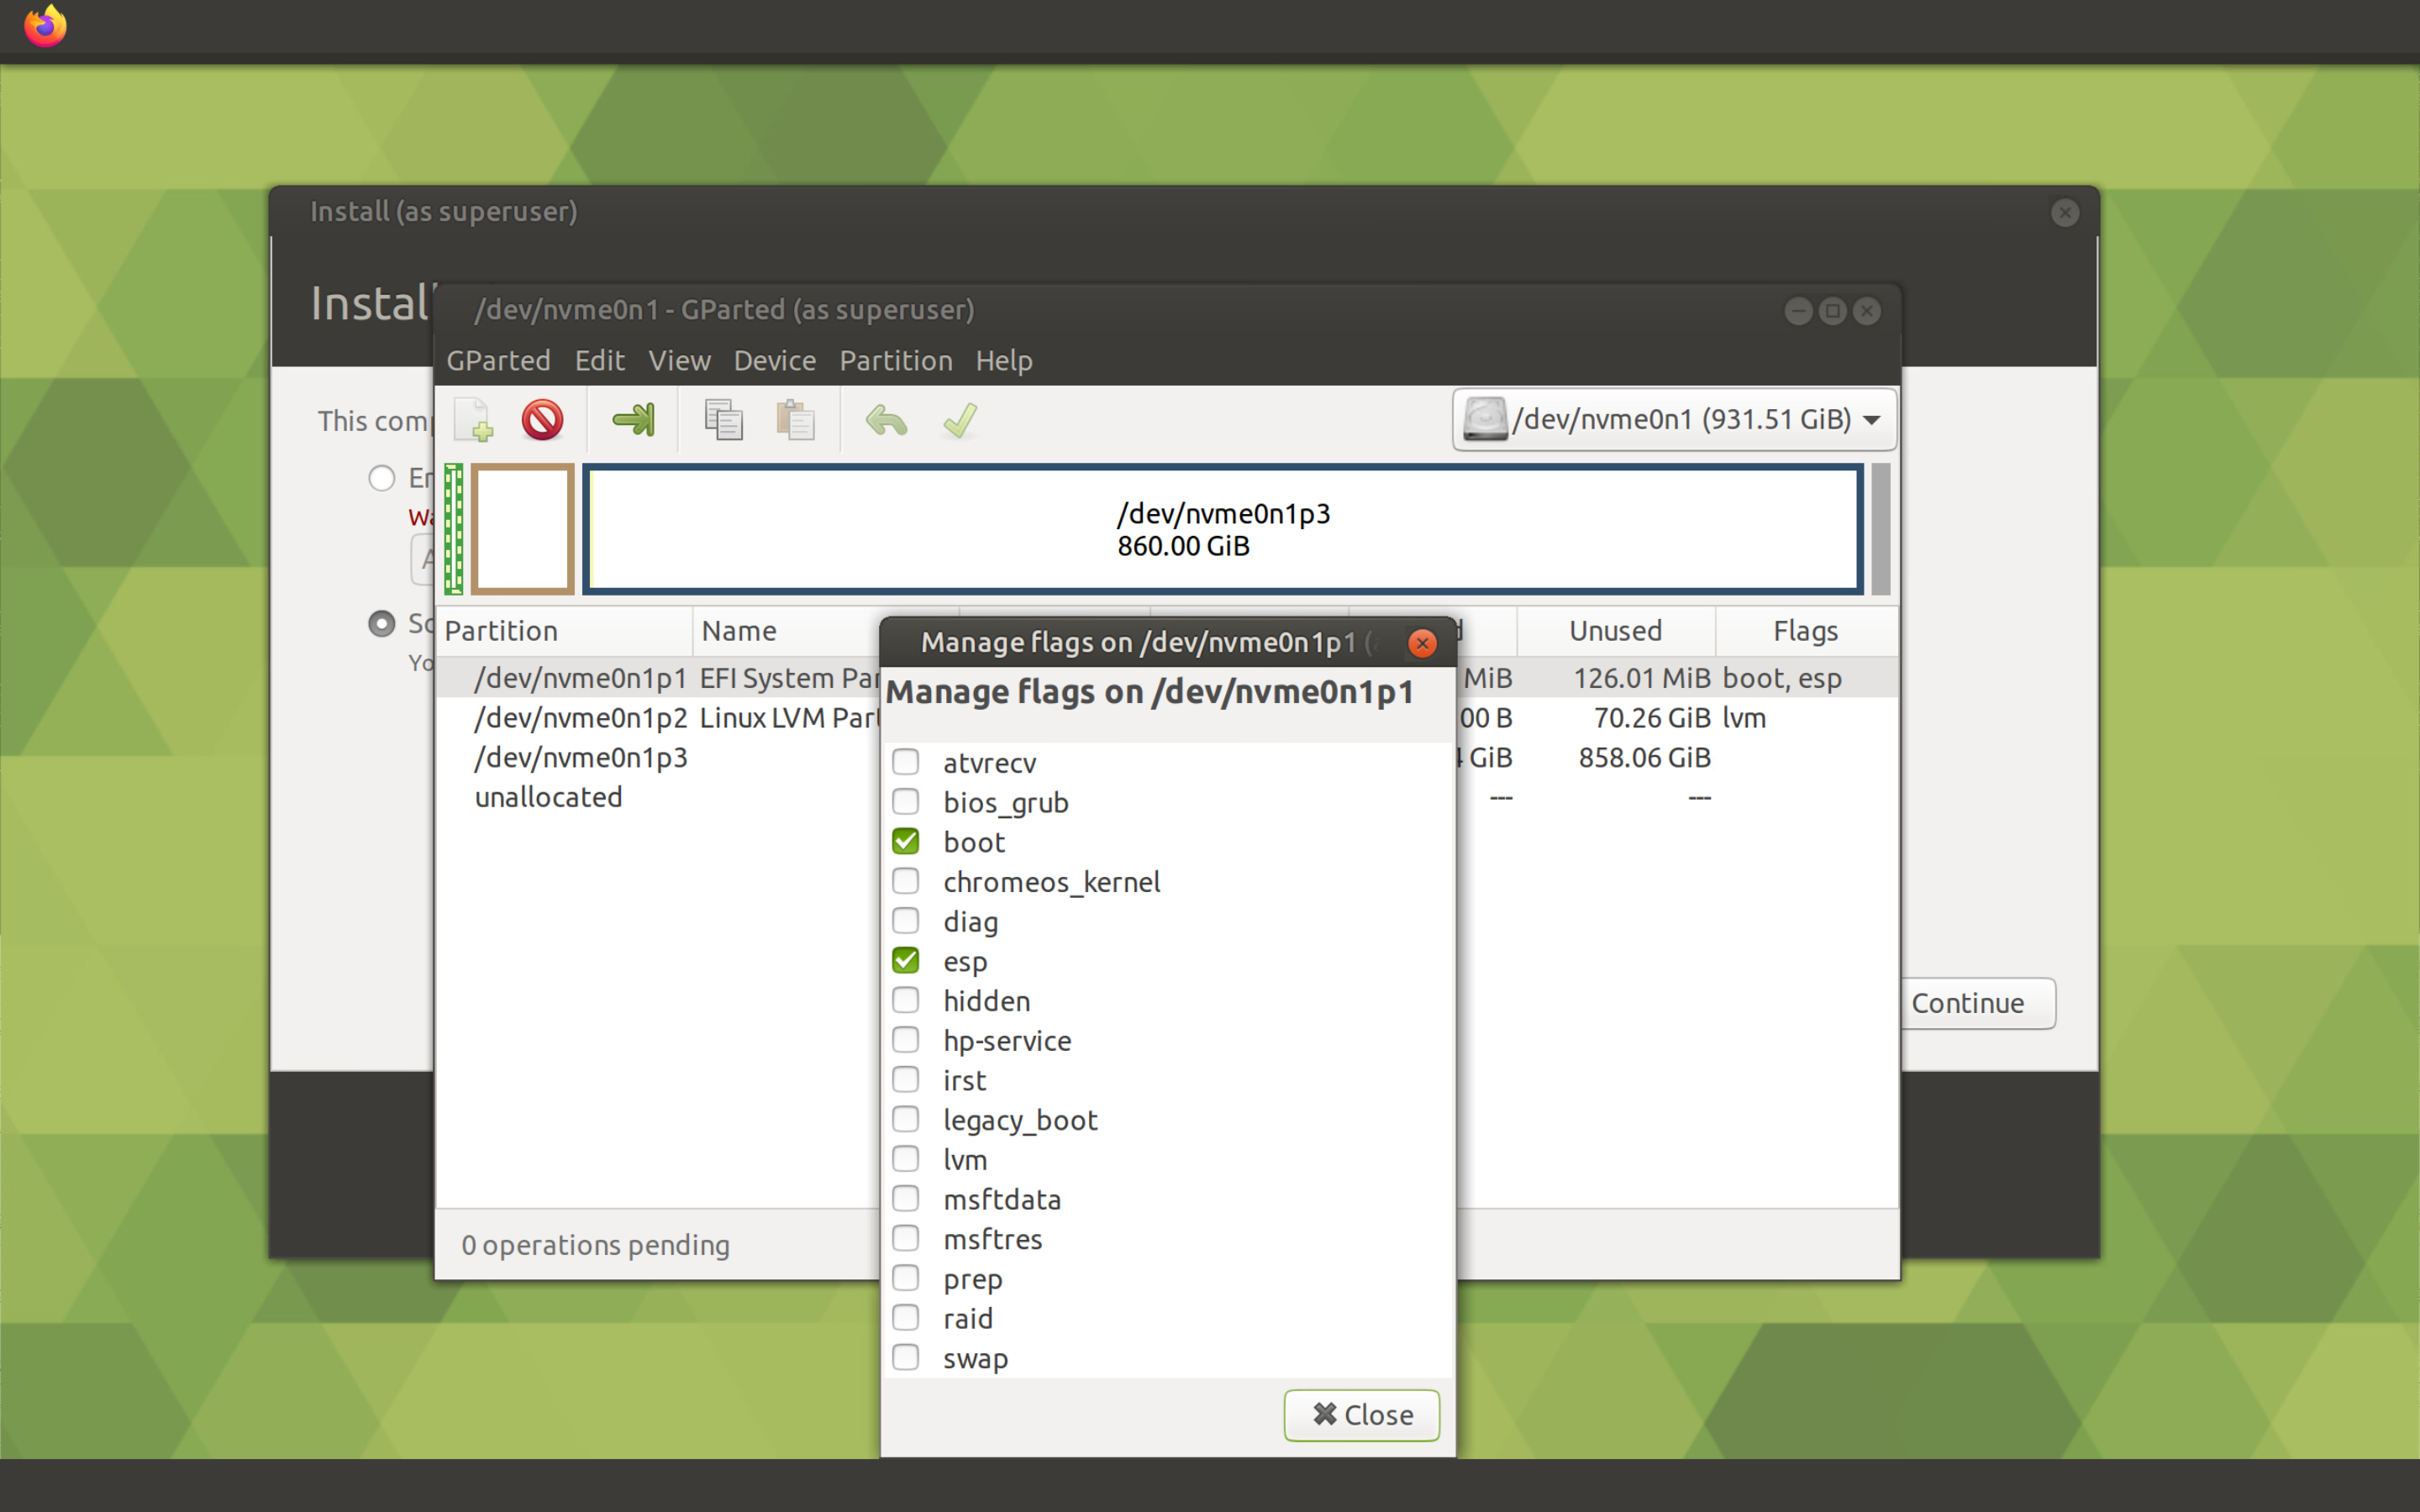
Select the boot and ESP flags, then click the Close button.
Close GParted and return to the console, where we execute the following commands:
$ sudo pvcreate /dev/nvme0n1p2
$ sudo vgcreate vg_radio /dev/nvme0n1p2
$ sudo lvcreate -n lv_boot -L 1072m vg_radio
$ sudo lvcreate -n lv_root -L 62680m vg_radio
$ sudo lvcreate -n lv_swap -L 8192m vg_radio
$ sudo lvs --units m
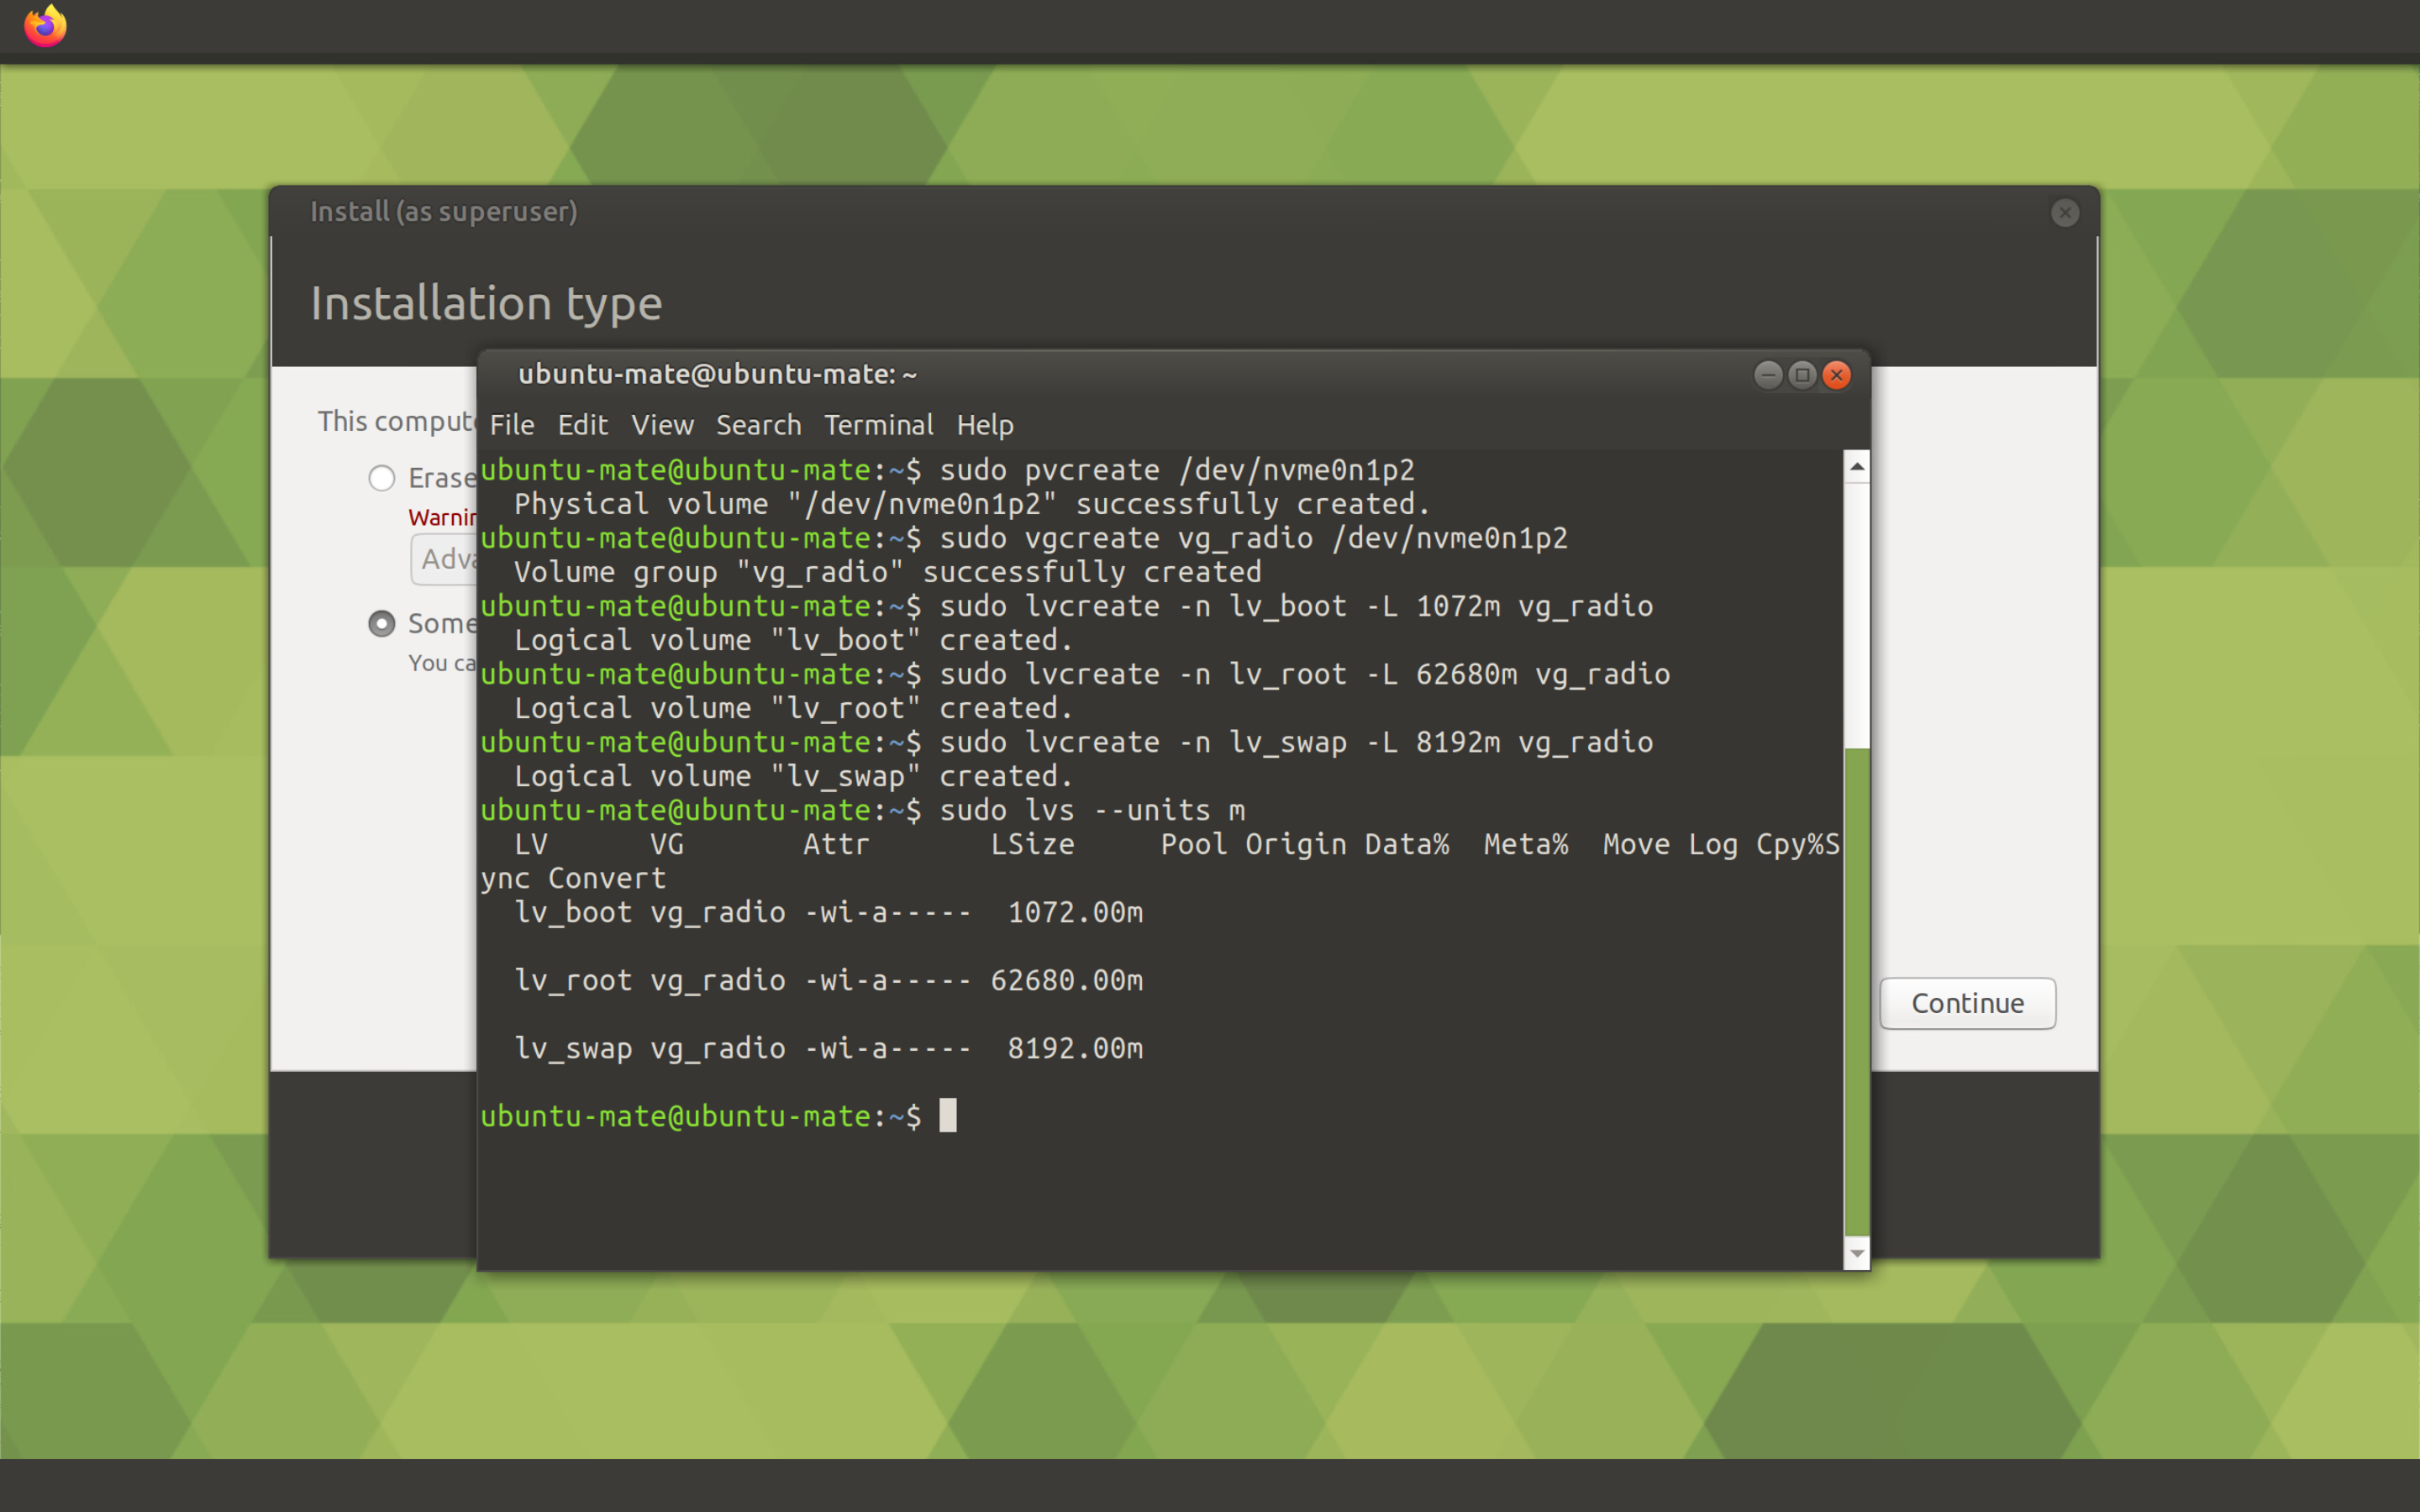
Here I use the name of the volume group vg_radio, because vg is the volume group, and radio is the future hostname of the VM. And the partitions in the lv names are logical volume, and boot, root, and swap are their destinations.
The sizes of logical volumes (except for the swap partition) are chosen empirically, mainly in order to show even values in the output of the
df -hcommand.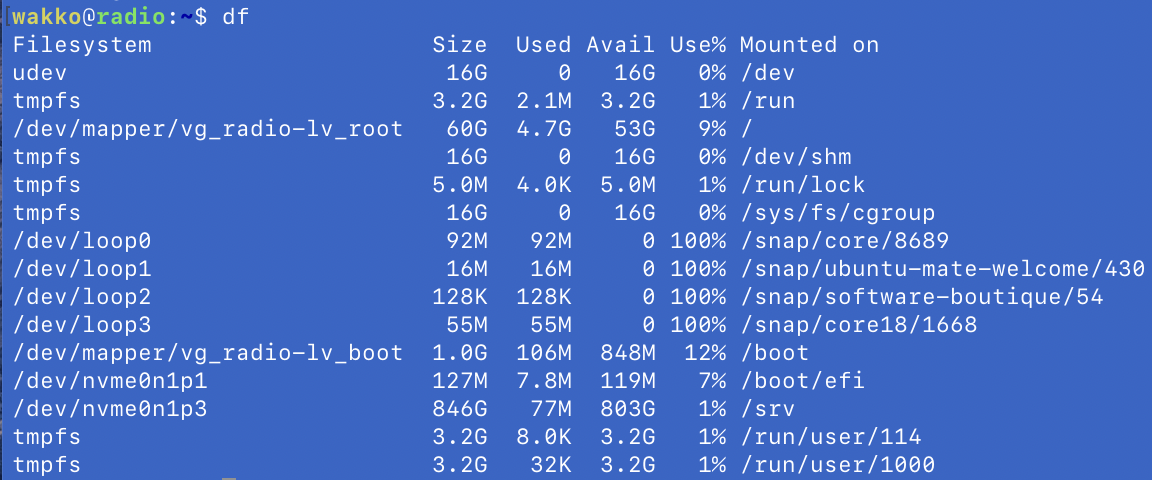
After setting up LVM, close the console and return to the installer. Select Something else and click the Continue button.
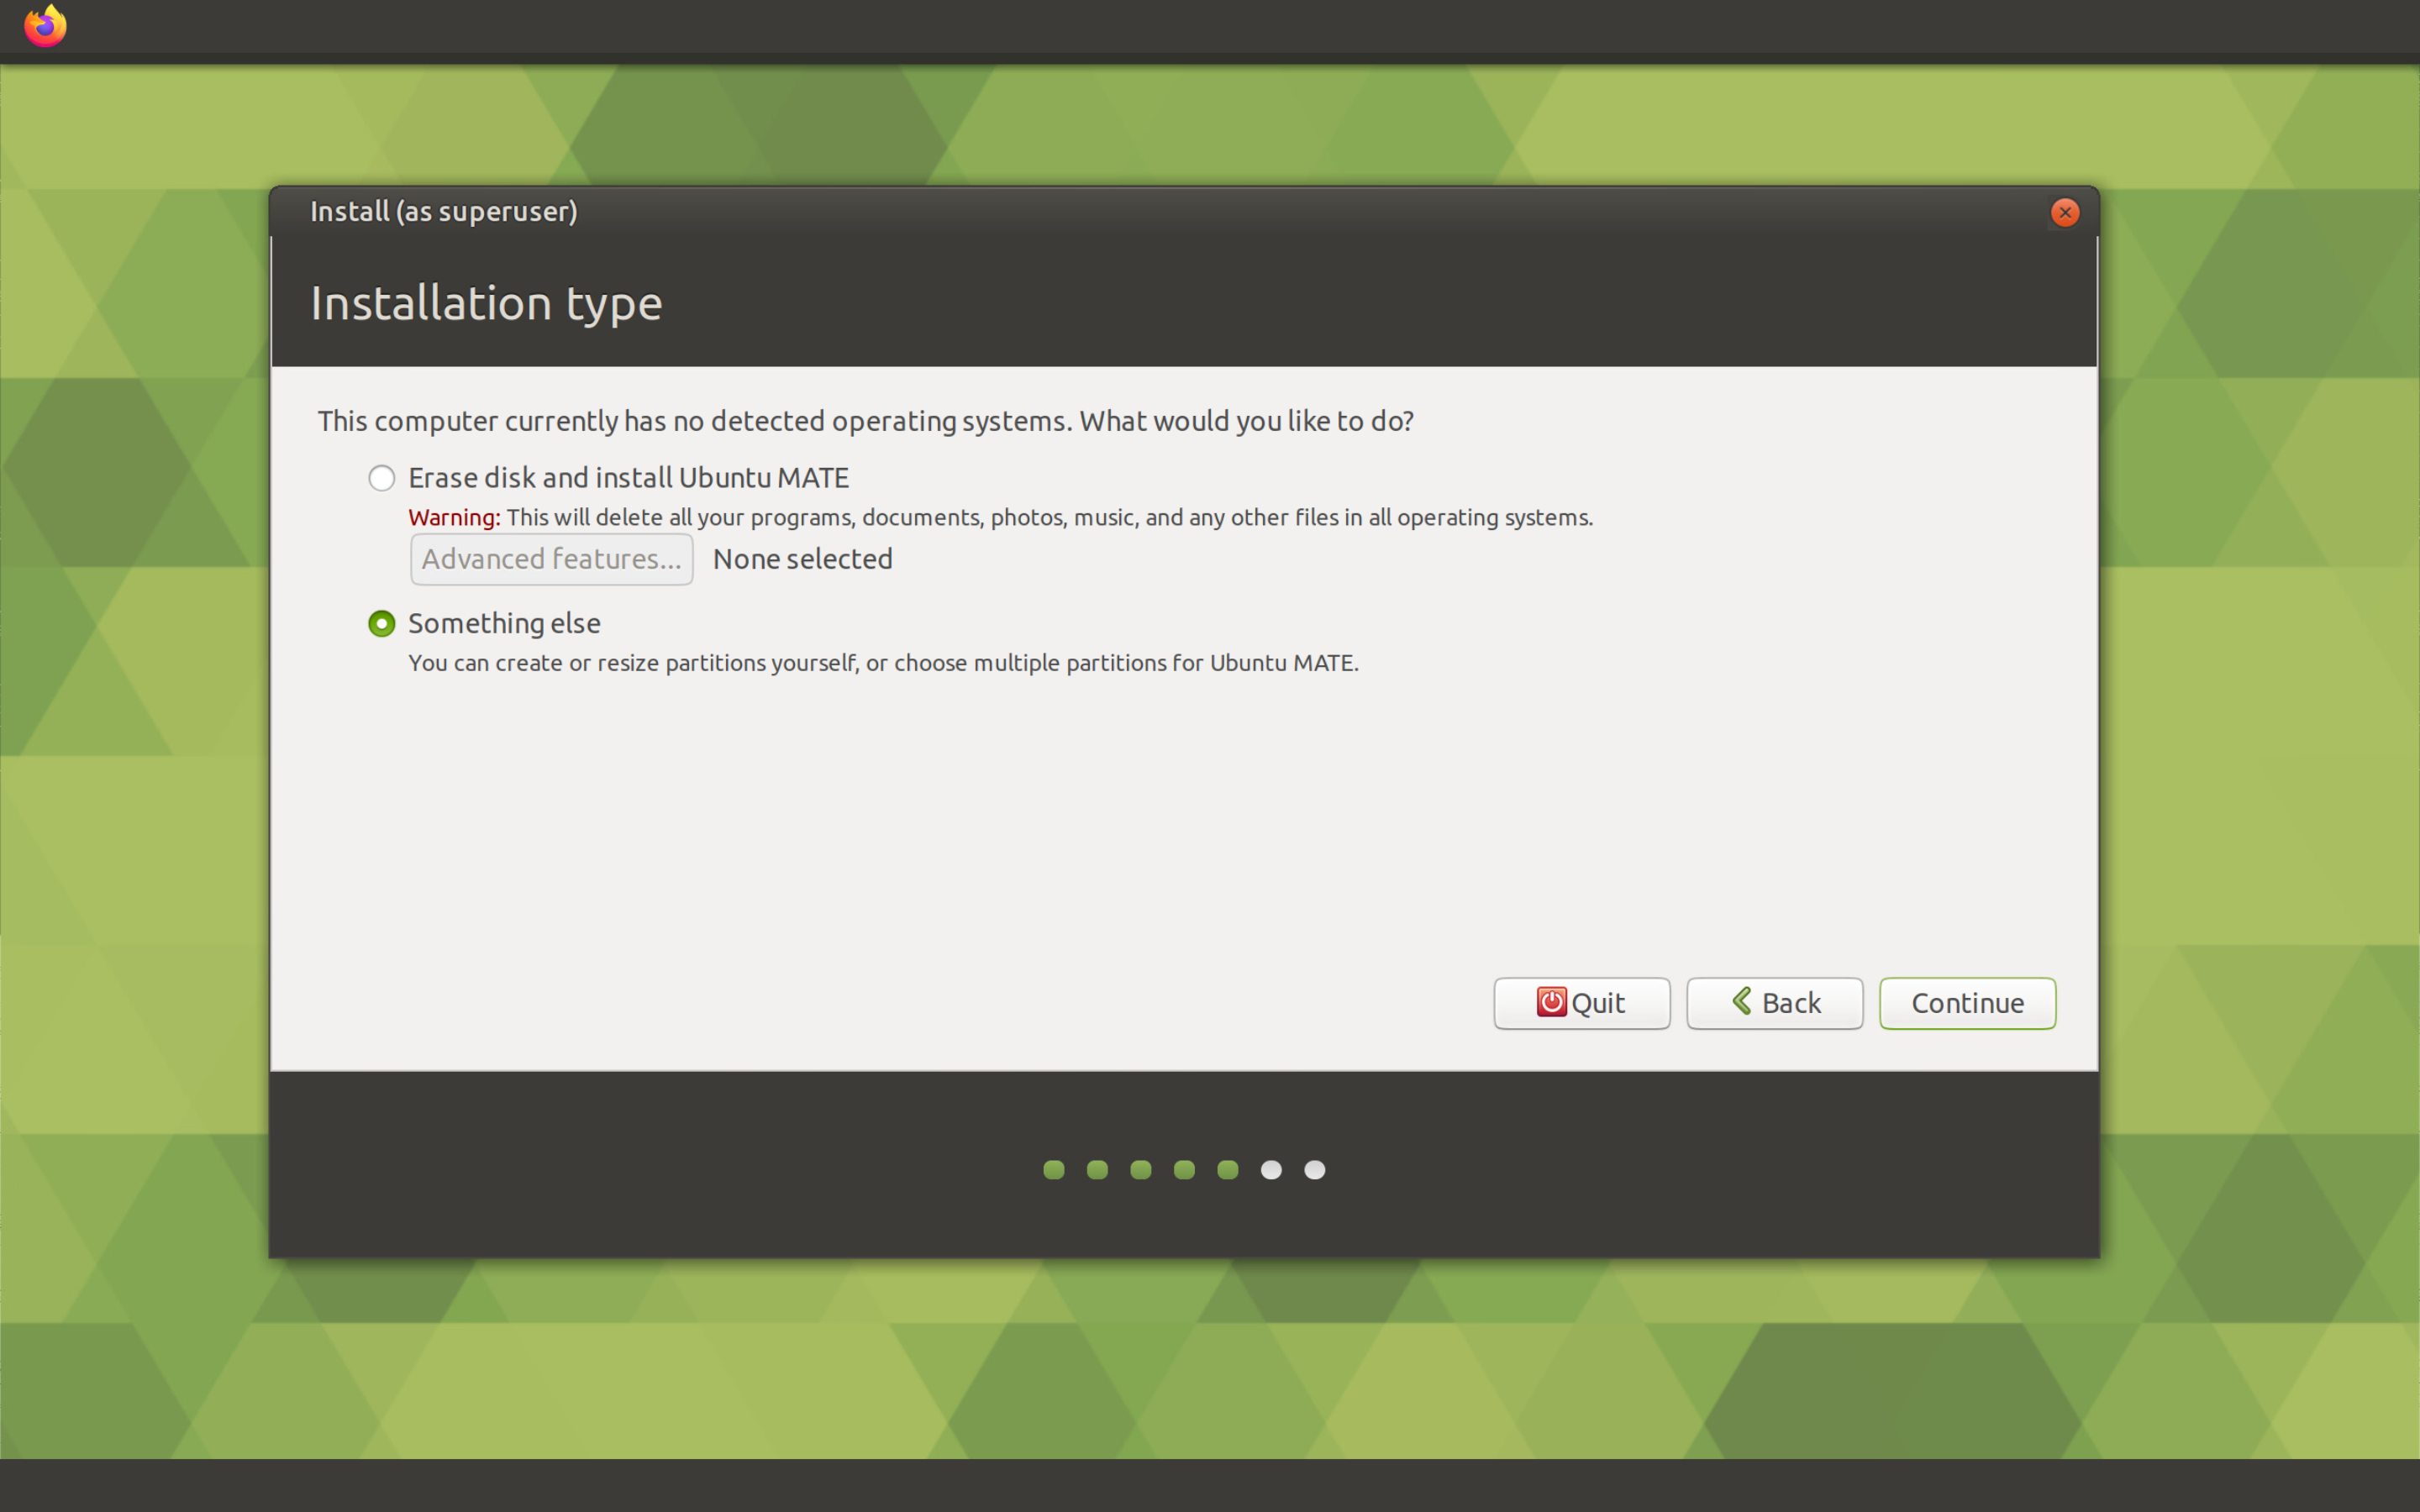
Most likely, our new partitions and logical LVM volumes will not be displayed in the installer disk partition window the first time.

Just click the Back button, select Something else again, and click the Continue button.

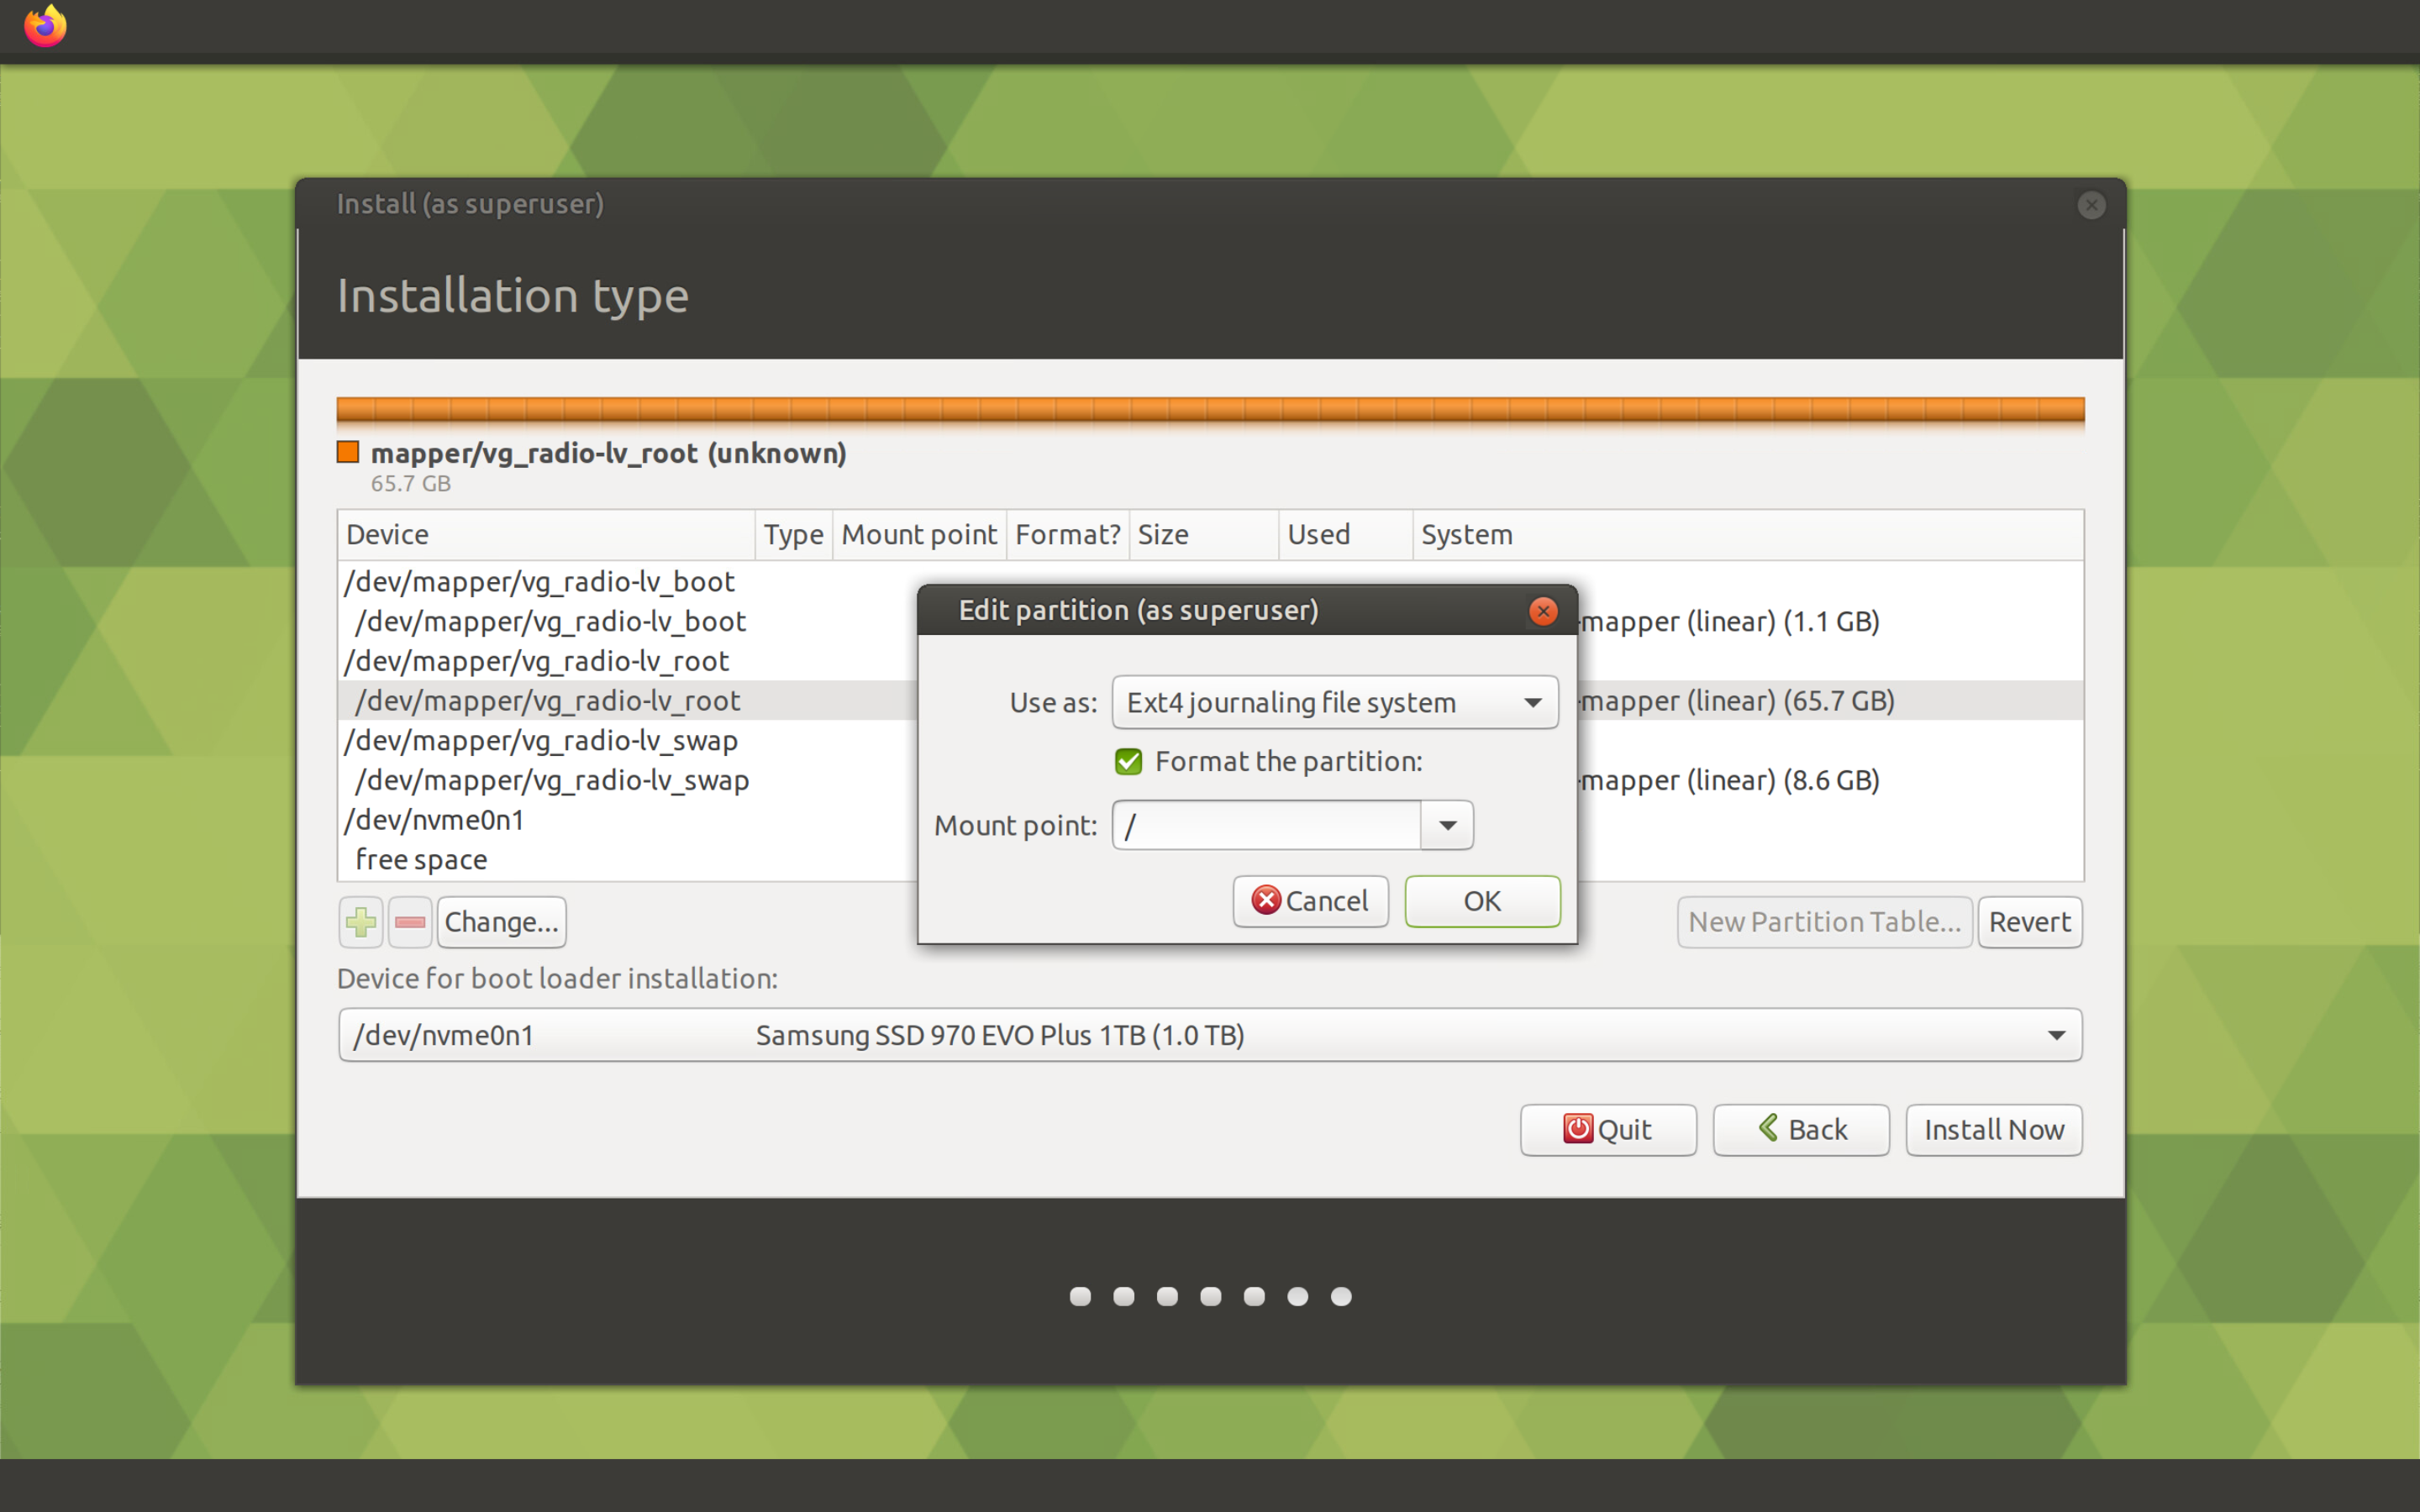
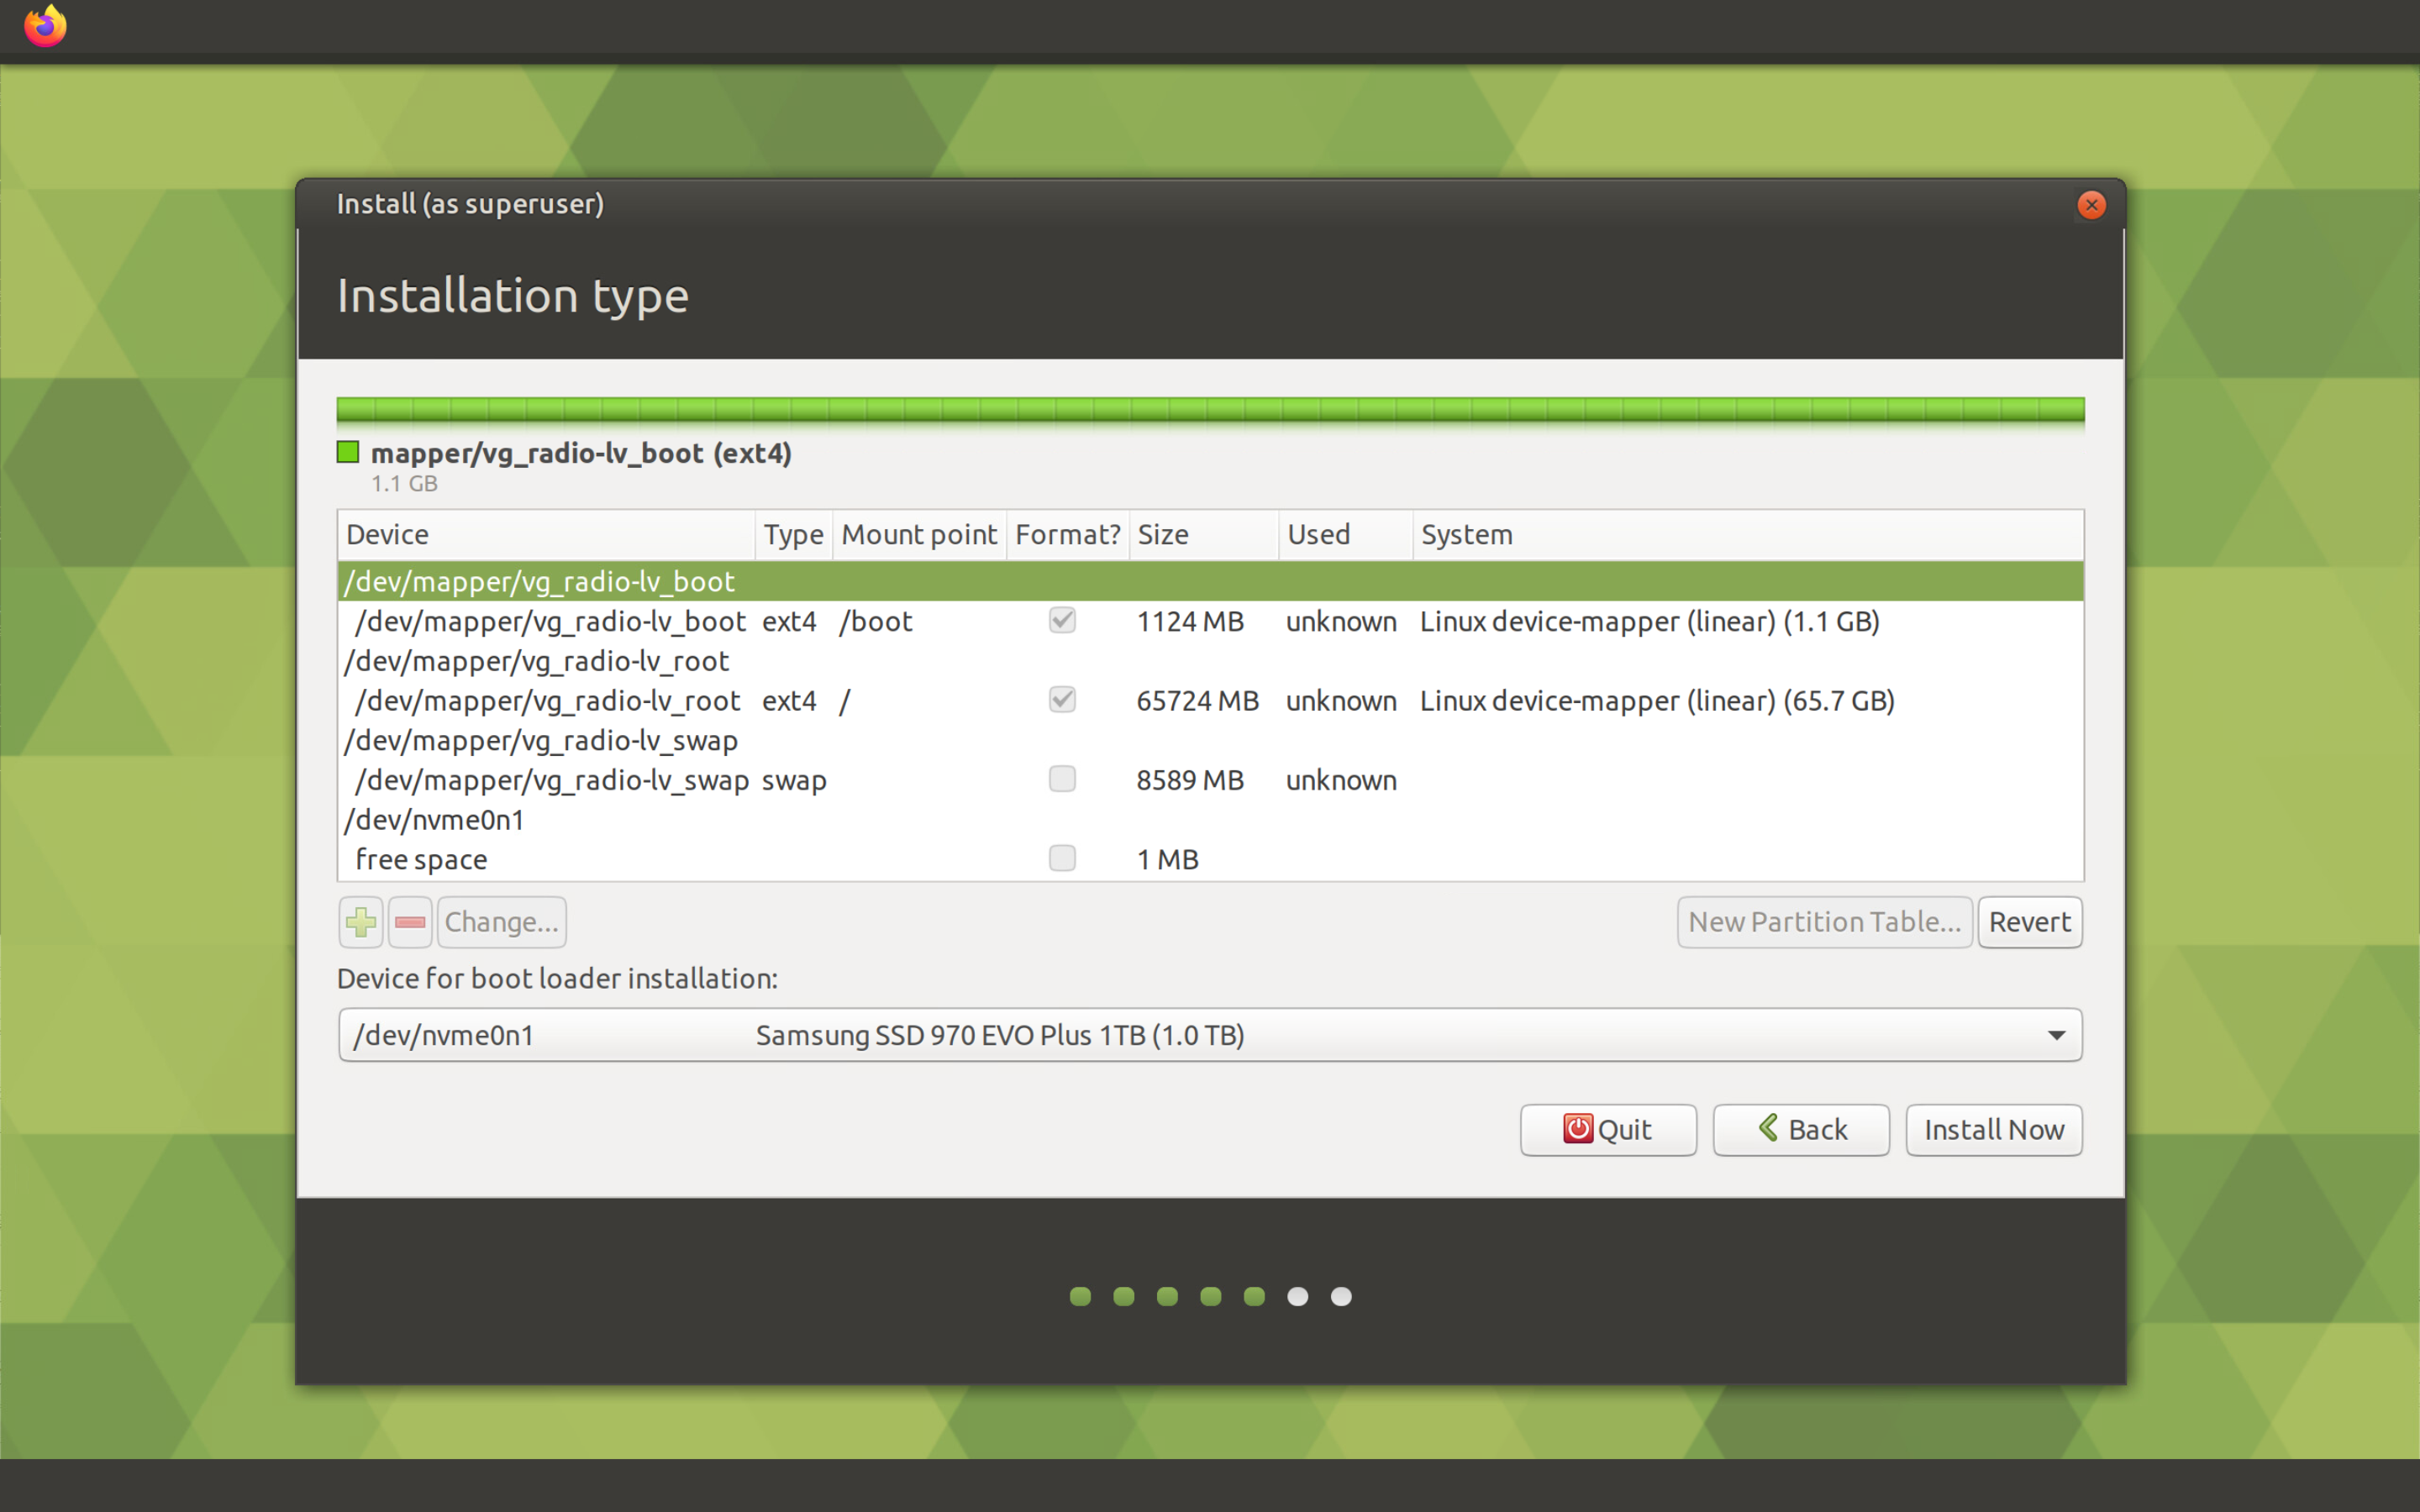
We need to map the created logical volumes and partitions to mount points and select file systems for them. First, select the volume /dev/mapper/vg_radio-lv_root that we have defined for the root and click the Change button. In the partition editing window, select the Ext4 file system type, check the box for formatting the partition, and select the mount point /, then click the OK button.
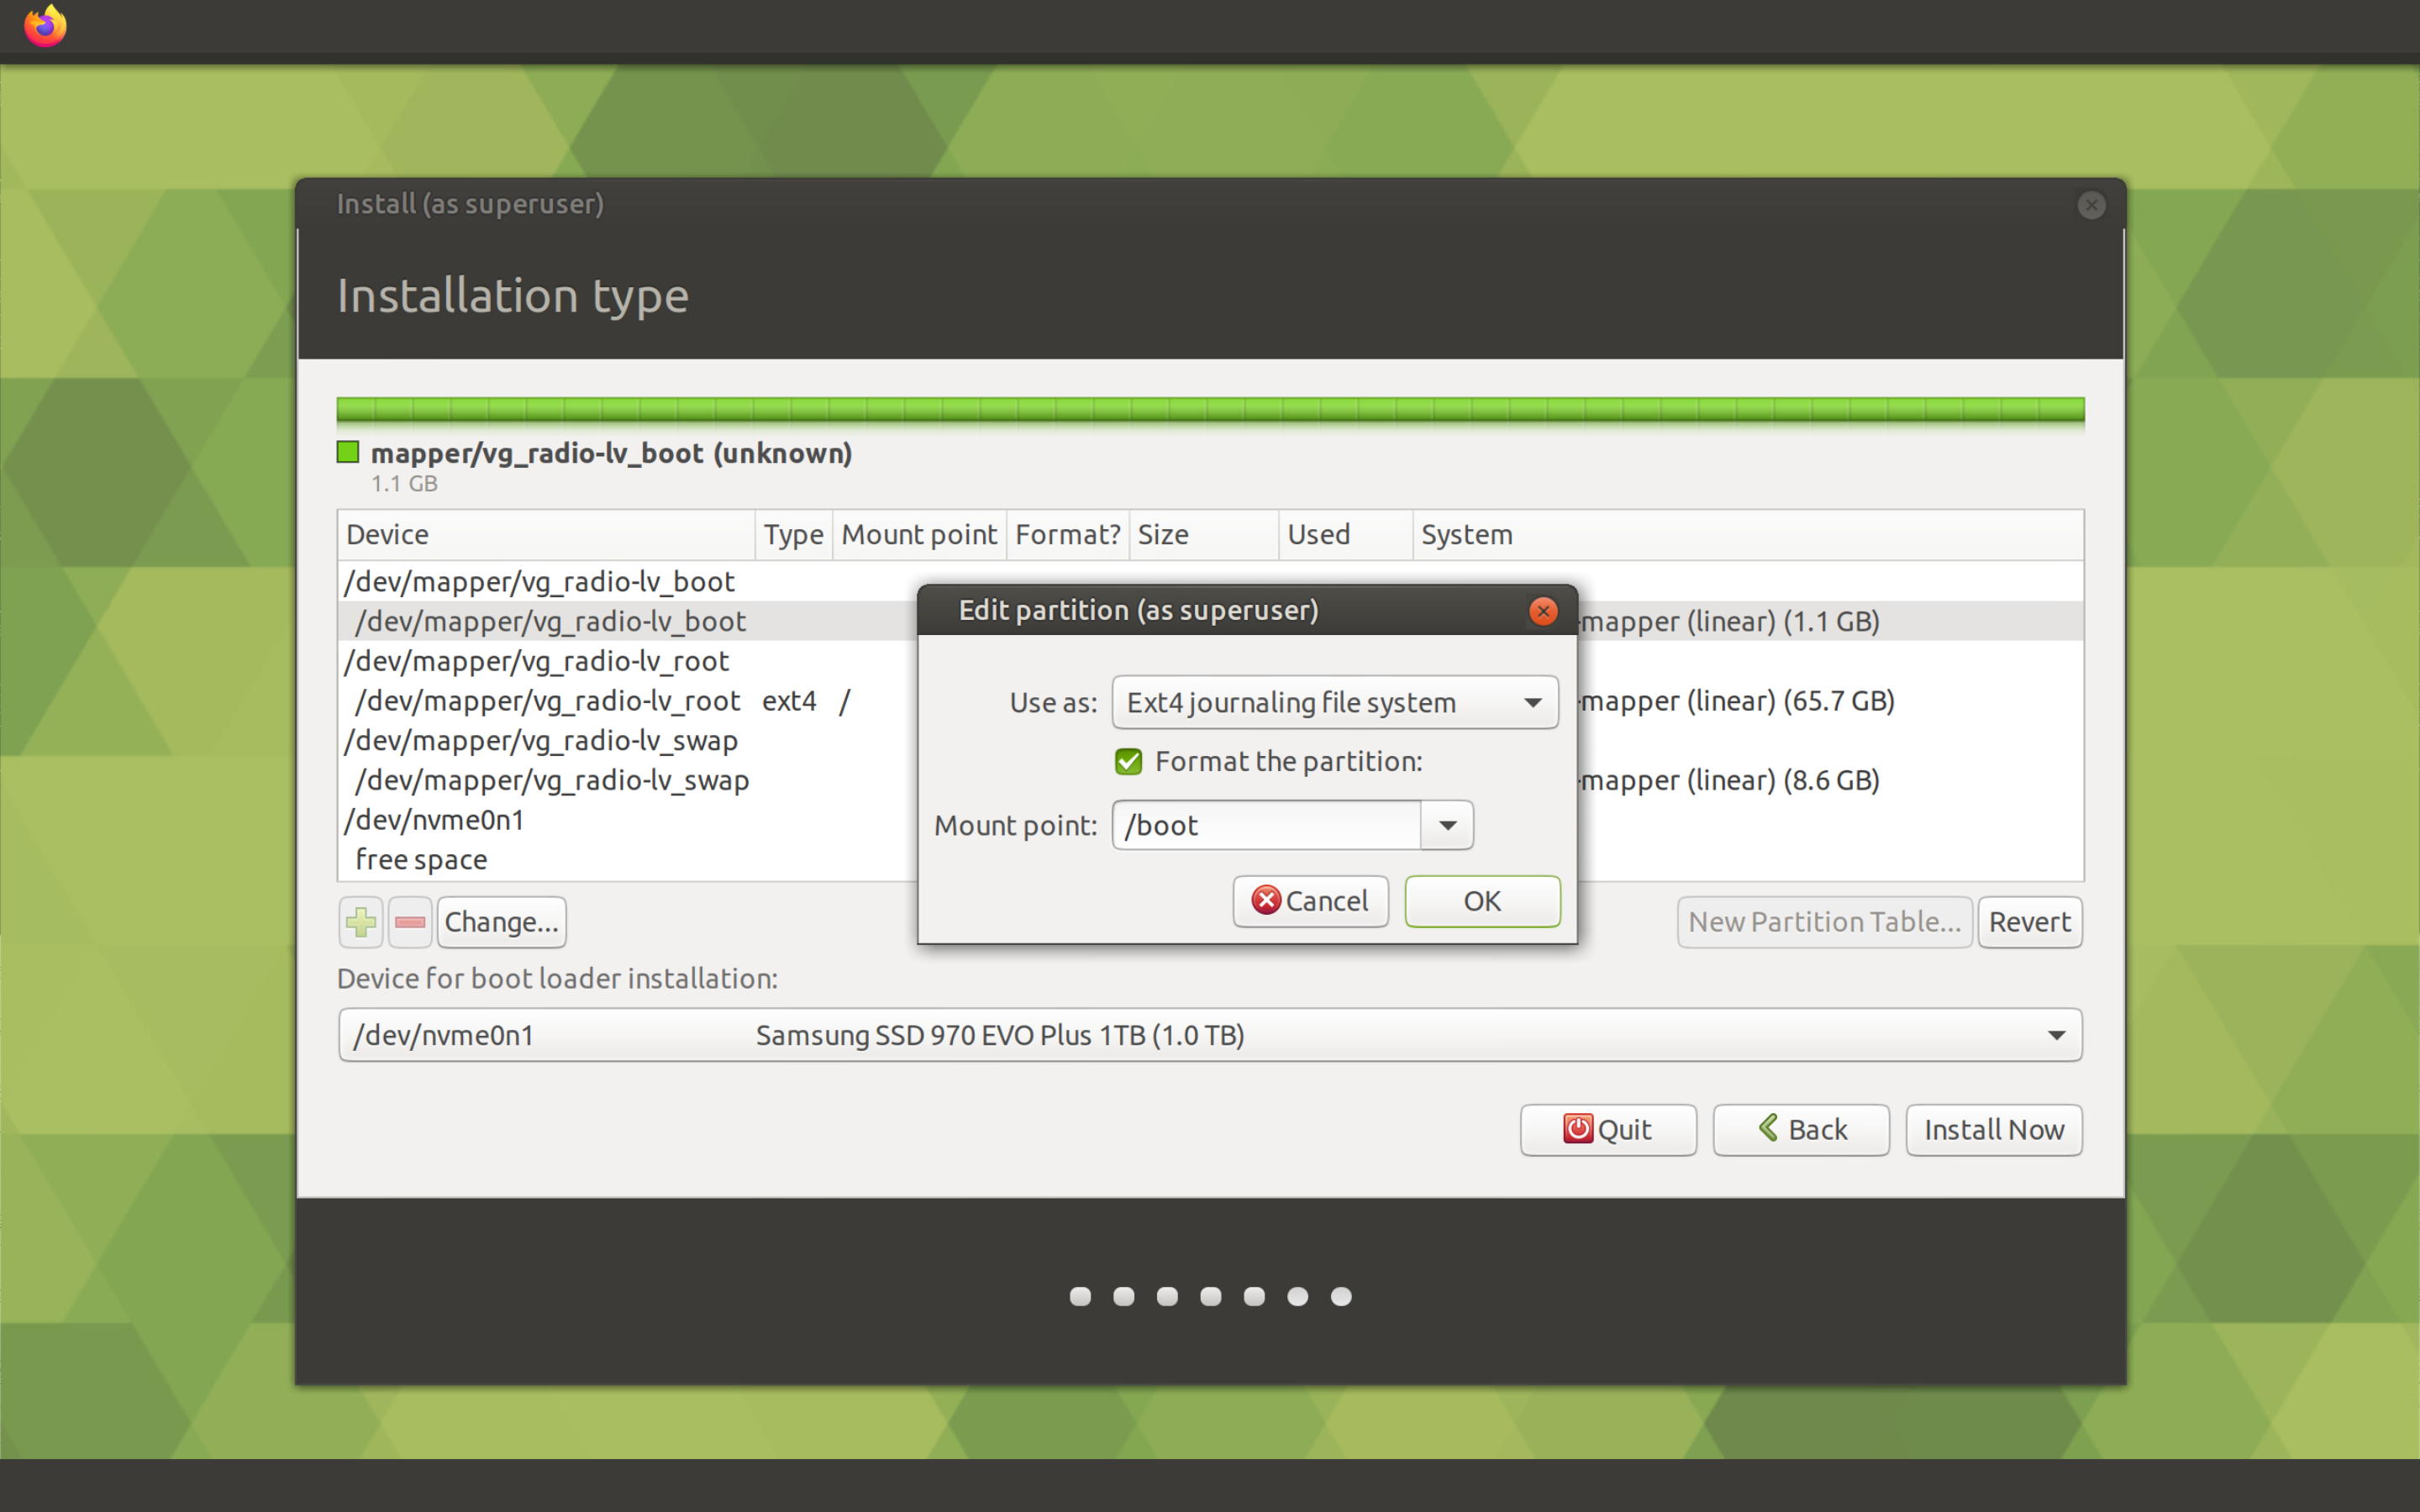
Repeat the same for the /dev/mapper/vg_radio-lv_boot volume. Select the volume and click the Change button. In the partition editing window, select the Ext4 file system type, check the box for formatting the partition, and select the mount point /boot, then click the OK button.
Now select the volume /dev/mapper/vg_radio-lv_swap and click the Change button. In the next window, select the volume type swap area and click the OK button.
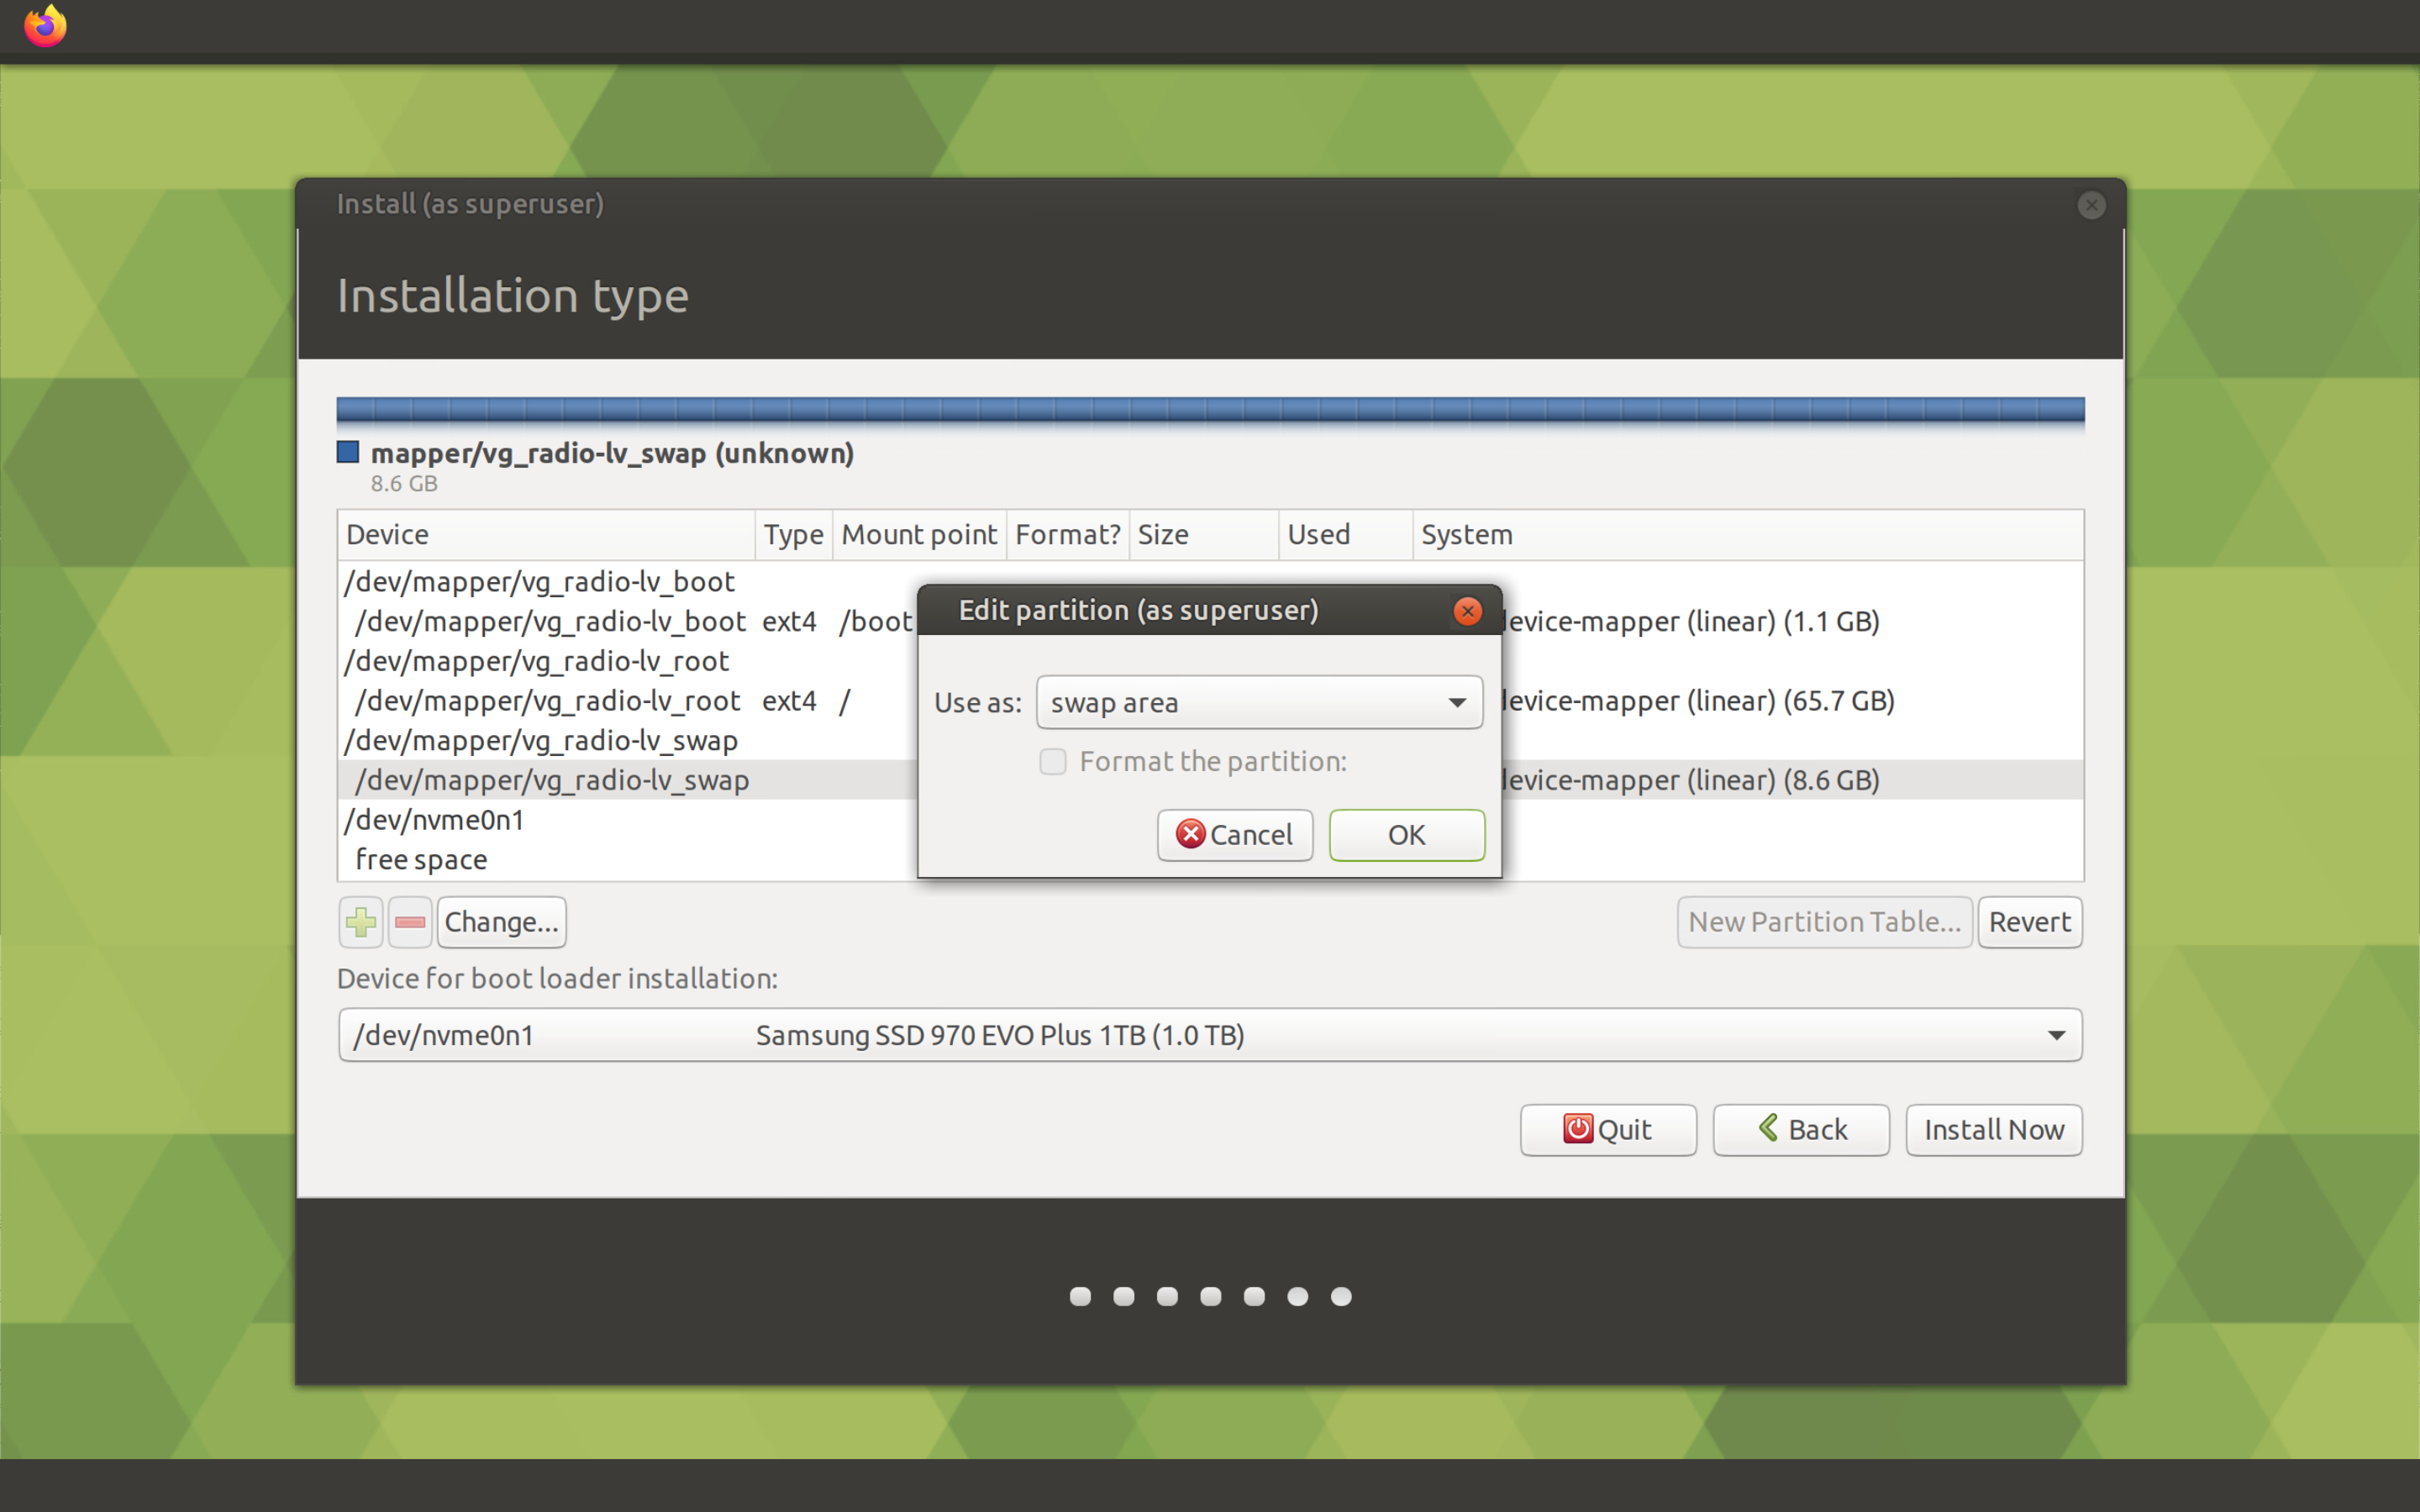
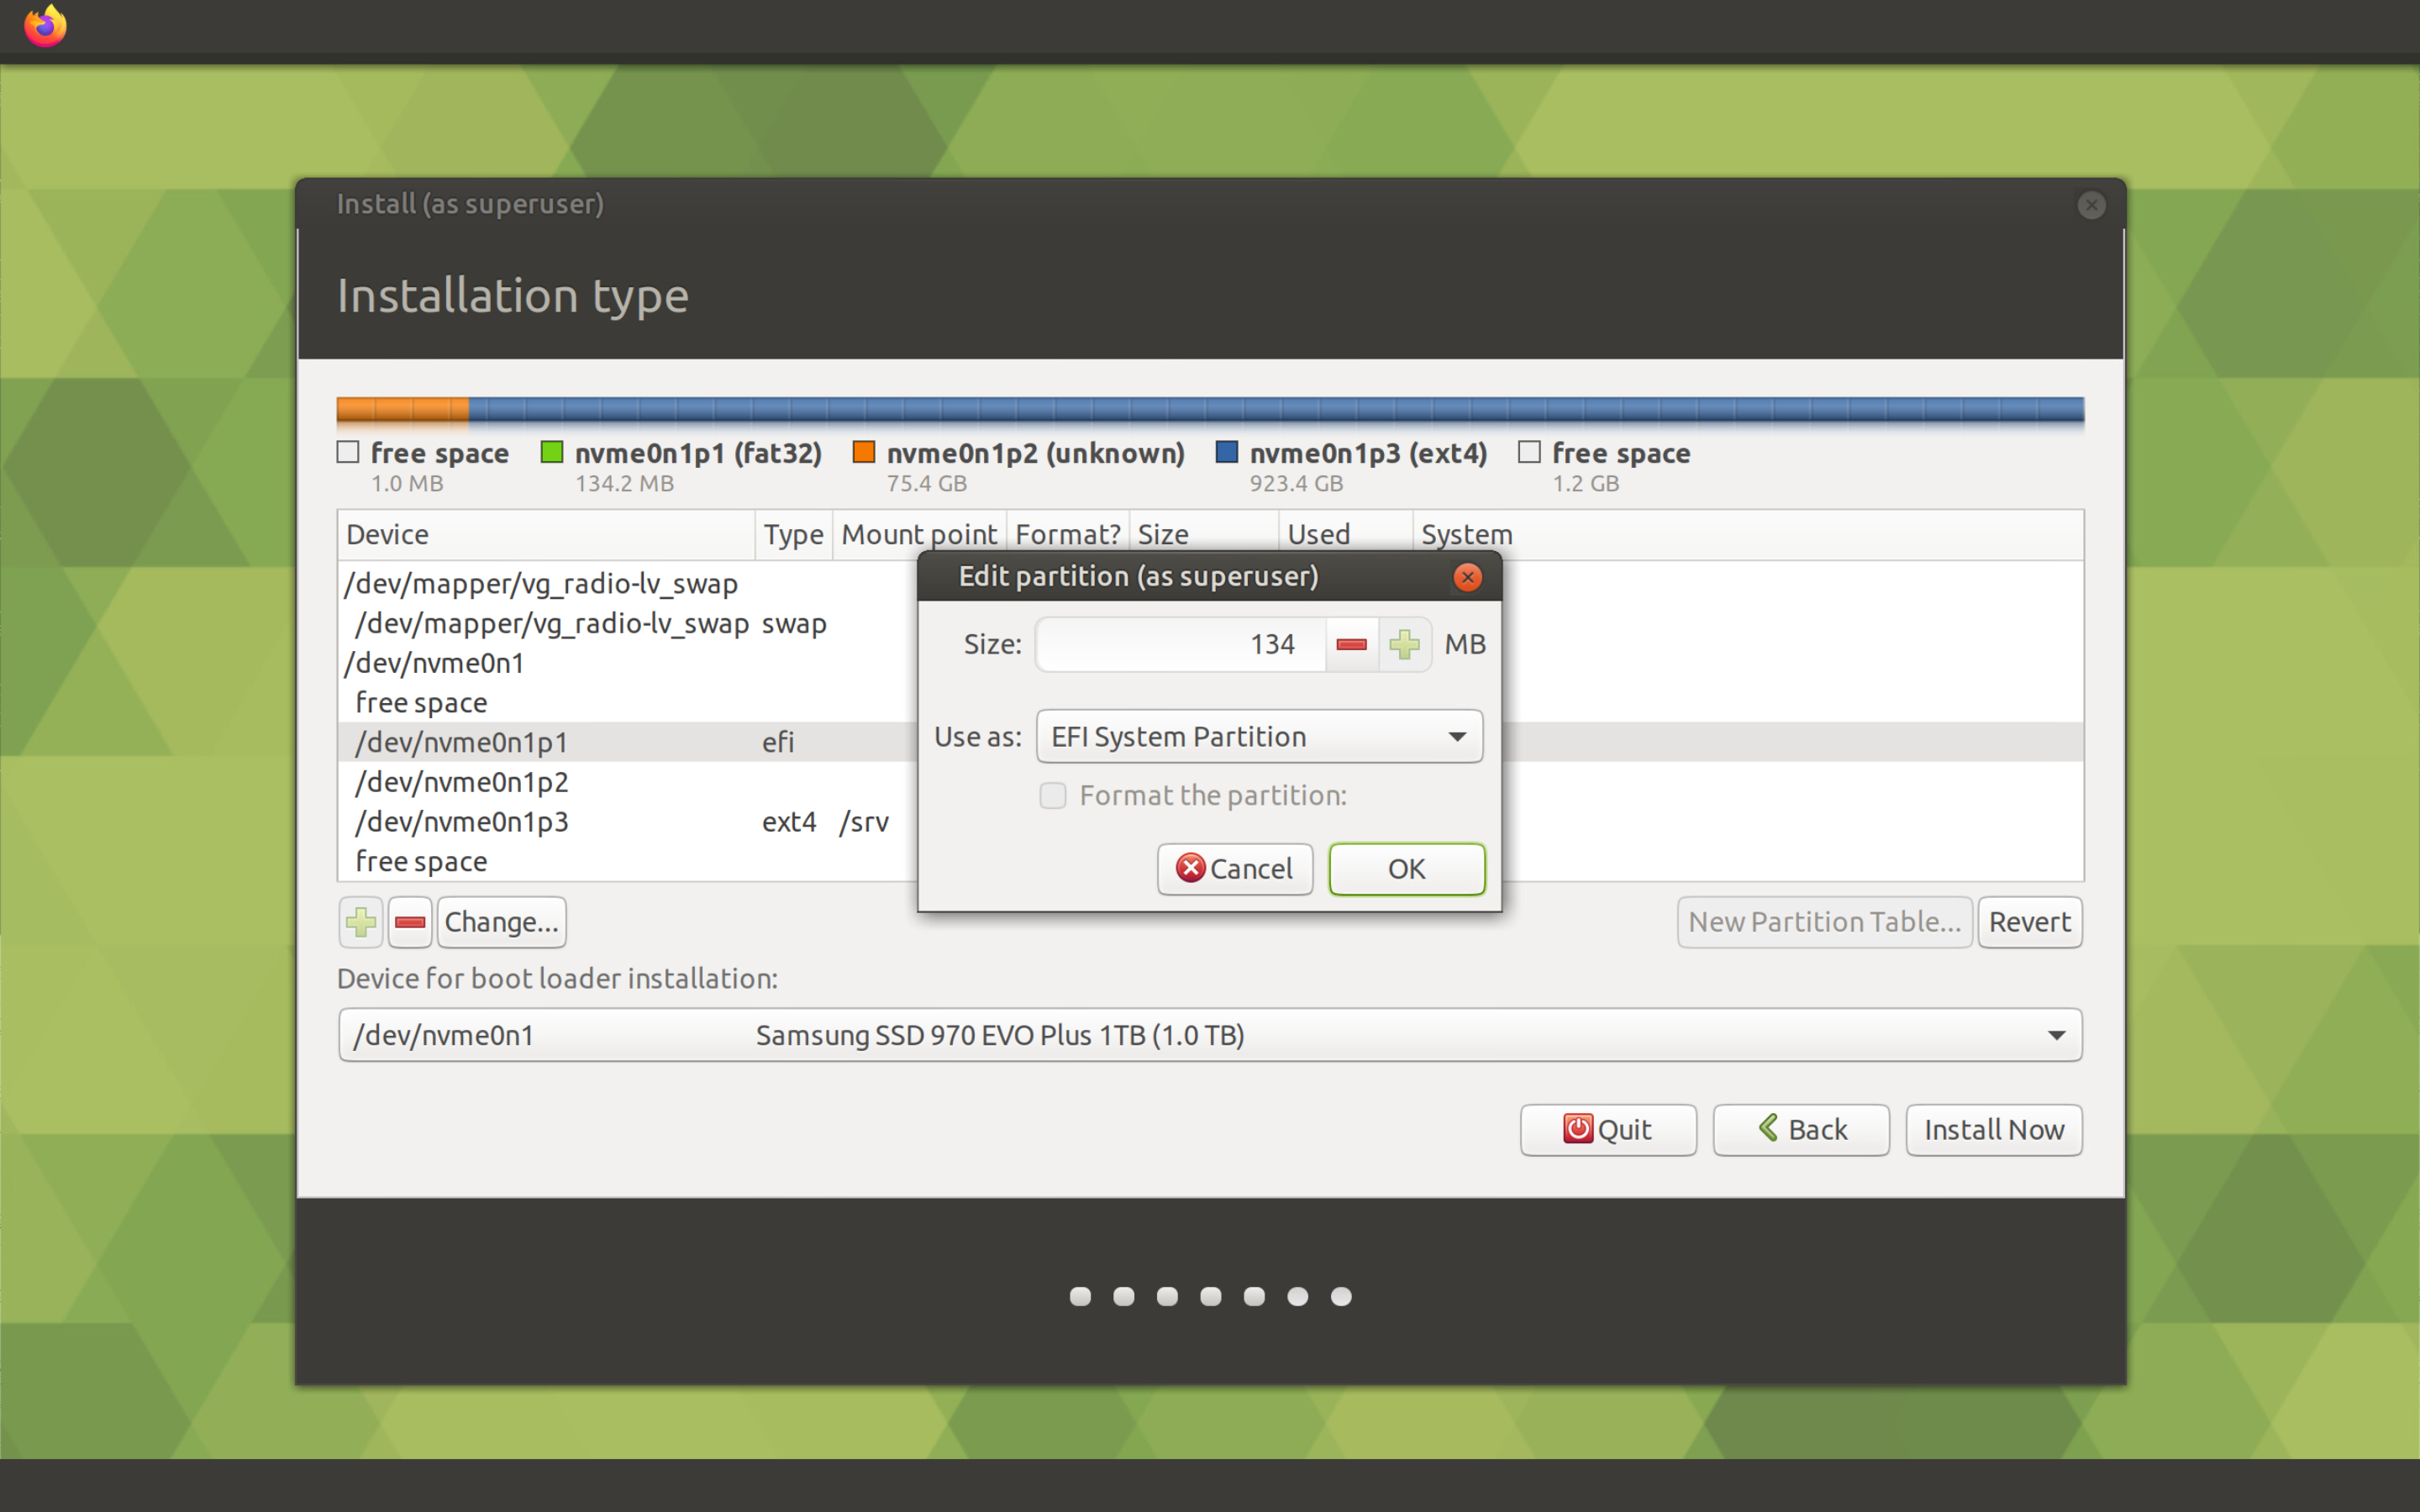
Looking at the next screenshot, it's easy to forget about two more volumes. Volume for data /srv and partition for EFI loader.
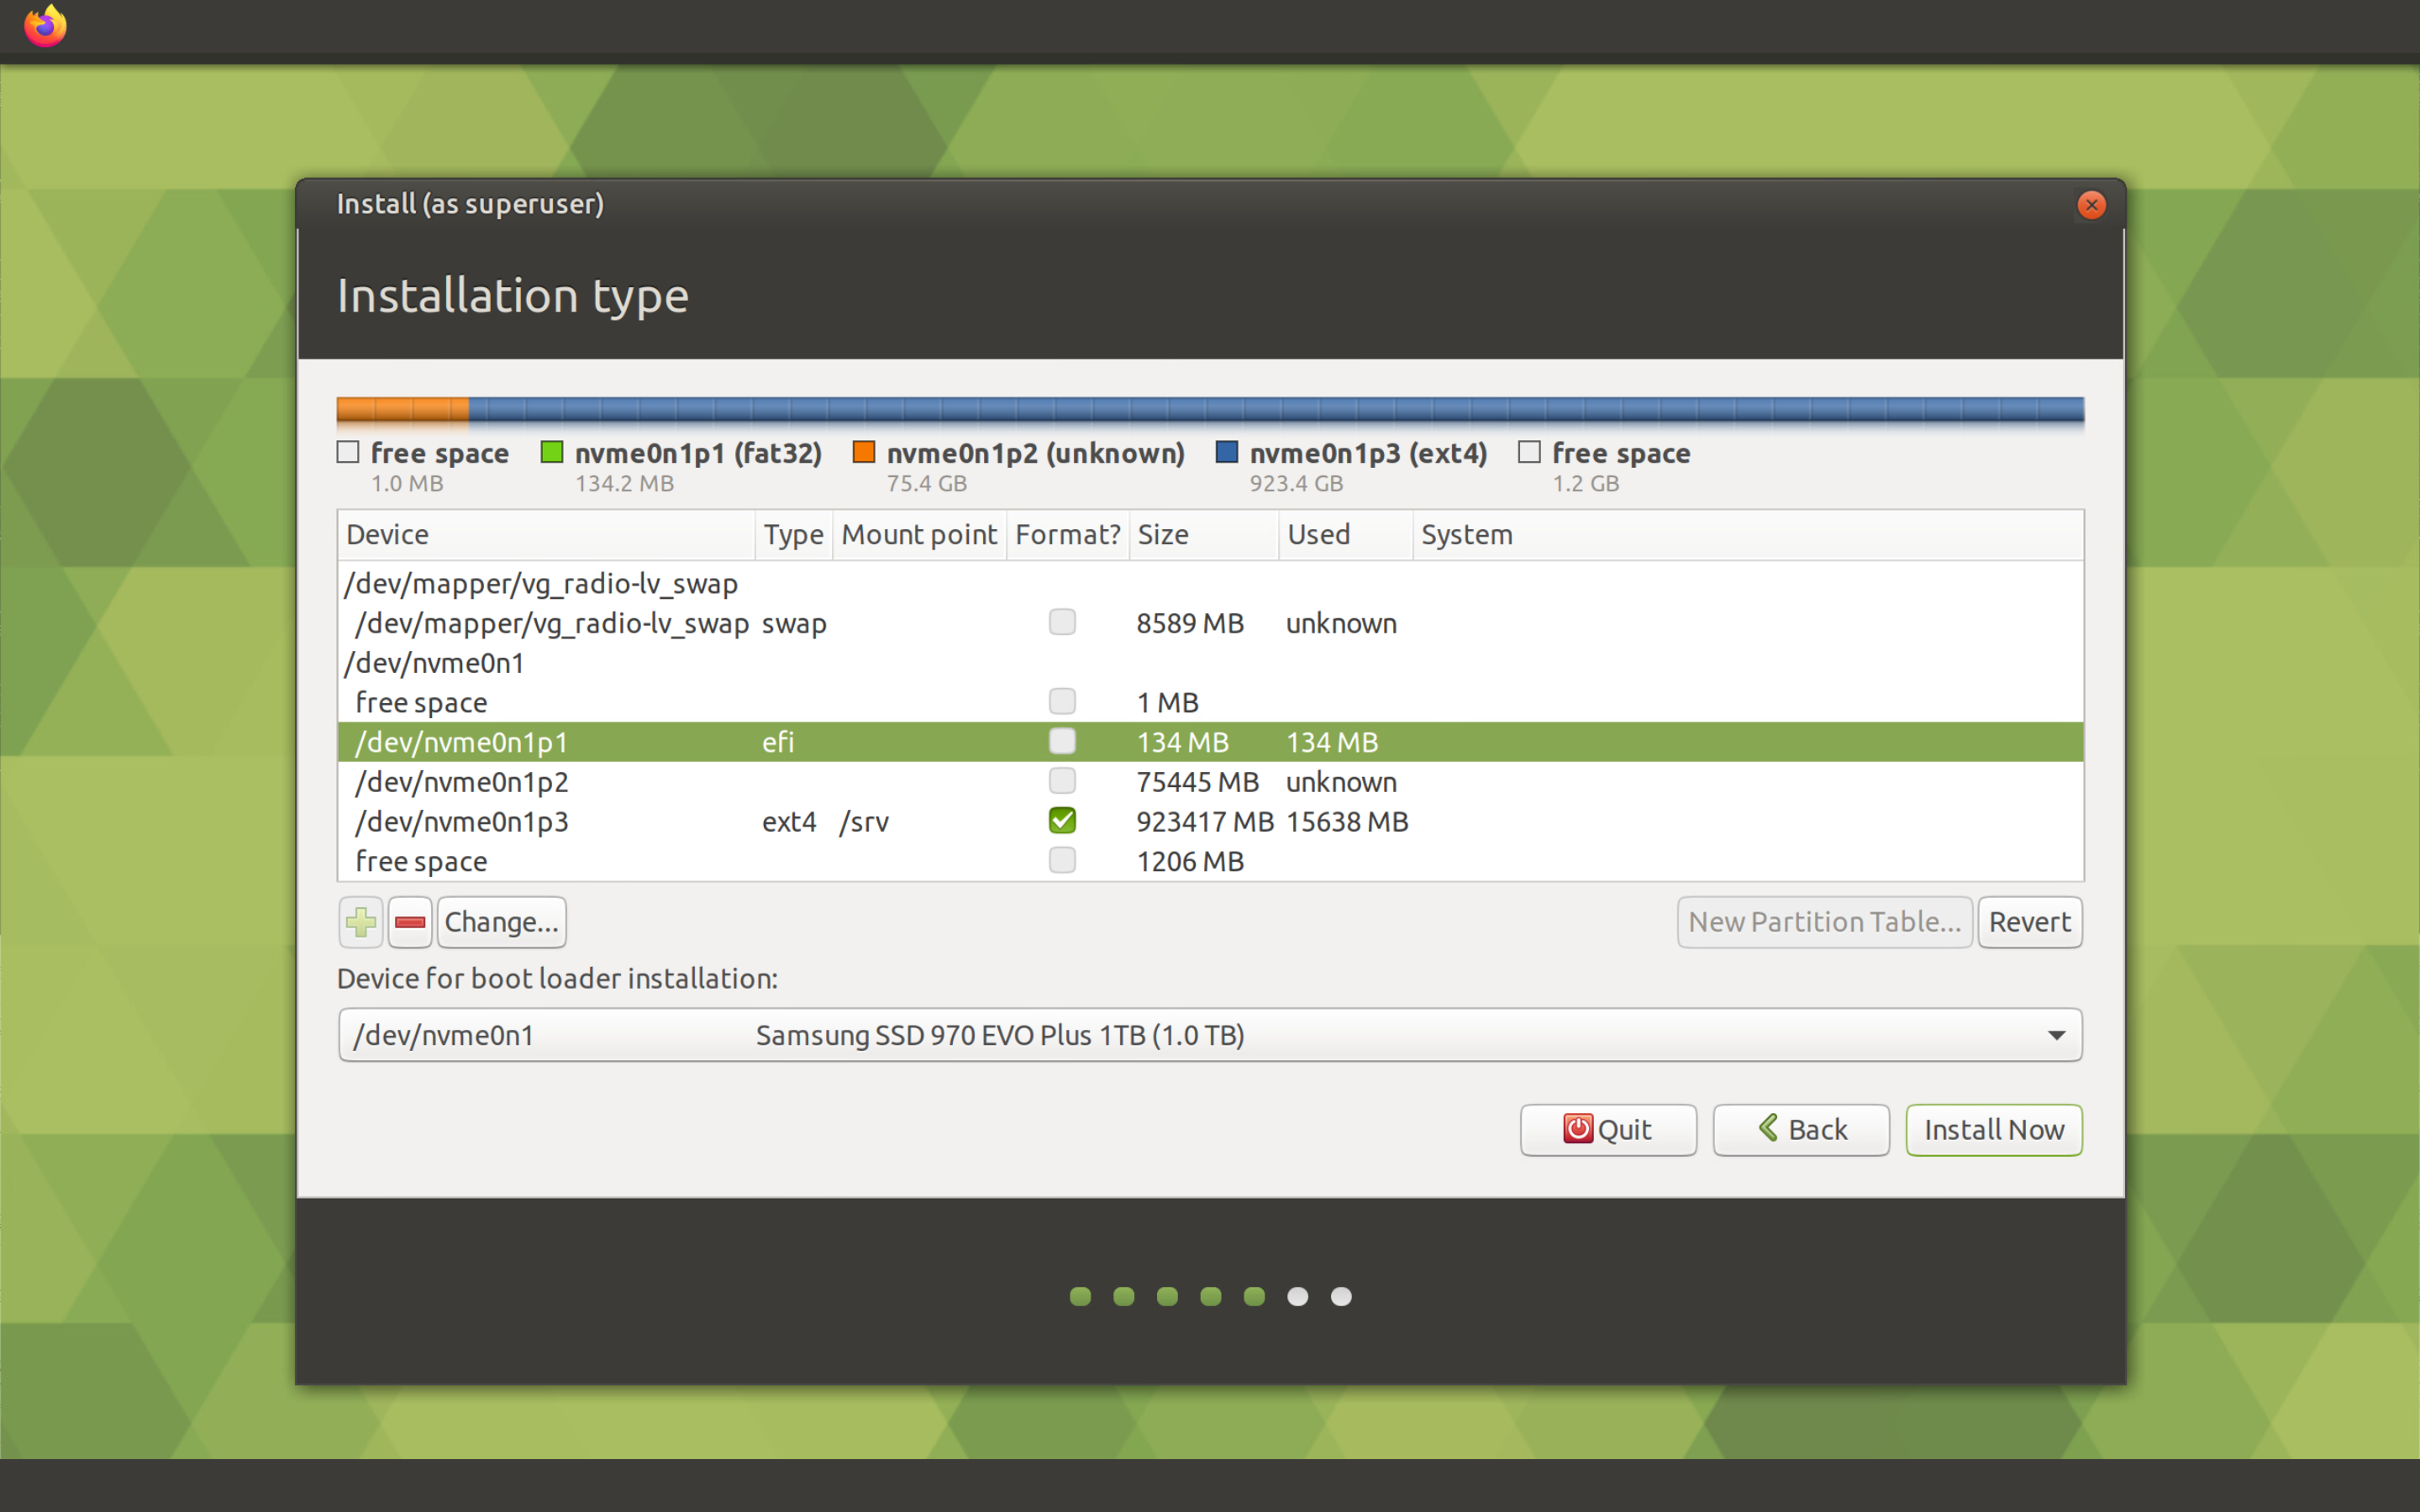
Select the /dev/nvme0n1p3 partition and click the Change button. In the partition editing window, select the Ext4 file system type, check the box for formatting the partition, and select the mount point /srv, then click the OK button.

Finally, select the /dev/nvme0n1p1 partition and click the Change button. In the parition editing window, make sure that the EFI System Partition value is selected in the Use as field and click the OK button.
As a device for installing the boot loader, we leave the default disk /dev/nvme0n1.
Now click on the Install Now button to start installing Ubuntu MATE on our disk.
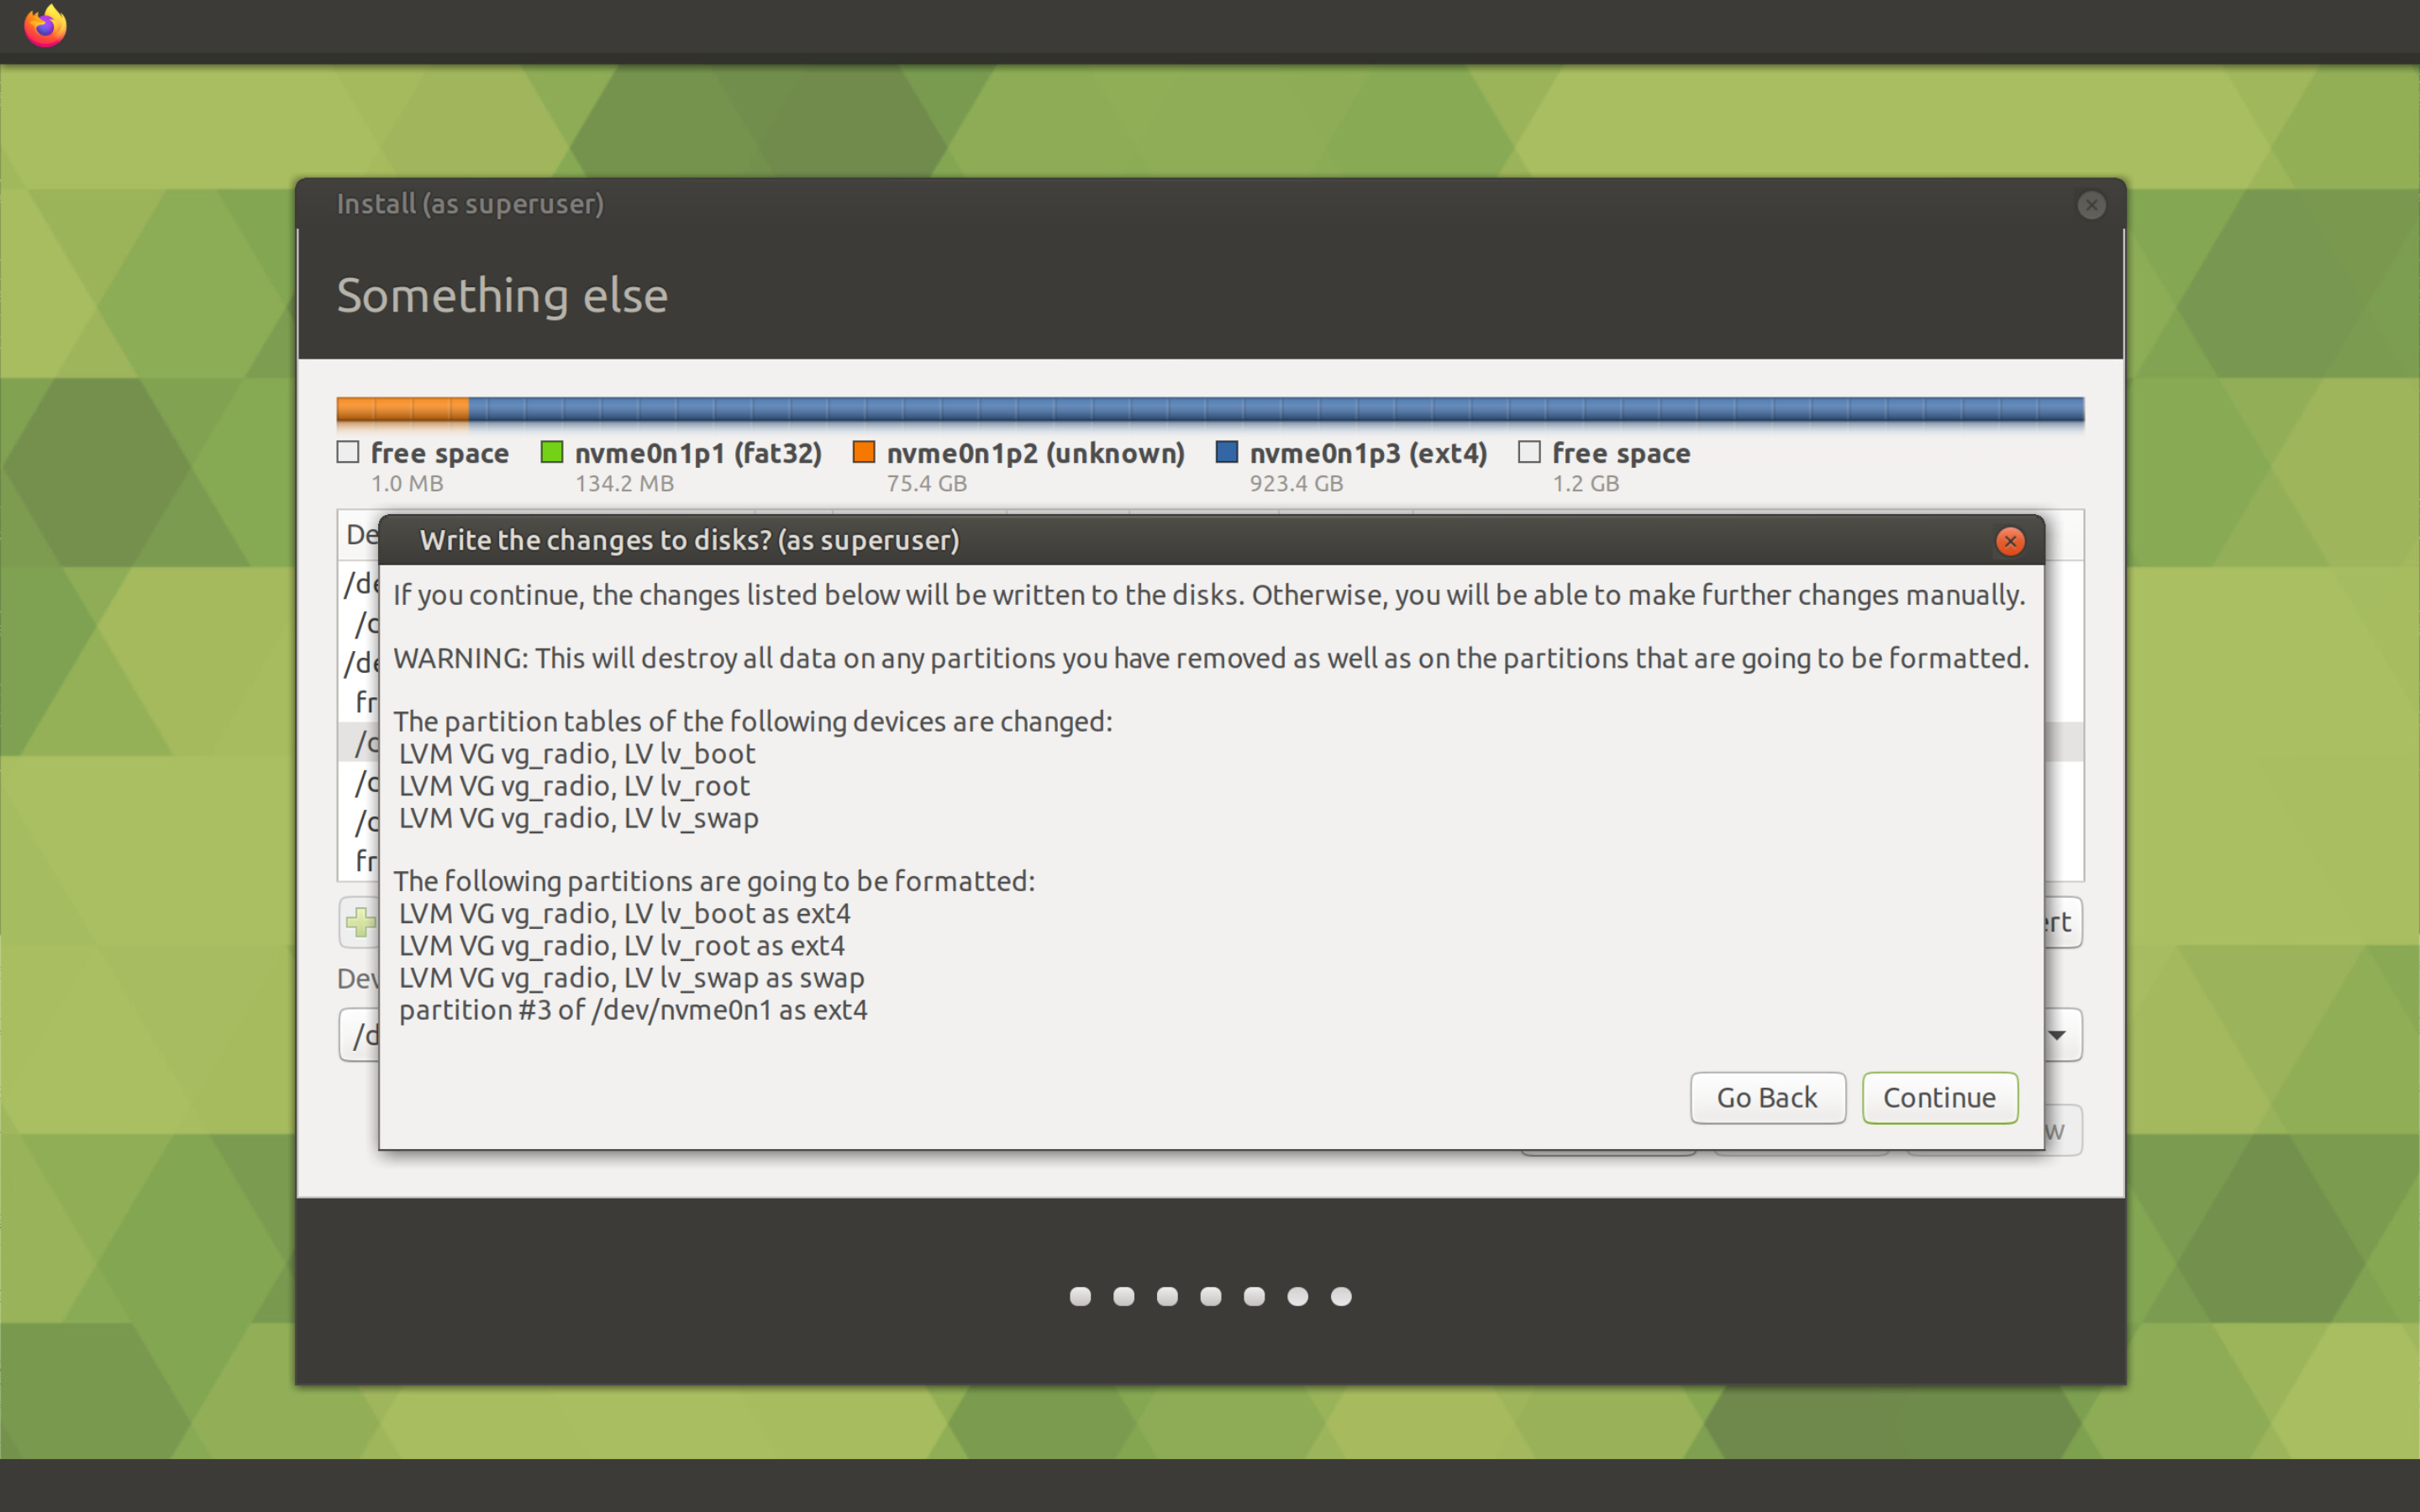
The installer will show us the changes to the partitions that we have just made. To continue the installation, click the Continue button.
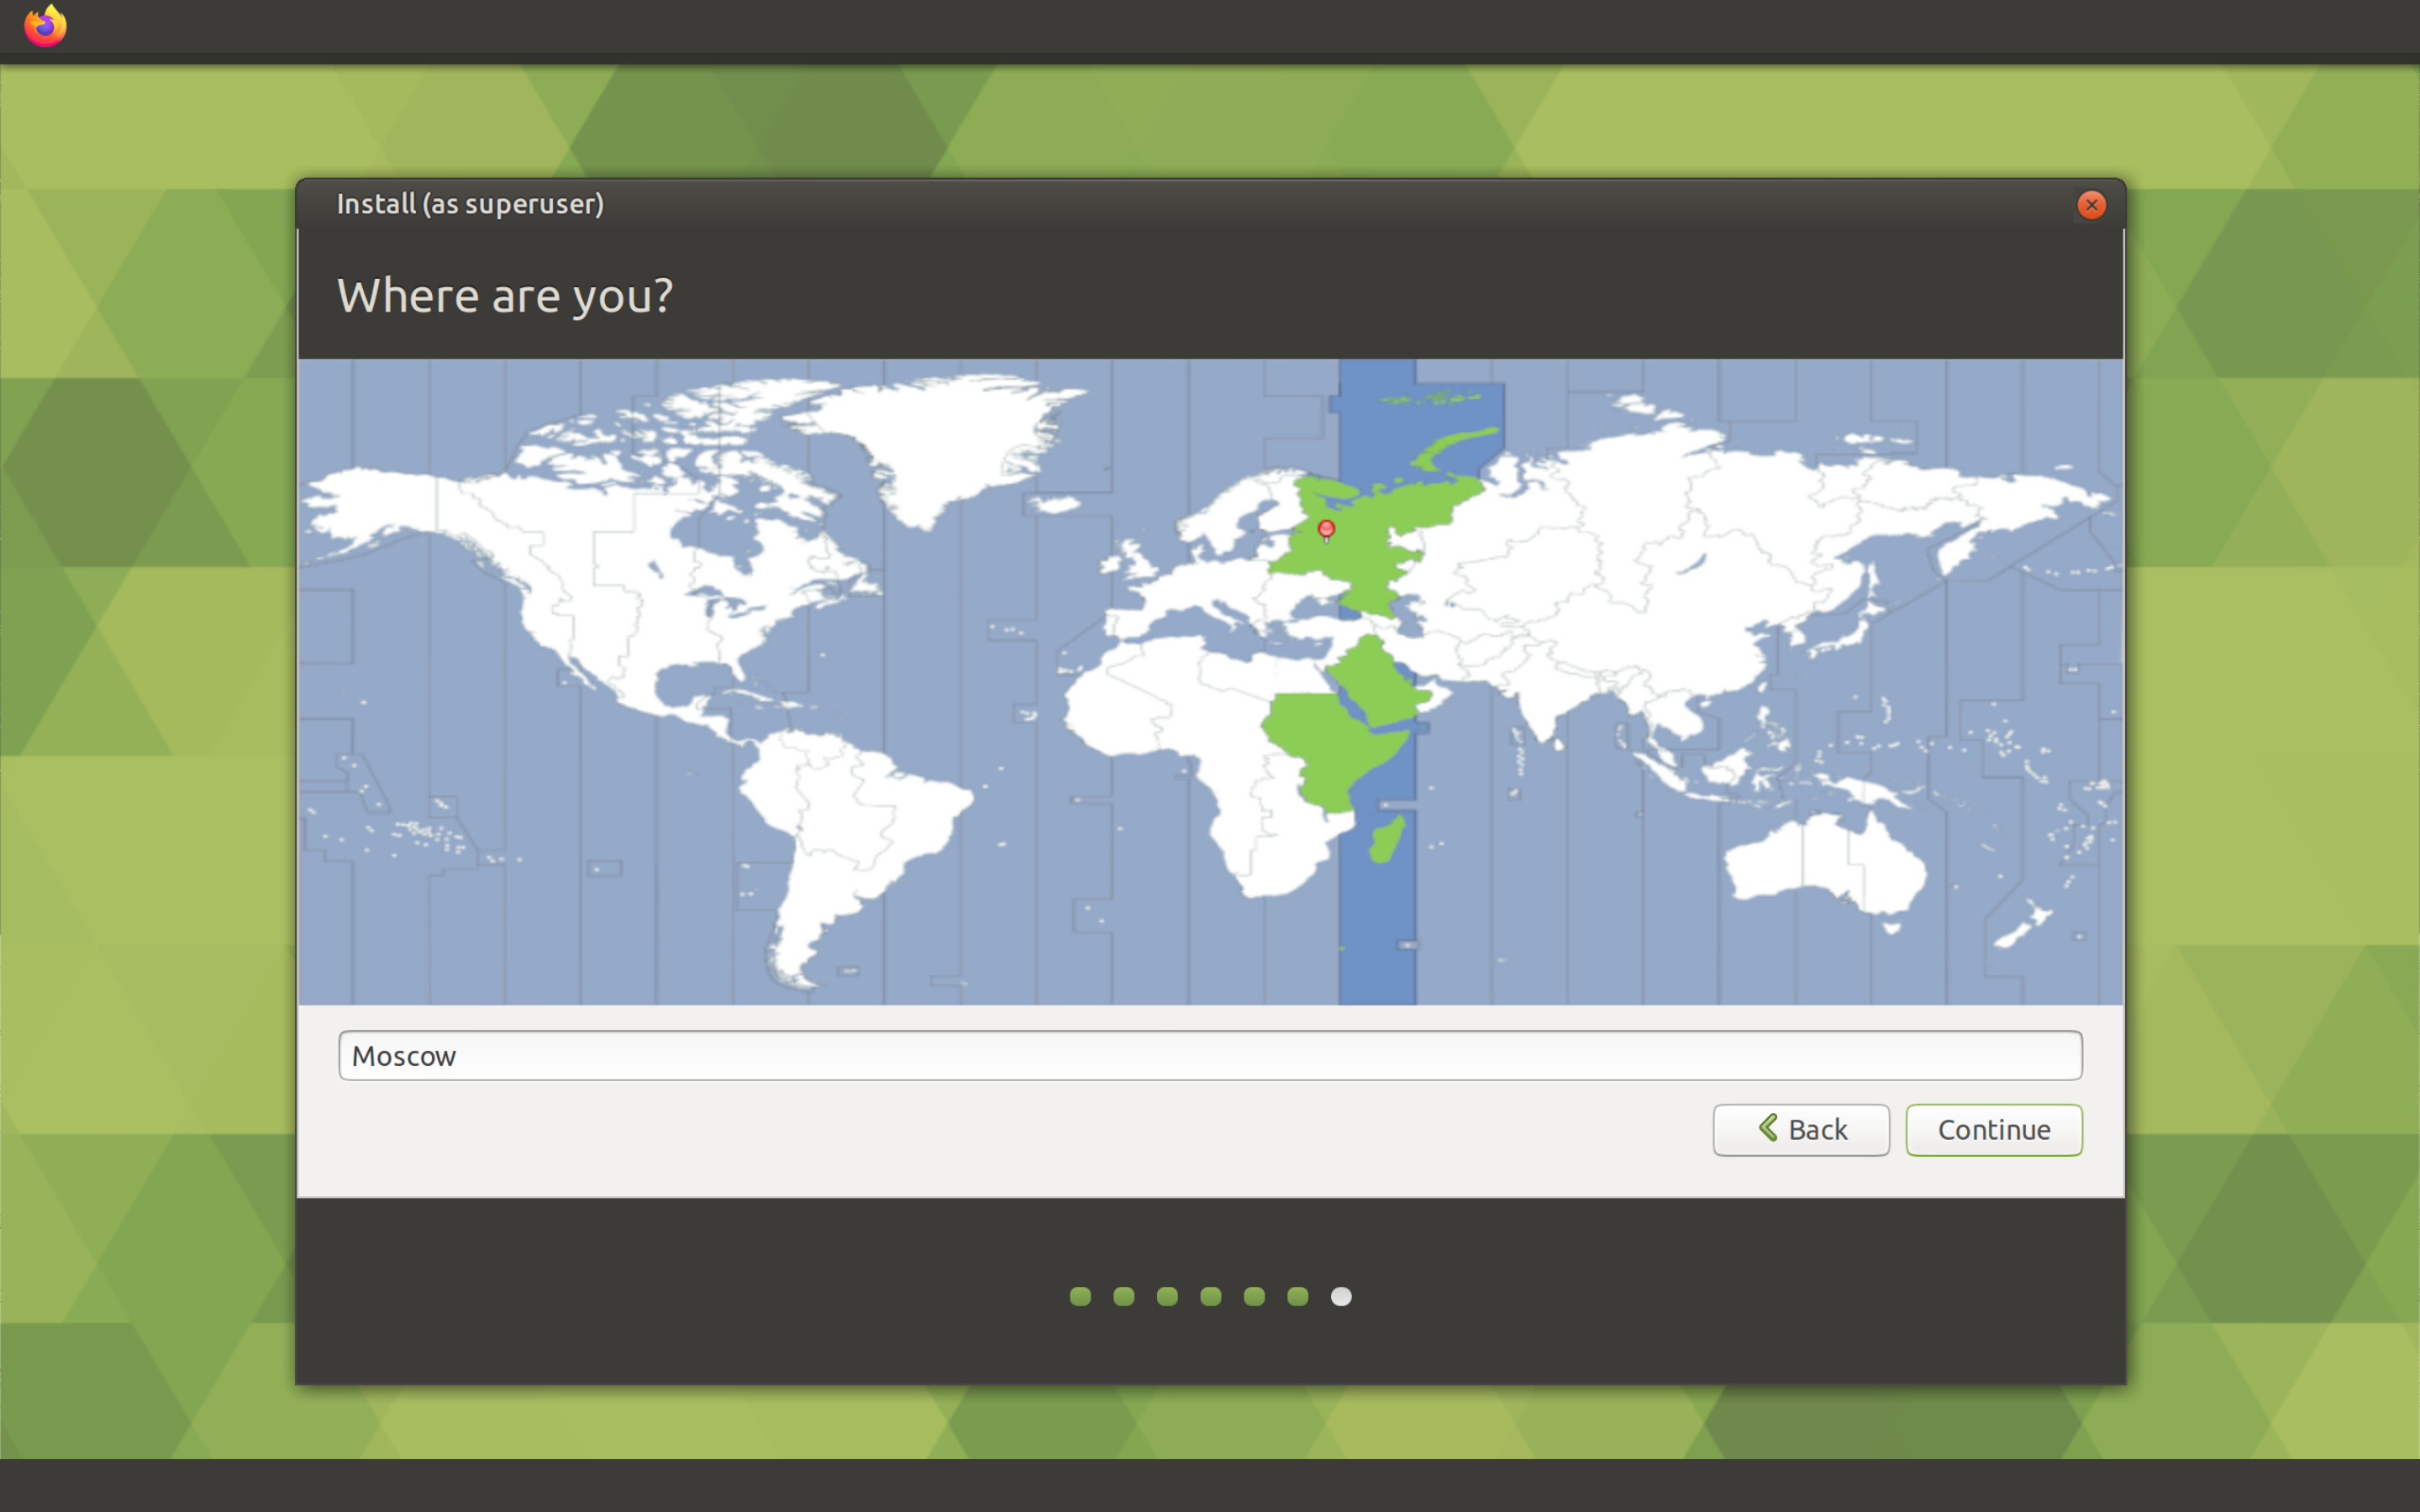
The penultimate step before installation is to choose the time zone. Choose yours and click on the Continue button.
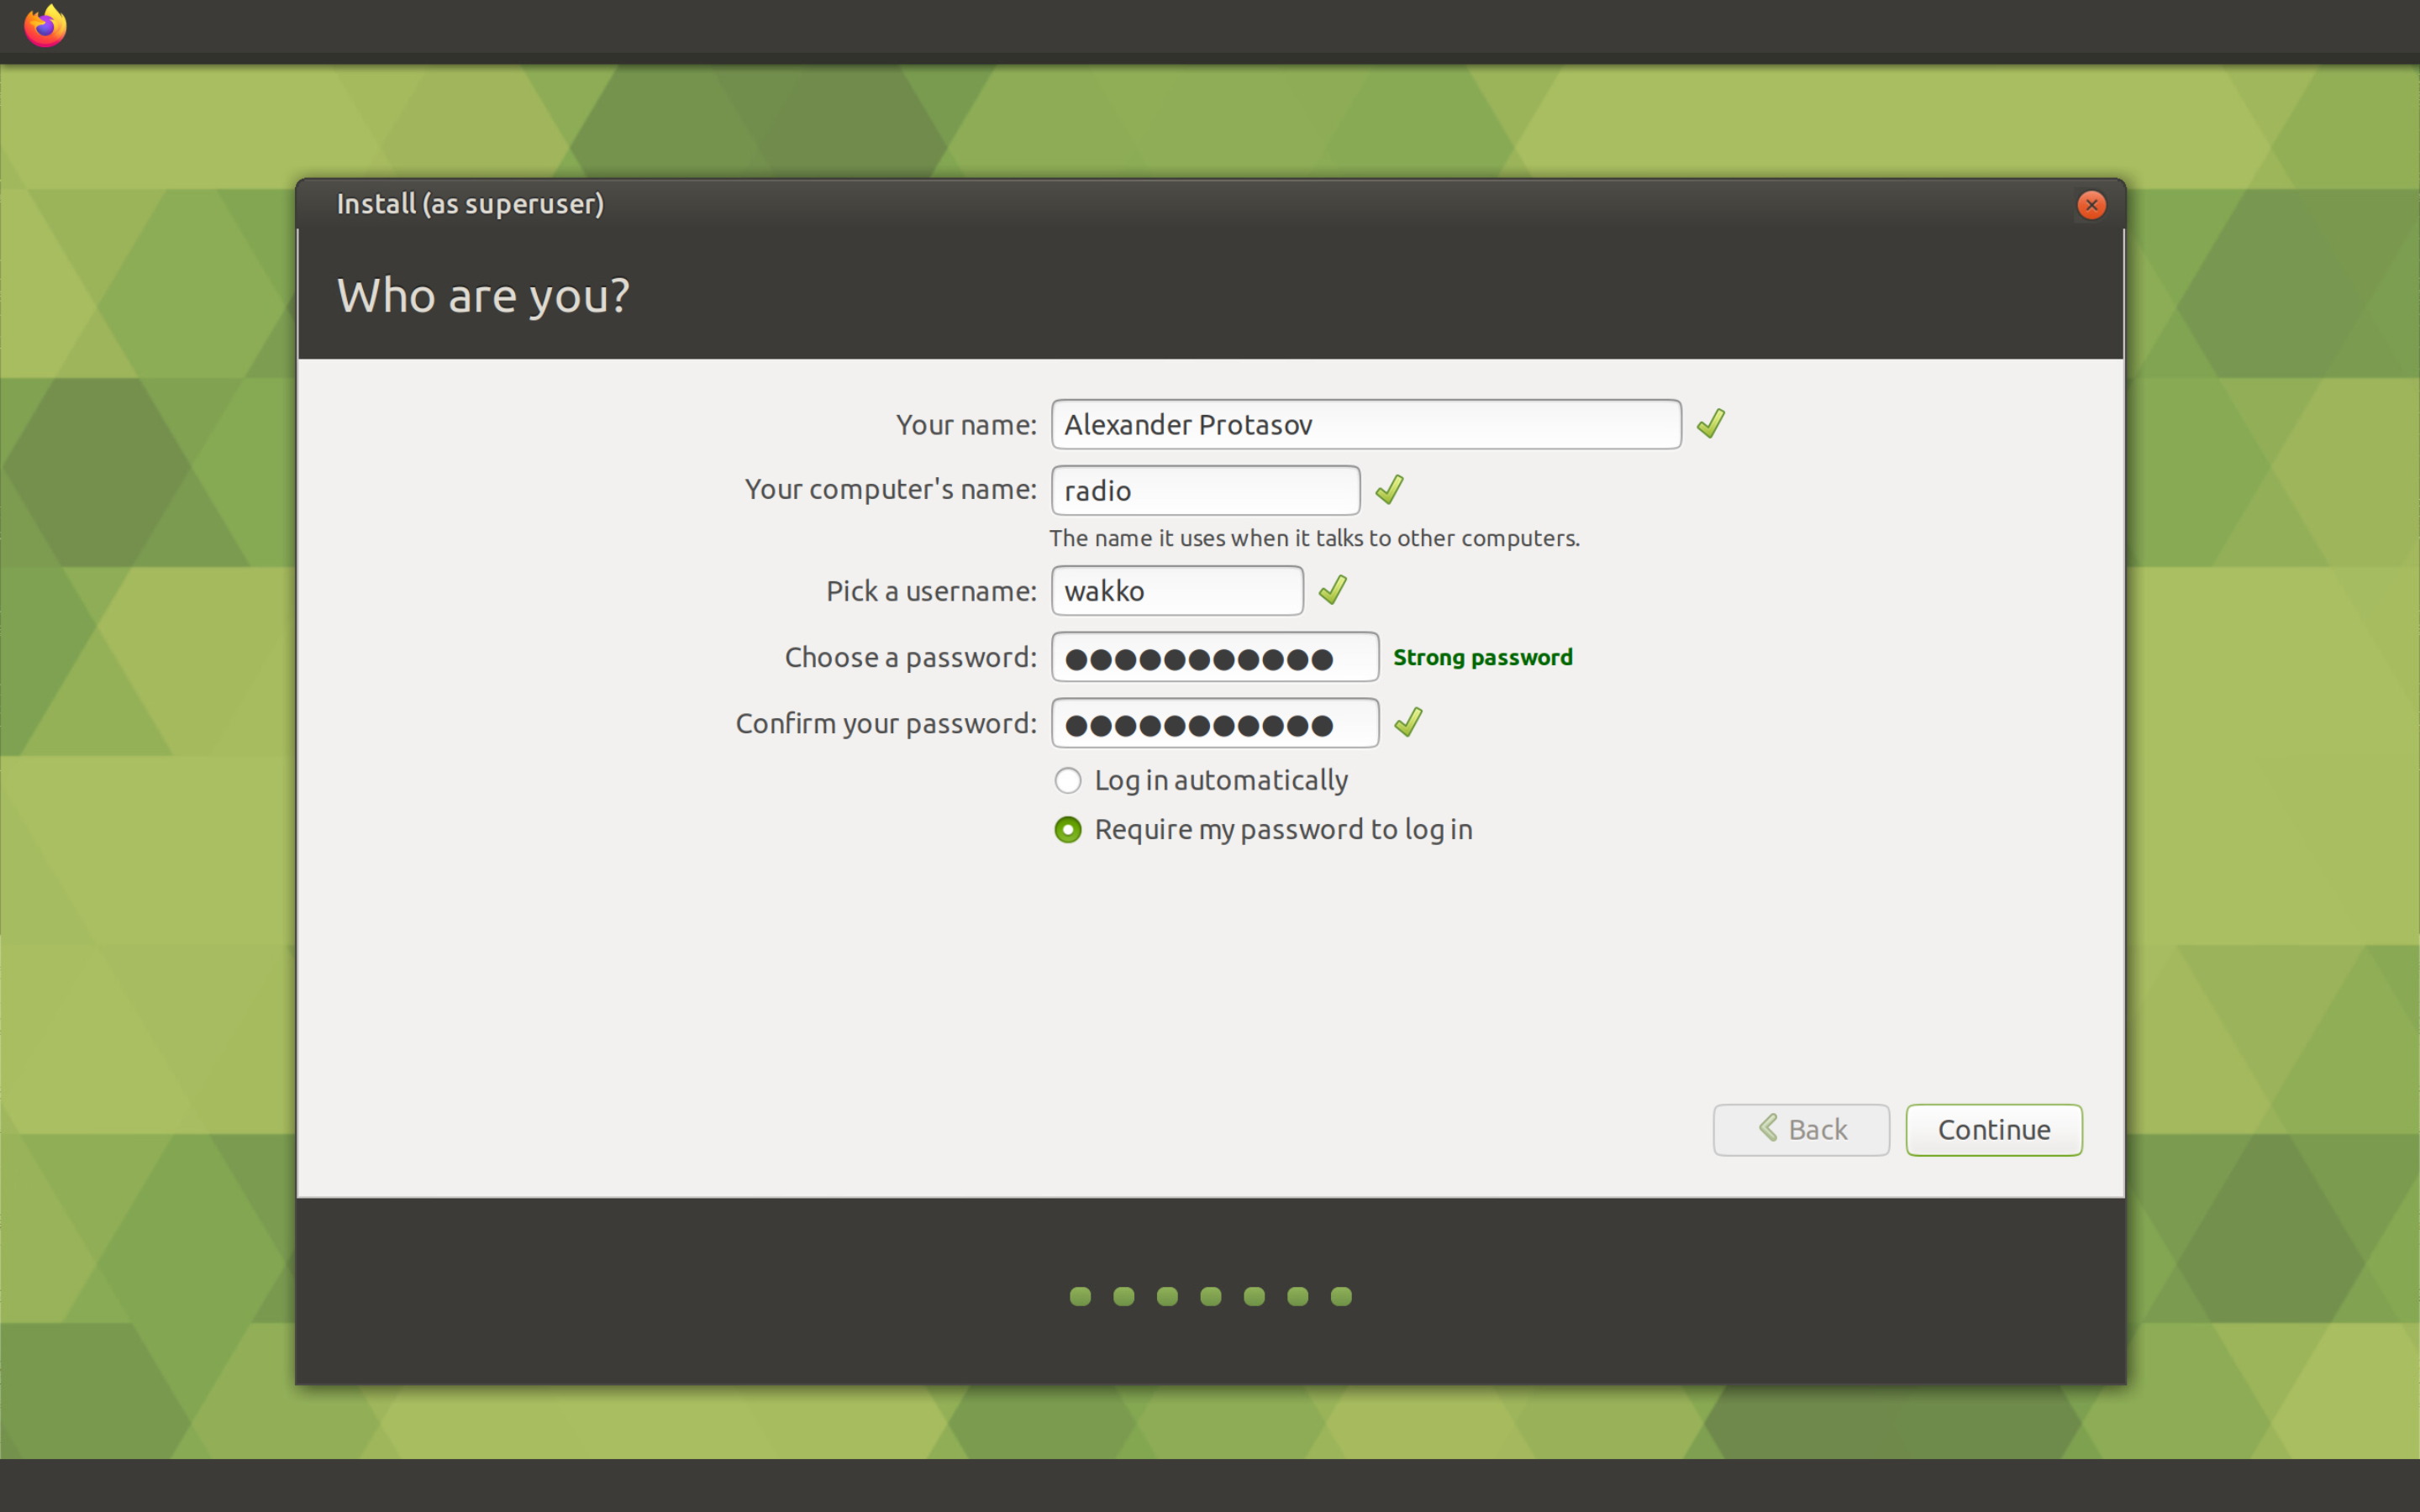
Before the installation itself, you will need to enter the name of the computer and the data necessary to create the user under which we will work. Fill out the form and click the Continue button.


After installation, you will see a message that the installation is complete, where you will need to click the Restart Now button to restart the virtual machine.
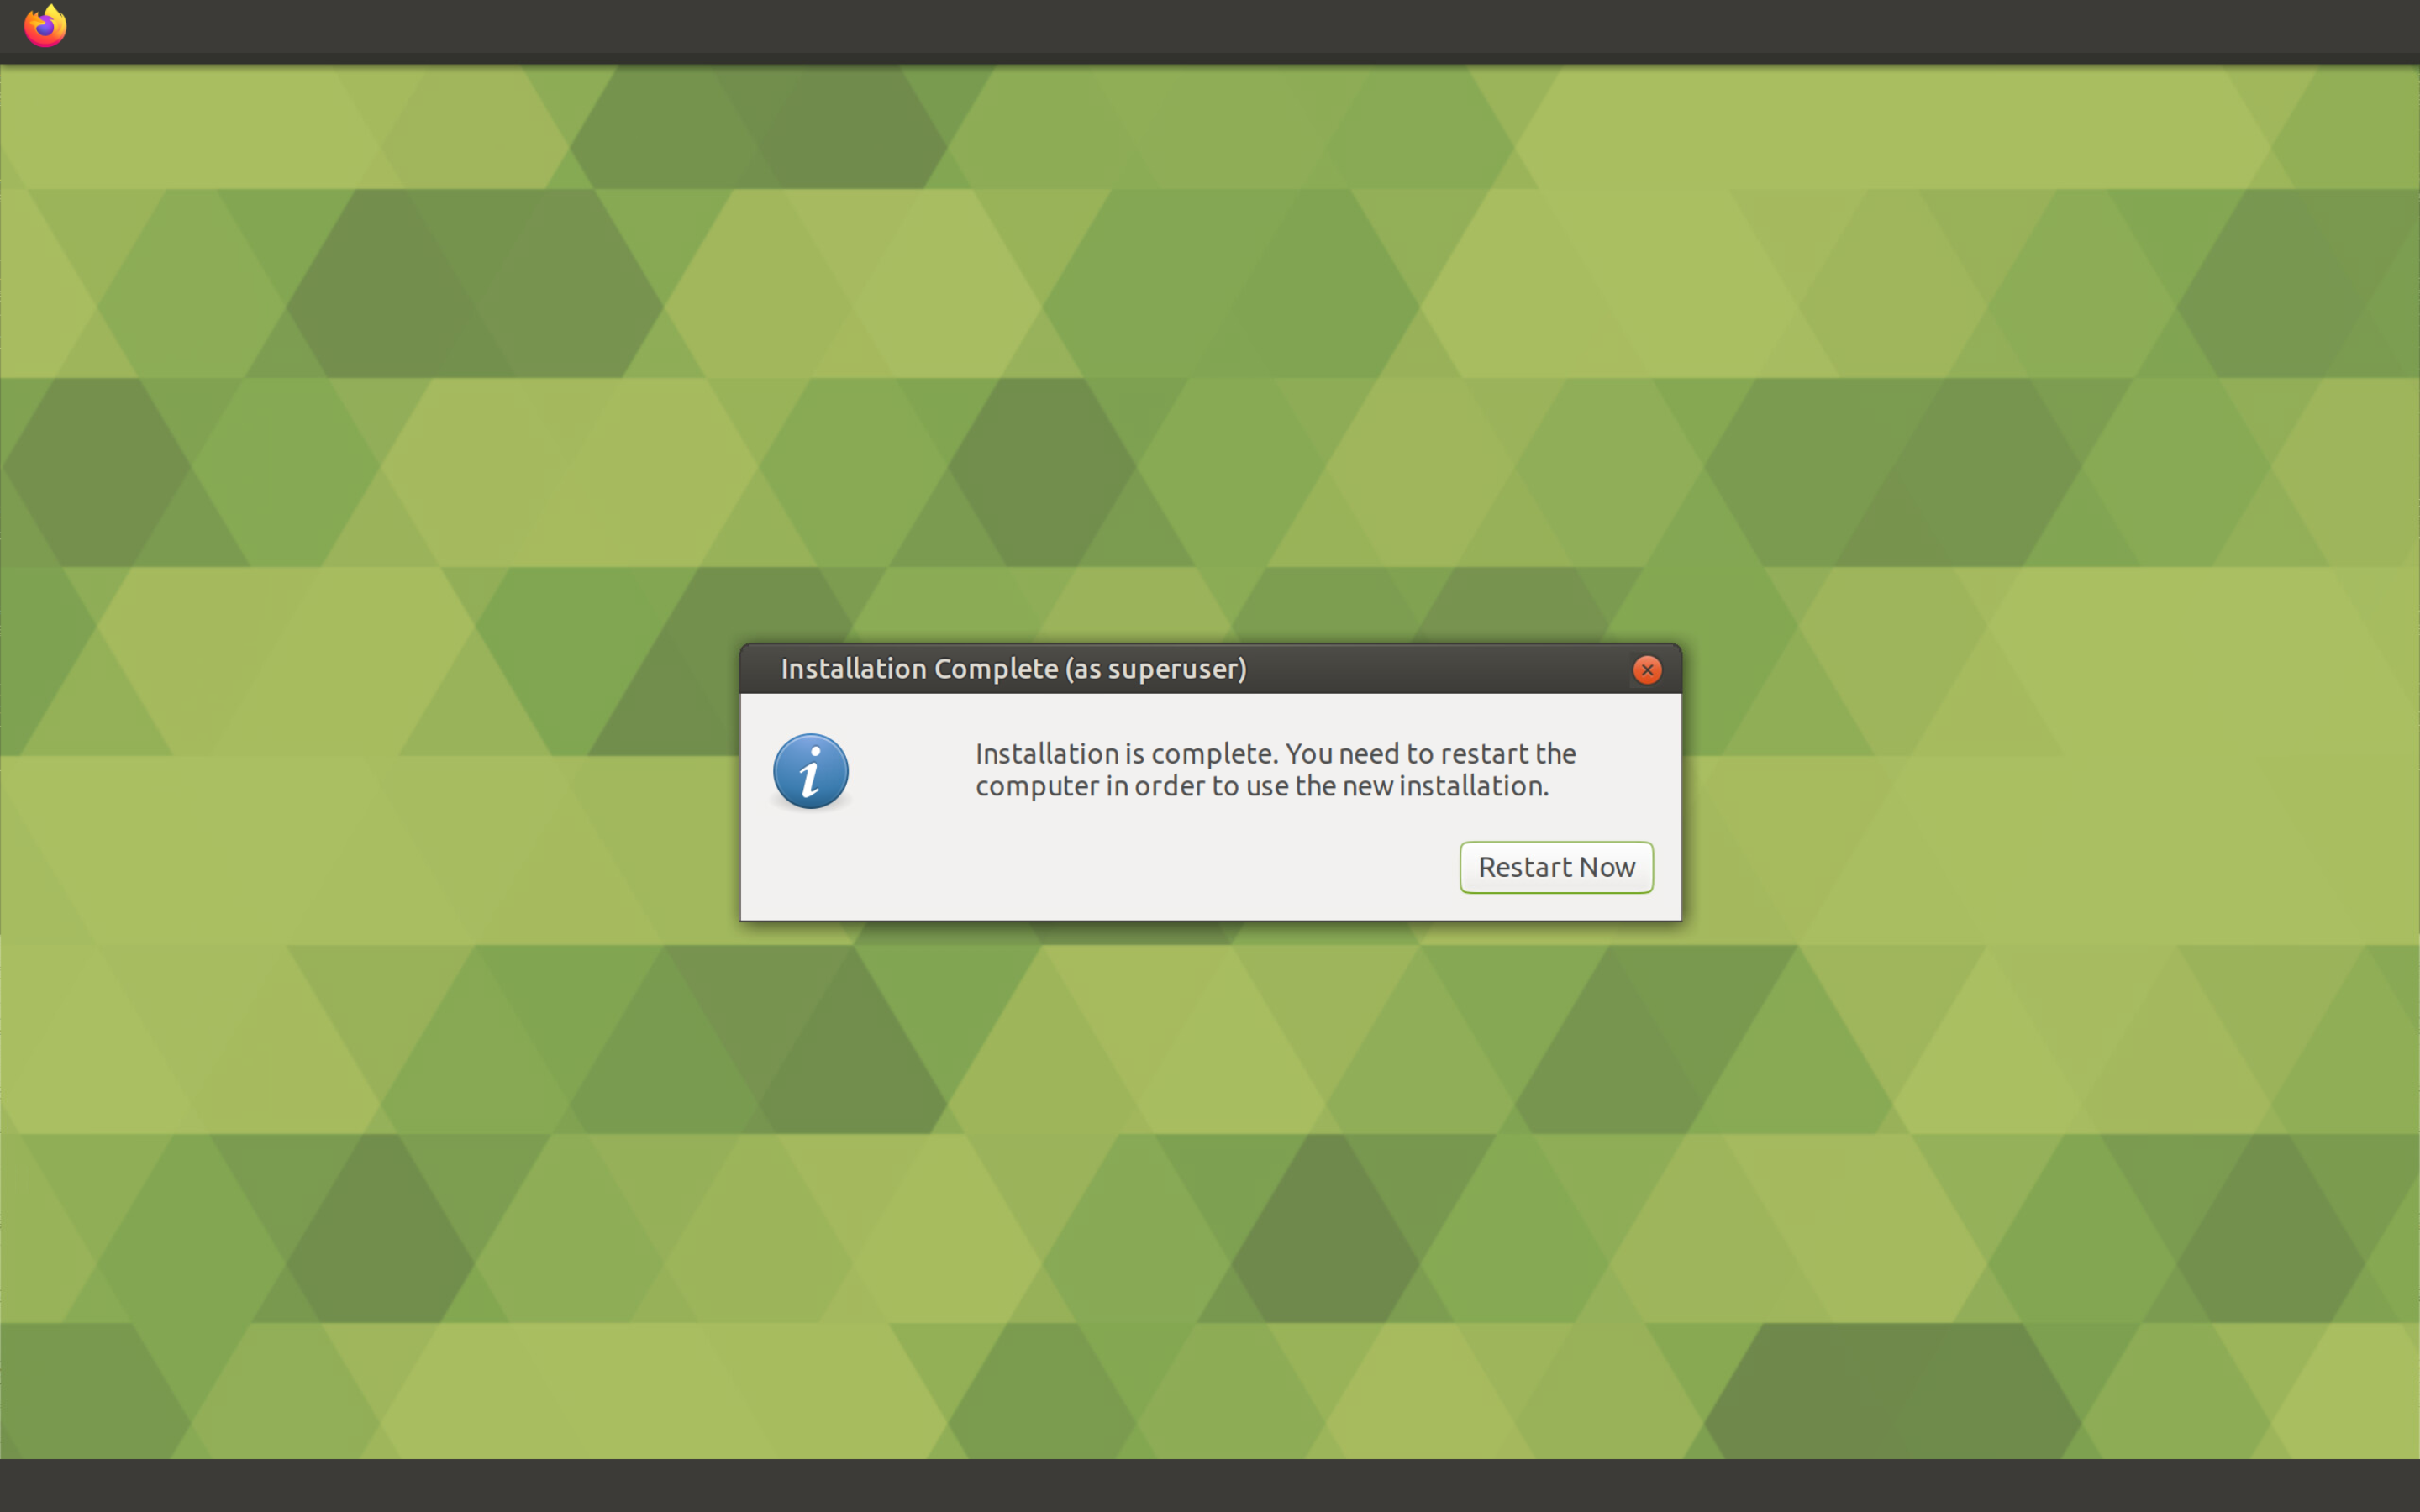
Before restarting, the installer will ask us to remove the mounted one .iso image and press the Enter button to continue. But since the installer itself will execute the eject command before displaying this message – the .iso image is mounted automatically, so just press the Enter button.

Updating the system after installation.
After we have logged in for the first time, the Welcome app will launch, which will immediately ask if we want to collect telemetry and send it to developers. Click on the Do Not Send button.

In the next window of the application, uncheck the Open Welcome when I log on item and click the Close button so that this application will no longer run.

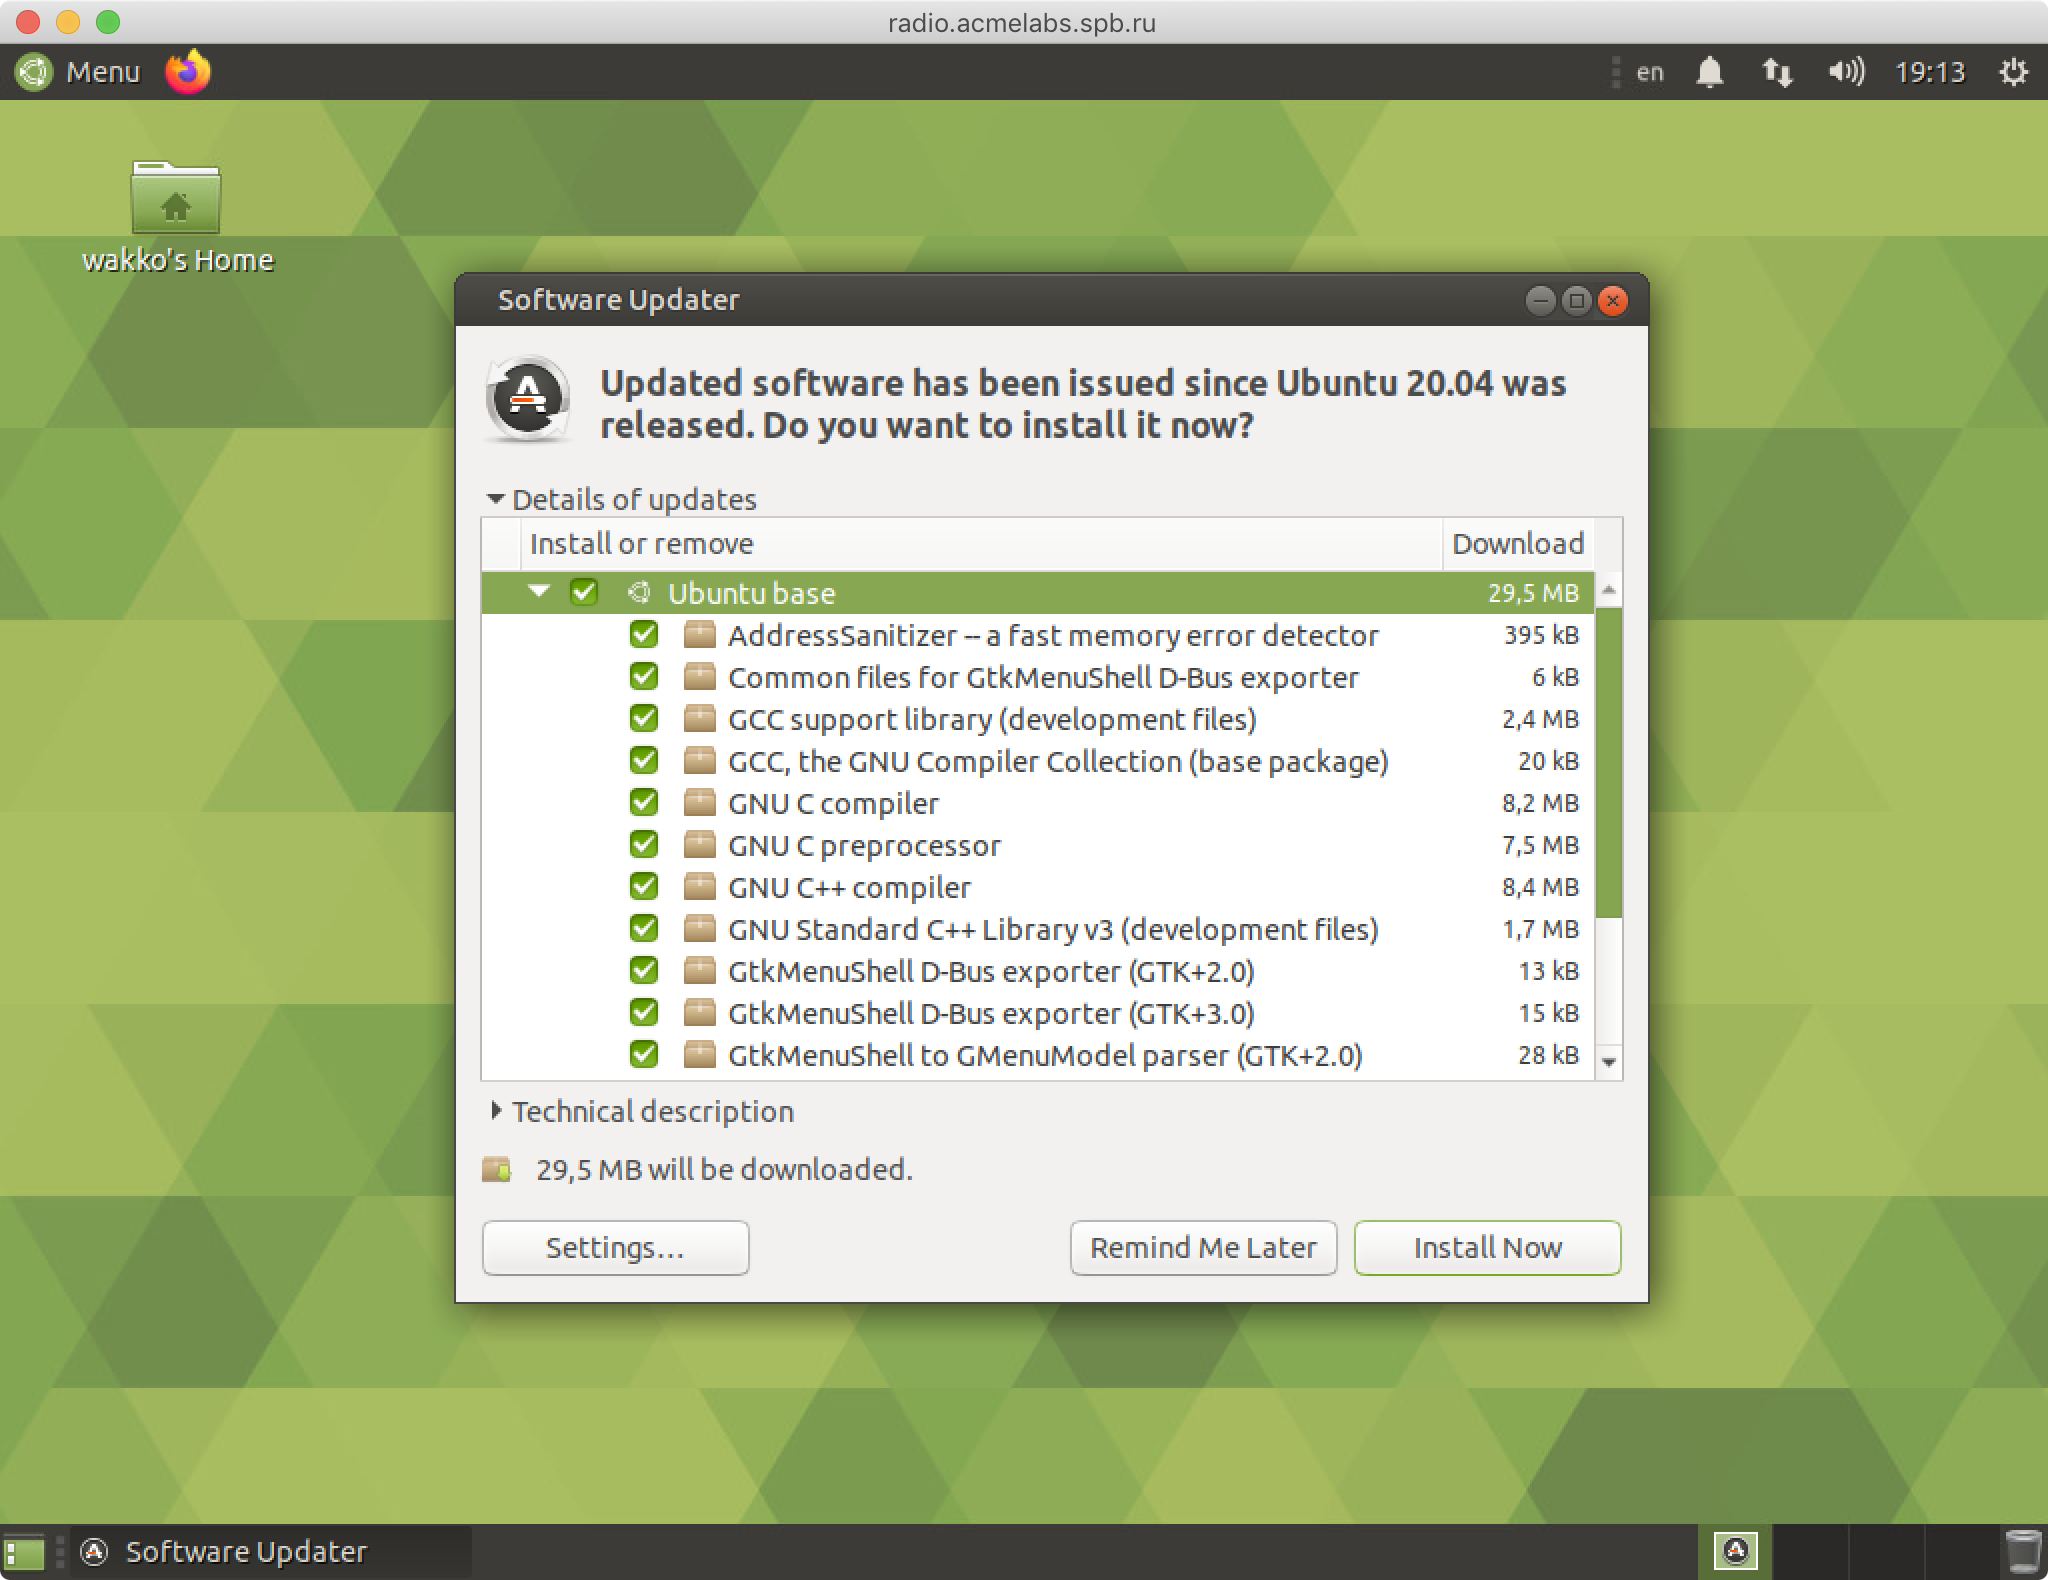
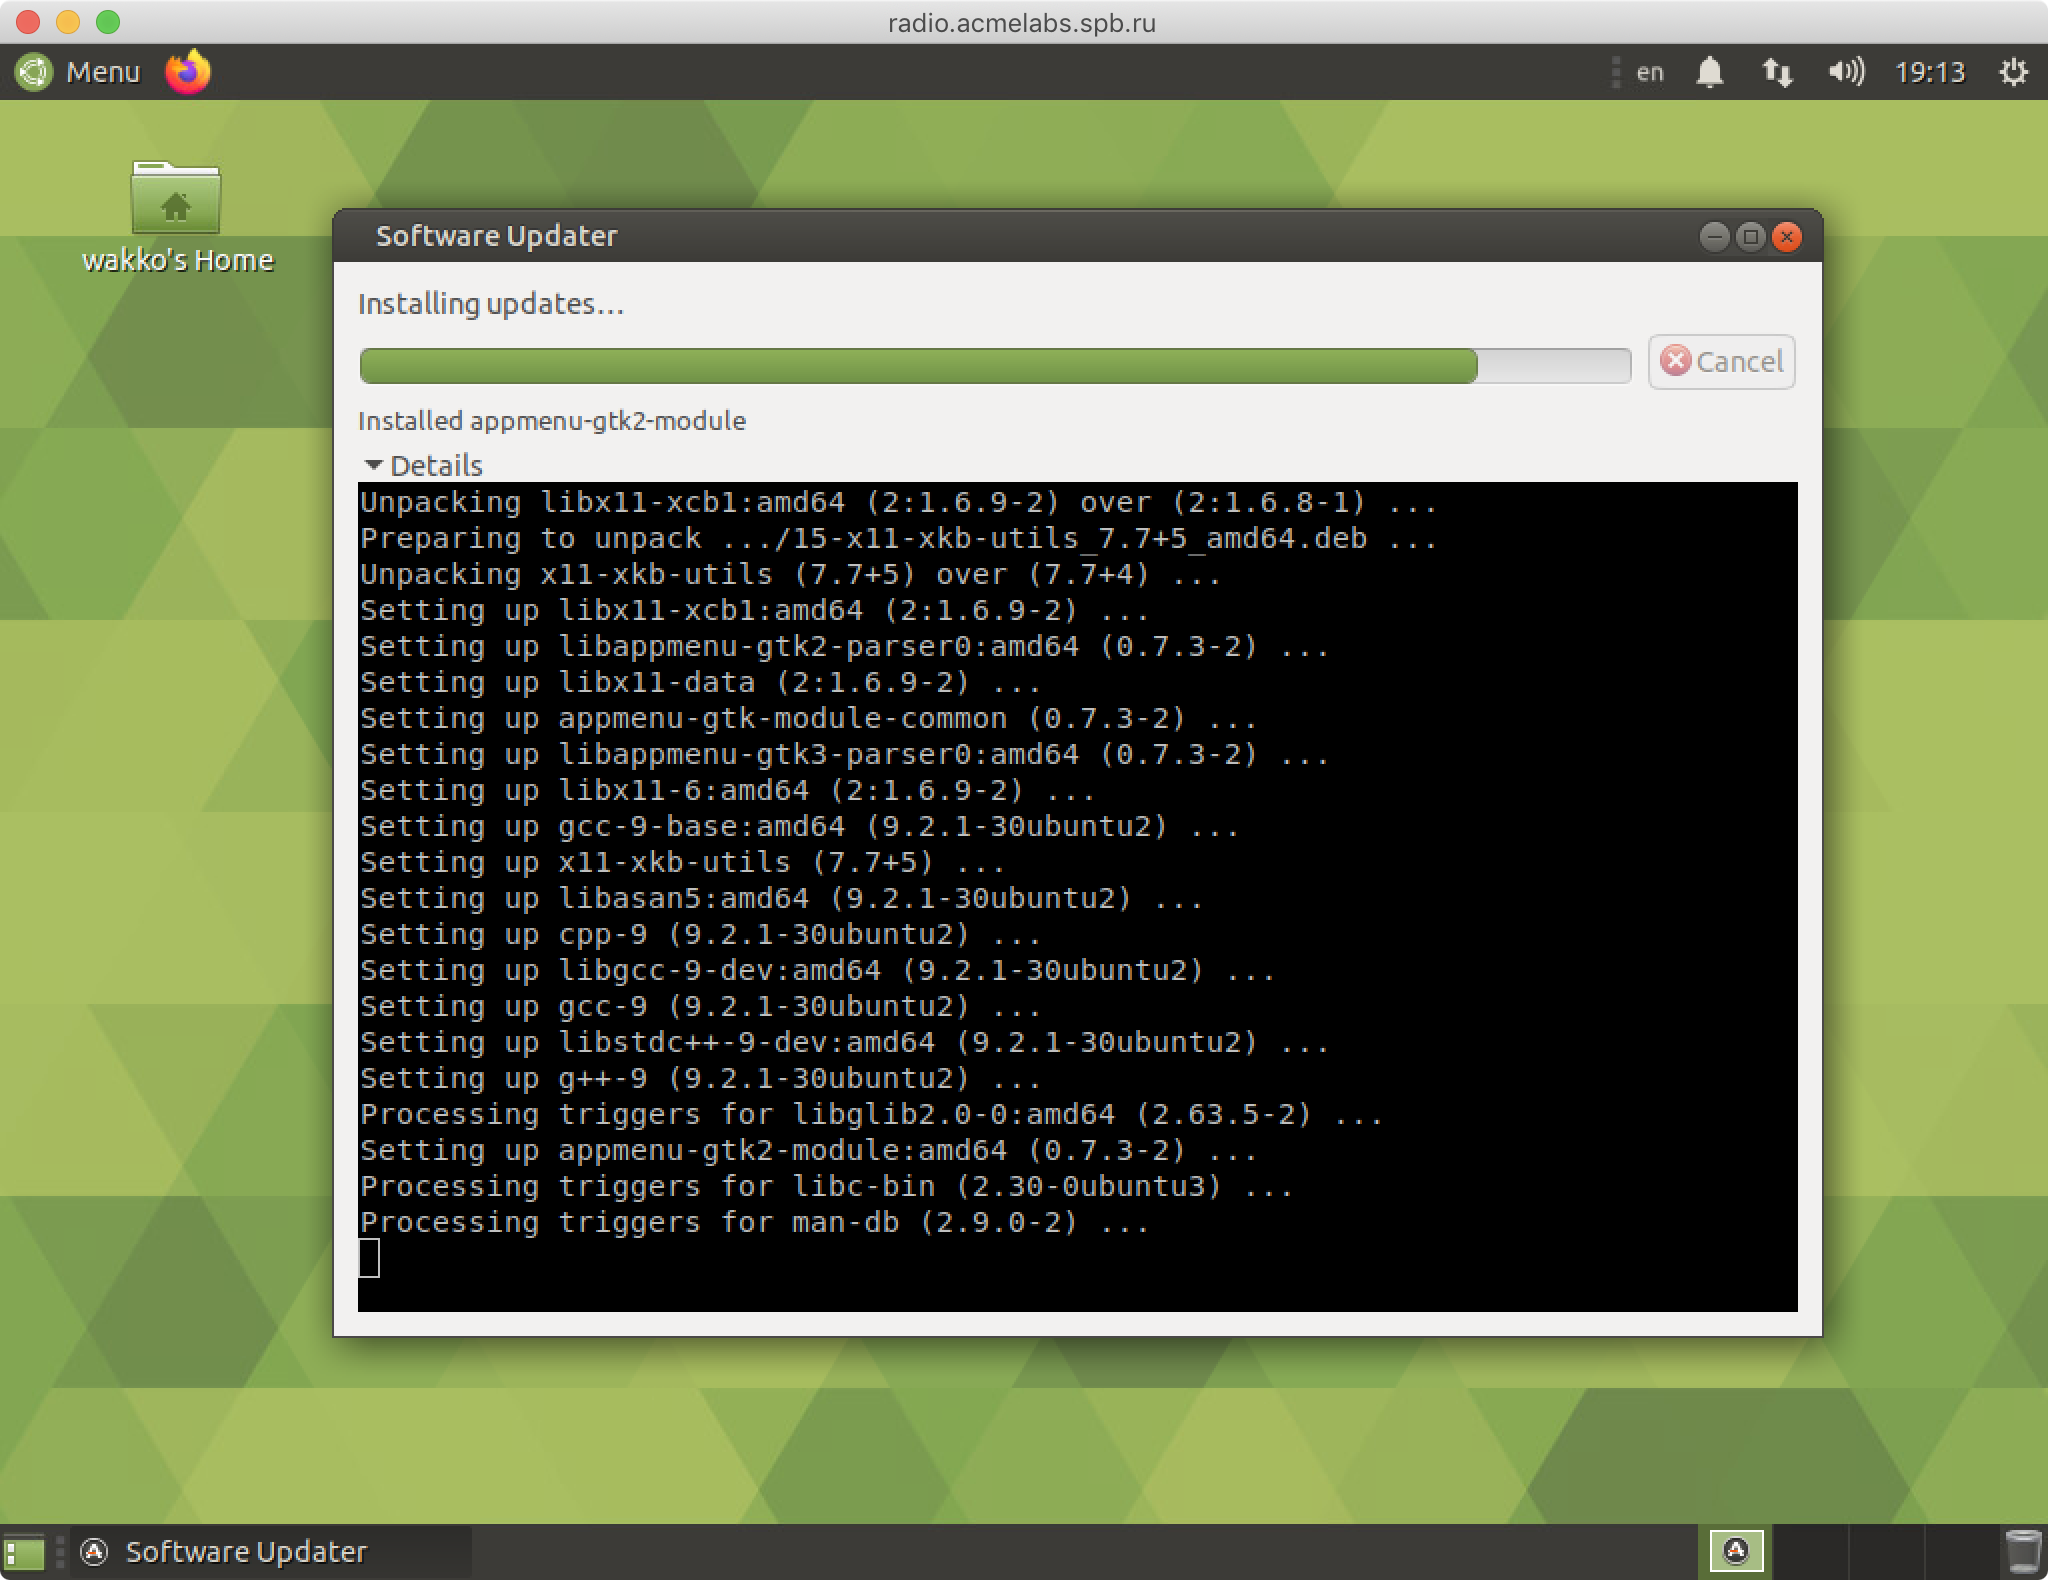
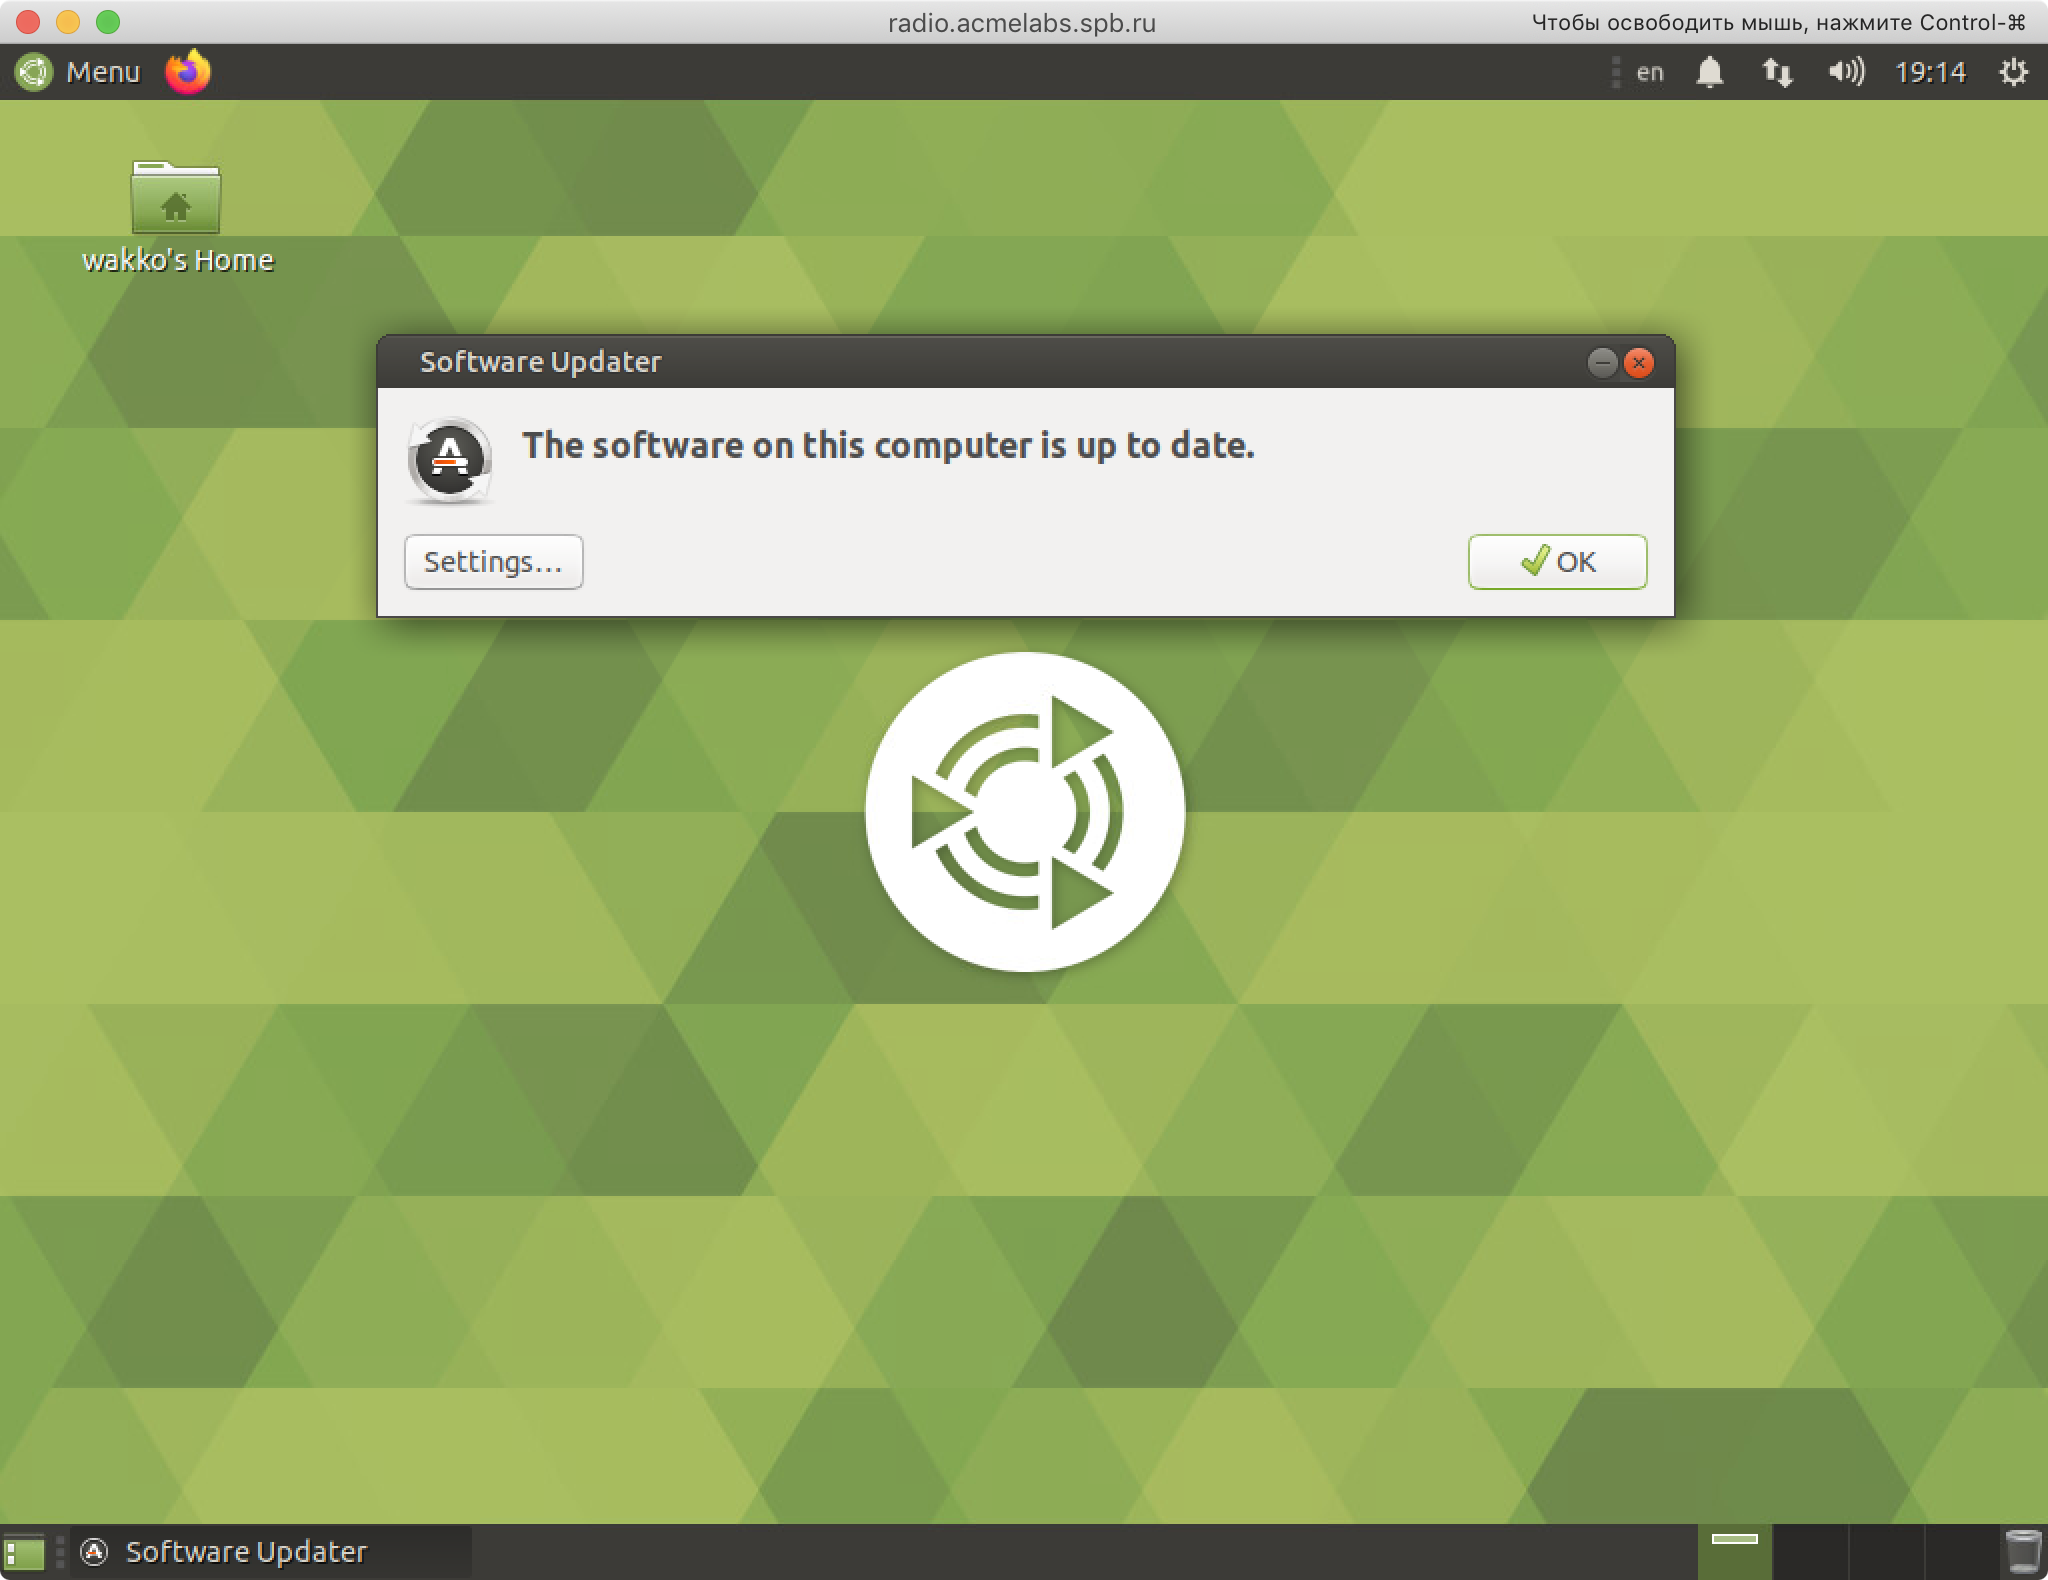
As you can see on the screen, we already have Software Updater running, just click on the name of this app on the taskbar. As we can see, there are quite a lot of updates, click on the Install Now button to install them. Applications will first be downloaded and then installed. After installing the updates, a message will appear in which you may need to click the Restart Now button to restart. But if updates for system packages (like the kernel) were not installed – there will be no need to reboot, then just click on the OK button.
Setup after installation.
Setting up the display.
After restarting Ubuntu MATE will start in graphical mode, but with a resolution of 1024x768.
If you use Parallels Desktop, you can change the resolution only after installing Parallels Tools. In the Parallels Desktop menu, select Install Parallels Tools in the Actions menu. After mounting an image with Parallels Tools, this image is automatically mounted and opened in Ubuntu. Double-click the
install-guiicon to install it. Enter the password and click OK. After installation, click on the Reboot button.
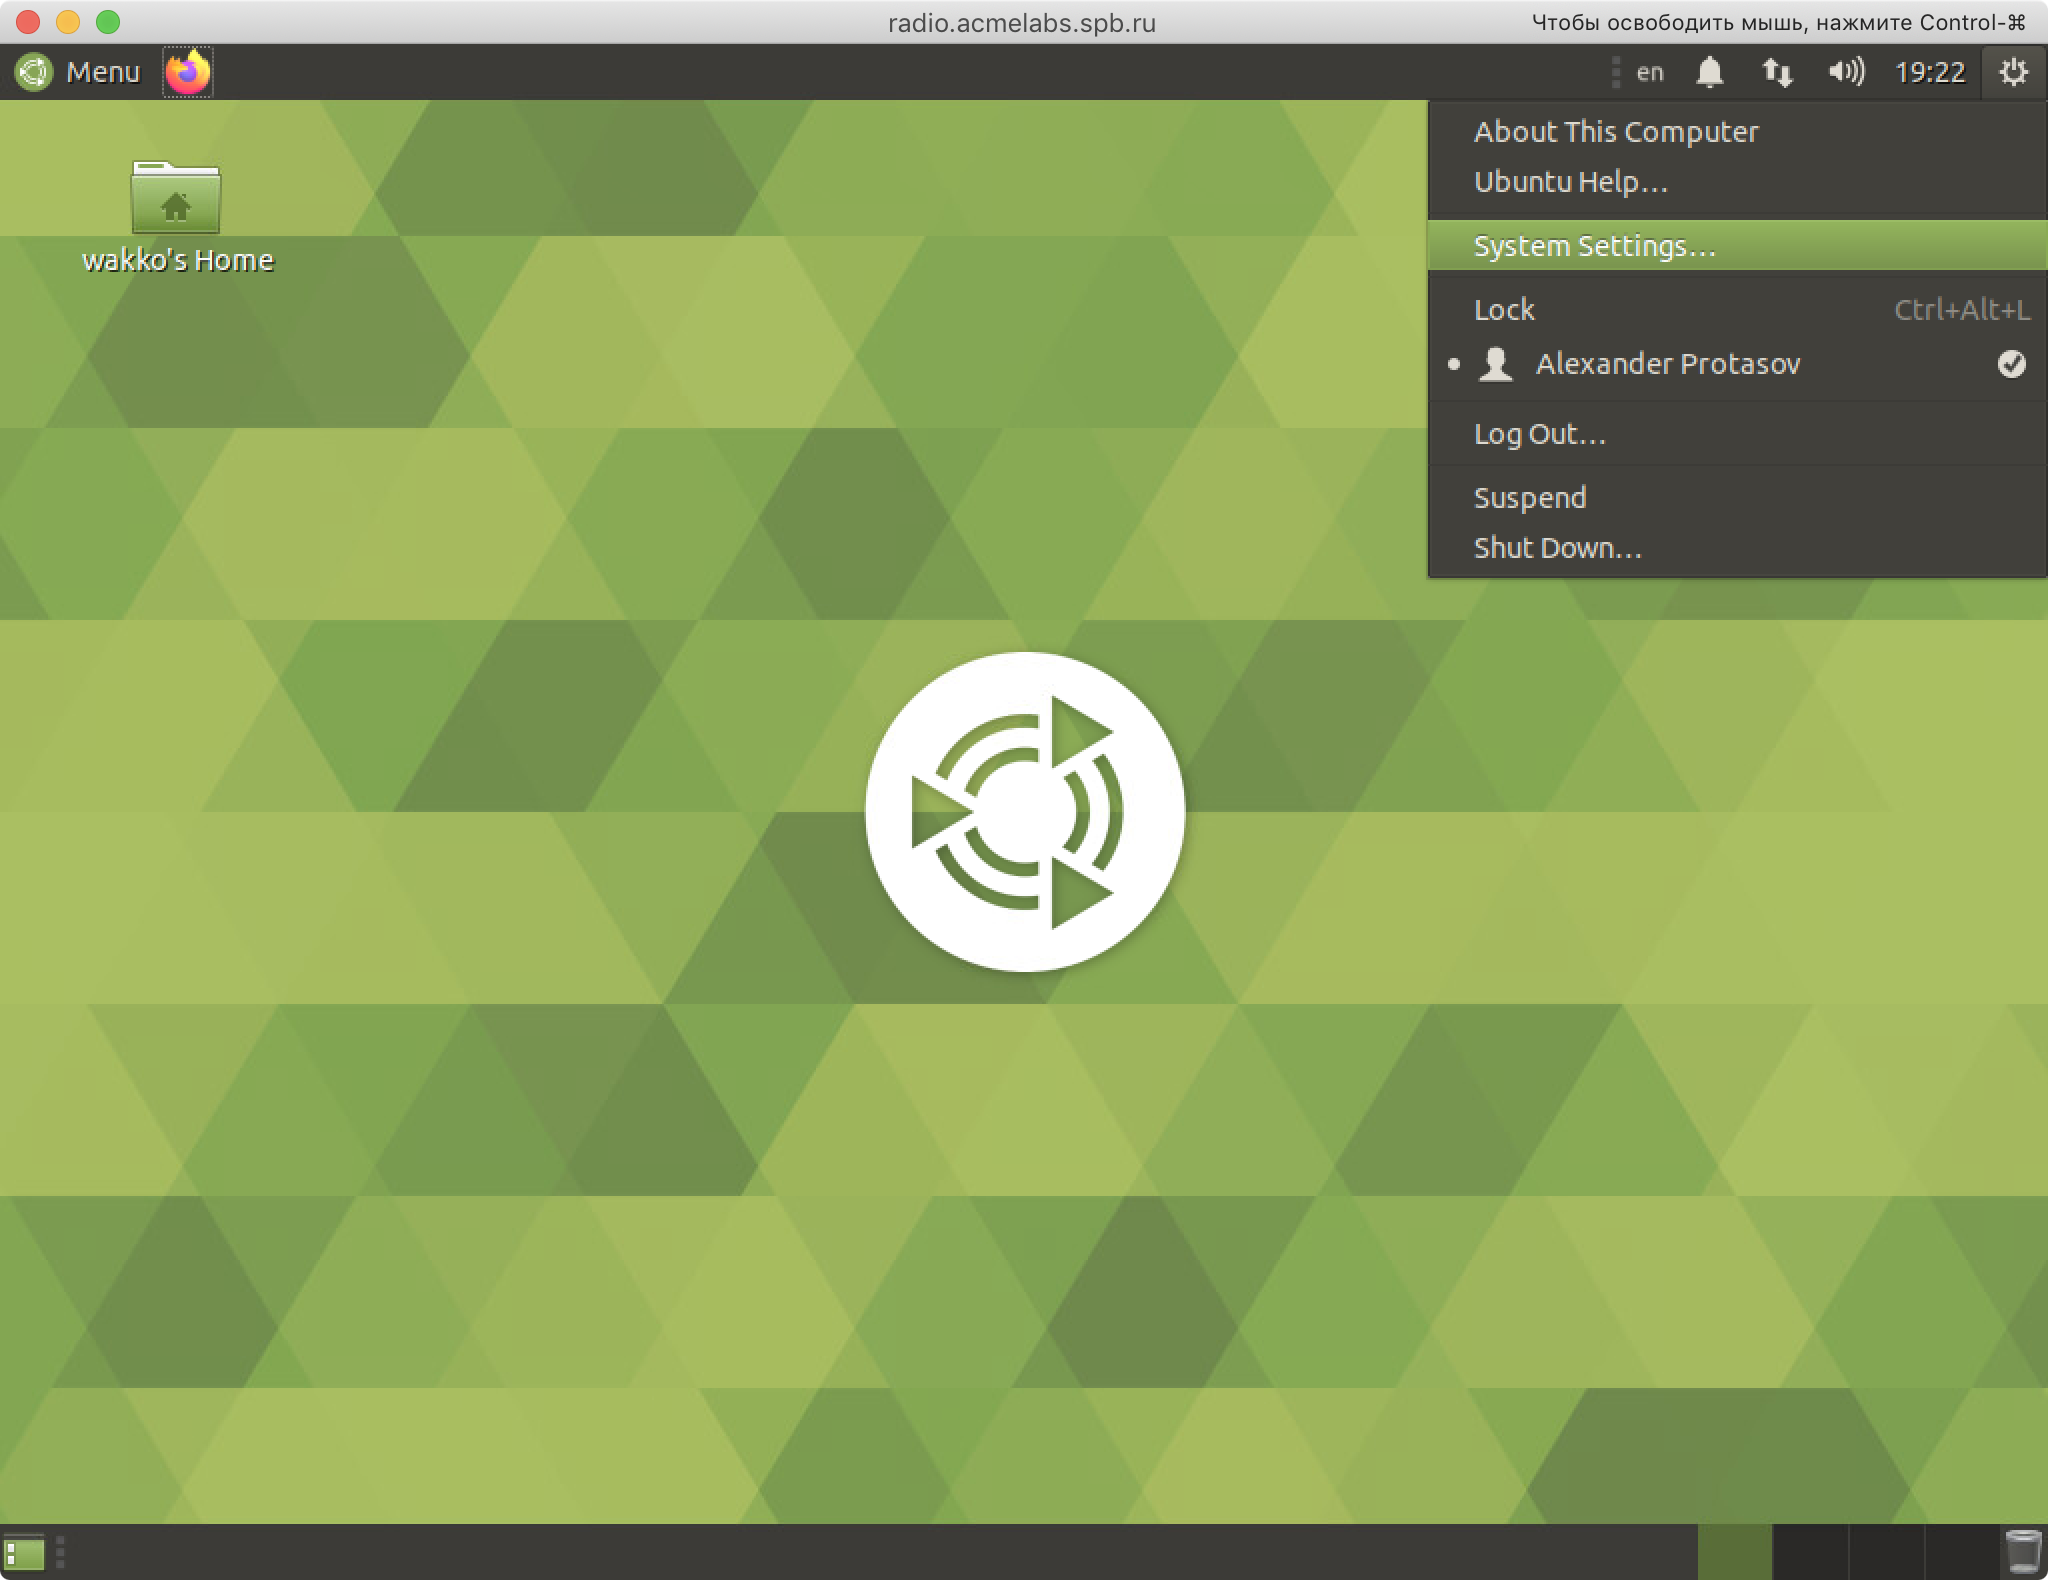
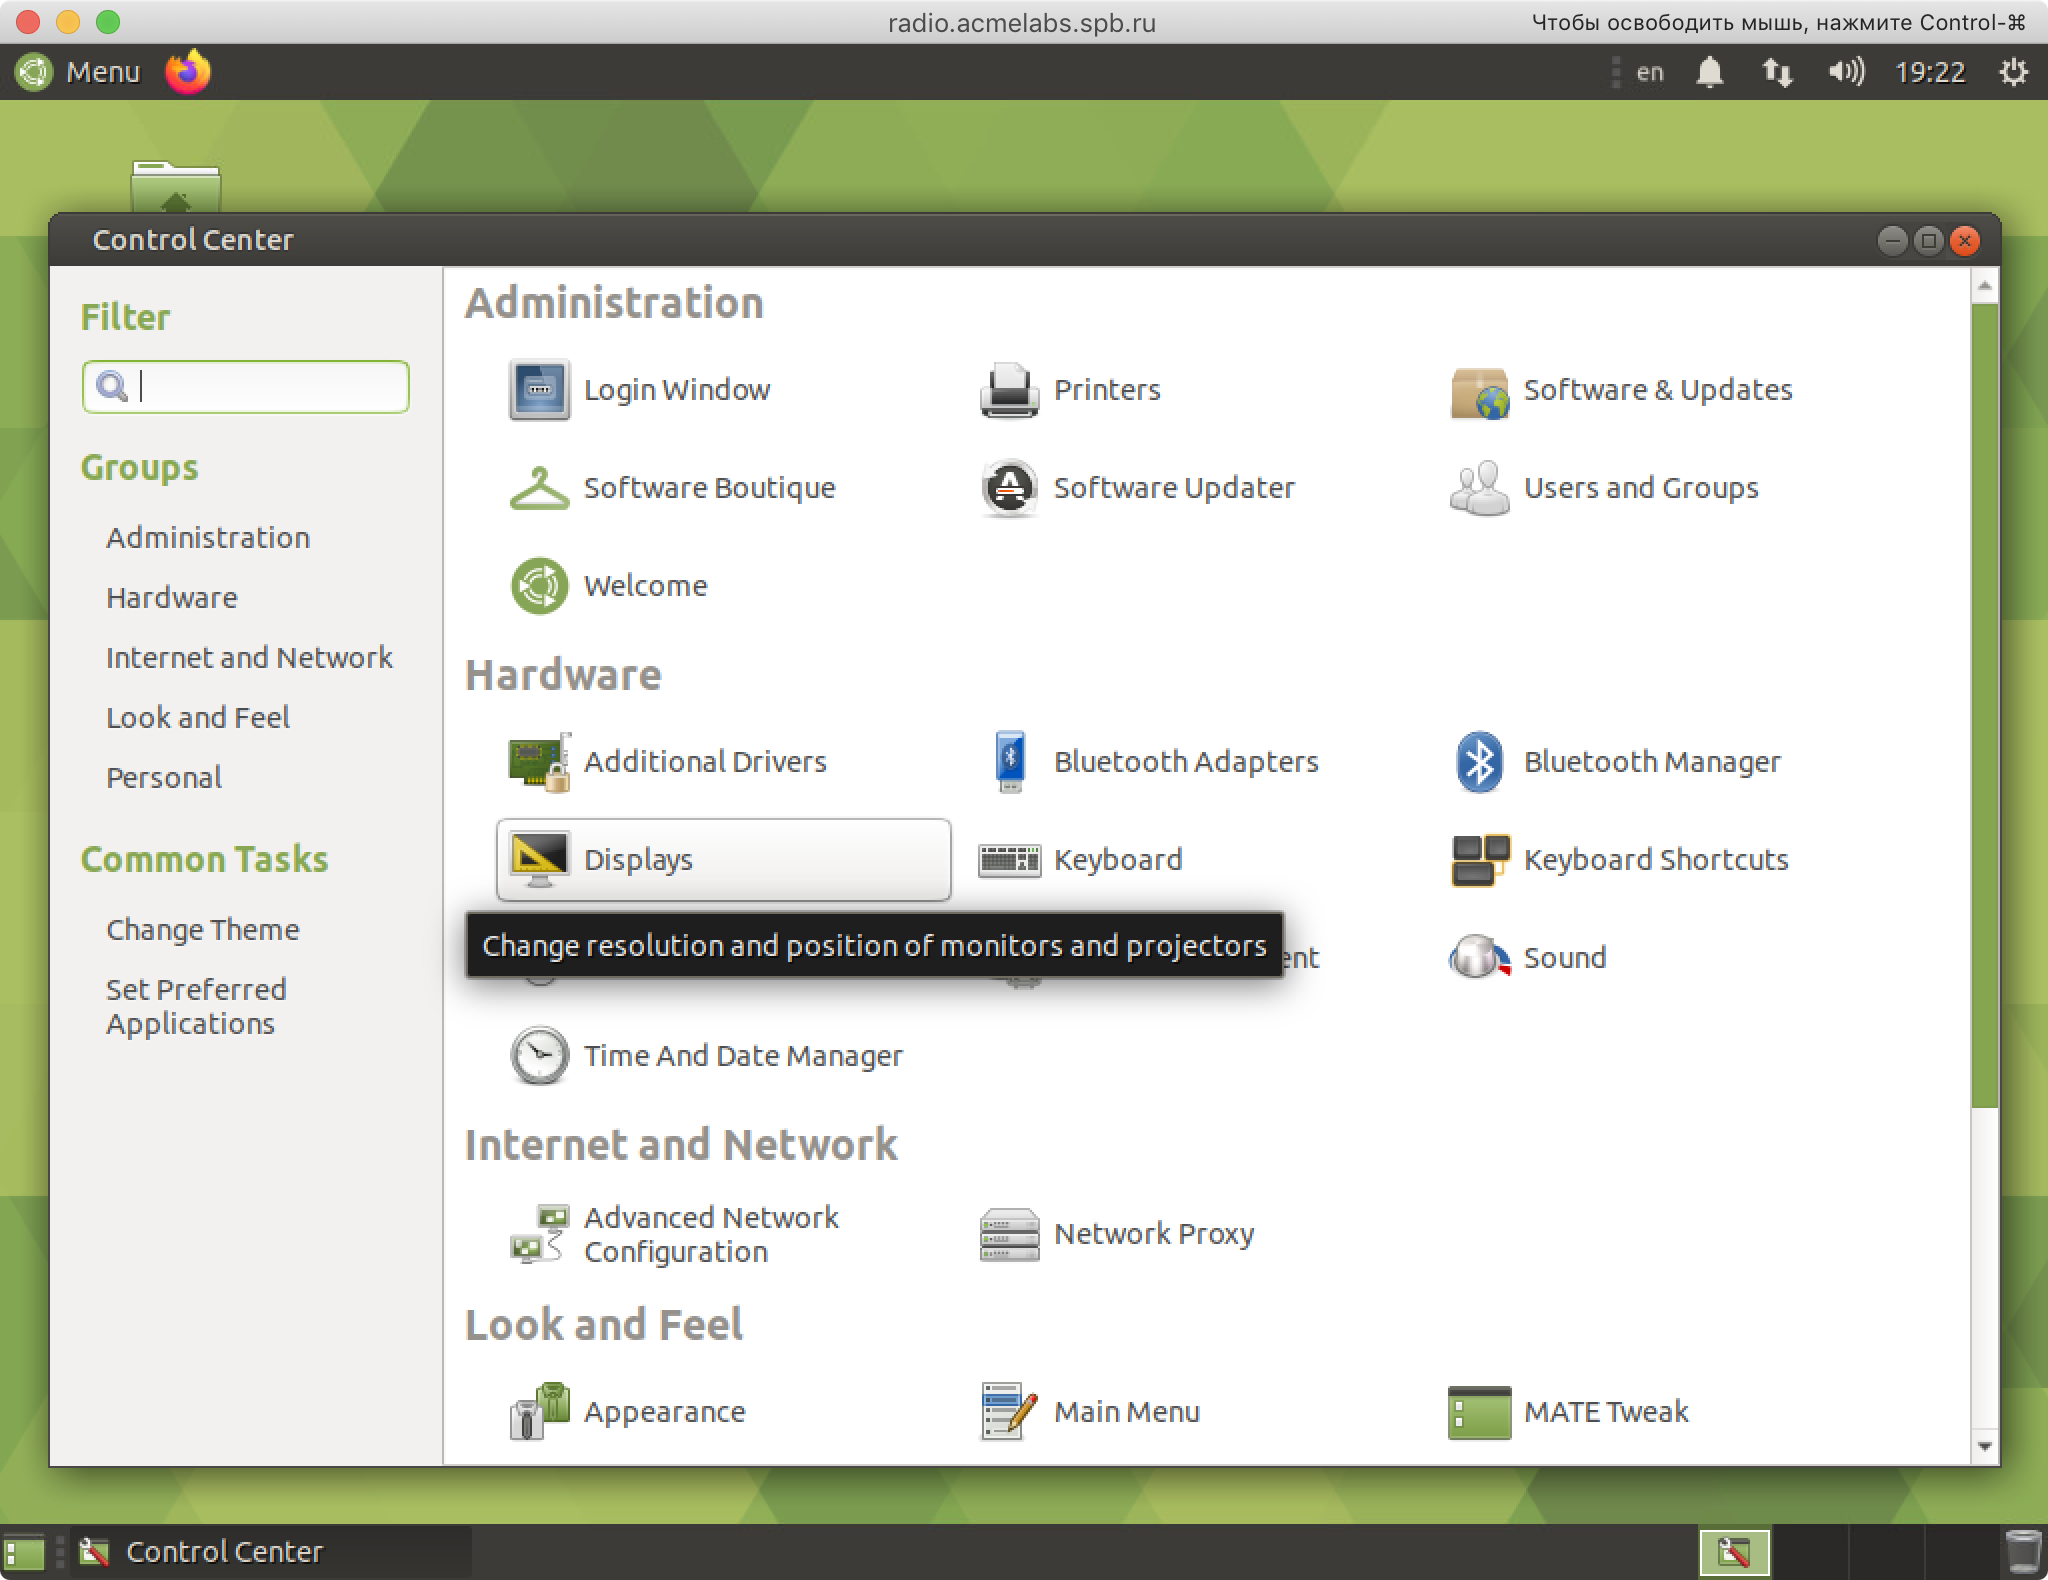
In the case of VMware ESXi or in the case of installing Ubuntu on bare metal, just open the control center, then in the Hardware block, open the Displays item and select any resolution you like from the list, then click the Apply button, and then the Keep This Configuration button, if the selected resolution suits us. In order to enable scaling, in the control center in the Look and Feel block, run the MATE Tweak applet. Then, in the left menu, select the Windows section and in the HiDPI item, select HiDPI instead of Auto-detect.
Now the interface takes on a human appearance. :)

A quick tip for MacBook users with Retina screens. If you want to use the built-in macOS Screen Sharing, which is also a Shared Screen, then when connecting to a remote computer via VNC, the default scale will be, let's say, not optimal and I did not find an option to change this scale correctly, you can only manually stretch the connection window. It is best to use the VNC Viewer program from RealVNC on the Mac. In this program, in the connection settings in the Options tab, set the Scaling parameter to 50% value. Now, when using this connection, the correct scale will be automatically set.
Configuring the terminal:
Launch the terminal (right-click on the desktop and select Open Terminal from the menu) and execut the command first:
$ gsettings set org.mate.caja-open-terminal desktop-opens-home-dir trueThis is necessary so that the terminal starts with the shell located in the default home folder, and not in the Desktop folder.
Let's add a few rights, they will be useful in the future:
$ sudo usermod -a -G audio,bluetooth,dialout,lp,netdev,plugdev wakkoThen immediately install the SSH server:
$ sudo apt install openssh-serverAfter that, you can connect to the operating system via ssh, so that you can copy commands from this page and paste them from the clipboard.
Next, we perform a number of commands to configure the terminal:
$ gsettings set org.mate.terminal.keybindings help 'disabled'
$ gsettings set org.mate.terminal.keybindings new-tab '<Super>t'
$ gsettings set org.mate.terminal.keybindings close-tab '<Super>w'
$ gsettings set org.mate.terminal.keybindings new-window '<Super>n'
$ gsettings set org.mate.terminal.keybindings close-window '<Super>q'
$ gsettings set org.mate.terminal.keybindings copy '<Super>c'
$ gsettings set org.mate.terminal.keybindings paste '<Super>v'
$ gsettings set org.mate.terminal.keybindings select-all '<Super>a'
$ gsettings set org.mate.terminal.keybindings search-find '<Super>f'
$ gsettings set org.mate.terminal.keybindings full-screen '<Super>Return'
$ gsettings set org.mate.terminal.keybindings next-tab '<Super>braceright'
$ gsettings set org.mate.terminal.keybindings prev-tab '<Super>braceleft'
$ gsettings set org.mate.terminal.keybindings switch-to-tab-1 '<Super>1'
$ gsettings set org.mate.terminal.keybindings switch-to-tab-2 '<Super>2'
$ gsettings set org.mate.terminal.keybindings switch-to-tab-3 '<Super>3'
$ gsettings set org.mate.terminal.keybindings switch-to-tab-4 '<Super>4'
$ gsettings set org.mate.terminal.keybindings switch-to-tab-5 '<Super>5'
$ gsettings set org.mate.terminal.keybindings switch-to-tab-6 '<Super>6'
$ gsettings set org.mate.terminal.keybindings switch-to-tab-7 '<Super>7'
$ gsettings set org.mate.terminal.keybindings switch-to-tab-8 '<Super>8'
$ gsettings set org.mate.terminal.keybindings switch-to-tab-9 '<Super>9'
$ gsettings set org.mate.terminal.keybindings switch-to-tab-10 '<Super>0'
$ gsettings set org.mate.terminal.profile:/org/mate/terminal/profiles/default/ allow-bold true
$ gsettings set org.mate.terminal.profile:/org/mate/terminal/profiles/default/ font 'Monospace 10'
$ gsettings set org.mate.terminal.profile:/org/mate/terminal/profiles/default/ use-system-font false
$ gsettings set org.mate.terminal.profile:/org/mate/terminal/profiles/default/ custom-command 'env TERM=xterm-256color /bin/bash'
$ gsettings set org.mate.terminal.profile:/org/mate/terminal/profiles/default/ use-custom-command true
$ gsettings set org.mate.terminal.profile:/org/mate/terminal/profiles/default/ default-size-columns 110
$ gsettings set org.mate.terminal.profile:/org/mate/terminal/profiles/default/ default-size-rows 36
$ gsettings set org.mate.terminal.profile:/org/mate/terminal/profiles/default/ use-custom-default-size true
$ gsettings set org.mate.terminal.profile:/org/mate/terminal/profiles/default/ scrollbar-position 'hidden'
After that, restart the terminal.
Disable the hotkey Command / Win:
$ gsettings set com.solus-project.brisk-menu hot-key ''
$ gsettings set org.mate.mate-menu hot-key ''
Enable the Super+R hotkey for the Run Application dialog:
$ gsettings set org.mate.Marco.global-keybindings panel-run-dialog '<Super>r'Disable the hotkey Super+T for terminal running:
$ gsettings set org.mate.Marco.global-keybindings run-command-4 'disabled'To start the terminal, the hotkeys
<Ctrl><Alt>+twill remain, and<Super>+twill be used in the terminal to open new tabs.
Setting up the desktop (setting a black background for faster work RDP and VNC):
$ gsettings set org.mate.background picture-filename ''
$ gsettings set org.mate.background color-shading-type 'solid'
$ gsettings set org.mate.background primary-color 'rgb(0,0,0)'
Setting up the work environment:
$ gsettings set org.mate.caja.preferences default-folder-viewer 'list-view'
$ gsettings set org.mate.caja.window-state sidebar-width 80
$ gsettings set org.mate.caja.window-state geometry '900x600+0+28'
$ gsettings set org.mate.interface enable-animations false
$ gsettings set org.mate.media-handling automount-open false
$ gsettings set org.mate.media-handling automount false
$ gsettings set org.mate.power-manager button-power shutdown
$ gsettings set org.mate.screensaver lock-enabled true
$ gsettings set org.mate.screensaver idle-activation-enabled false
$ gsettings set org.mate.screensaver themes []
Configuring the keyboard and layout:
$ gsettings set org.mate.peripherals-keyboard delay 300
$ gsettings set org.mate.peripherals-keyboard rate 50
$ gsettings set org.mate.peripherals-keyboard-xkb.kbd layouts "['us', 'ru']"
$ gsettings set org.mate.peripherals-keyboard-xkb.kbd options "['grp_led\tgrp_led:scroll', 'grp\tgrp:ctrl_shift_toggle']"
$ gsettings set org.mate.peripherals-keyboard-xkb.indicator font-family 'Ubuntu 14'
Now install Midnight Commander and a number of additional utilities:
$ sudo apt install mc atop curl htop iotop pinfo screenSetting the full DNS name of the computer:
$ sudo hostnamectl set-hostname radio.acmelabs.spb.ruAdding rights to edit network connections to the netdev group:
$ sudoedit /etc/polkit-1/localauthority/50-local.d/10-network-manager.pkla
[Let Group 'netdev' Modify System Settings for Network]
Identity=unix-group:netdev
Action=org.freedesktop.NetworkManager.settings.modify.system
ResultAny=yes
ResultInactive=no
ResultActive=yes
Adding rights for all users to use Wi-Fi:
$ sudoedit /etc/polkit-1/localauthority/50-local.d/50-allow-wi-fi-scan.pkla
[Allow Wi-Fi Scan for All Users]
Identity=unix-user:*
Action=org.freedesktop.NetworkManager.wifi.scan
ResultAny=no
ResultInactivity=no
ResultActive=yes
Removing the warning update-initramfs:
After the kernel update, during the creation of initrd.img images the following warnings appear:
I: The initramfs will attempt to resume from /dev/dm-2
I: (/dev/mapper/vg_radio-lv_swap)
I: Set the RESUME variable to override this.
To avoid them, run several commands:
$ sudo blkid | grep swap
/dev/mapper/vg_radio-lv_swap: UUID="b13bf4a9-03c1-4e32-a583-5a347dc73a06" TYPE="swap"
$ sudoedit /etc/initramfs-tools/conf.d/resume
RESUME=UUID=b13bf4a9-03c1-4e32-a583-5a347dc73a06
$ sudo update-initramfs -u -k all
Disabling the 30-second wait for the grub loader during startup Ubuntu:
$ sudoedit /etc/default/grub
GRUB_RECORDFAIL_TIMEOUT=2
$ sudo update-grub
Installing and configuring RDP:
Last time I installed VNC, but has since abandoned it and completely switched to RDP.
$ sudo apt install xrdp
$ sudo adduser xrdp ssl-cert
$ sudoedit /etc/xrdp/sesman.ini
[Security]
AllowRootLogin=false
[Xorg]
param=-layout
param=X11 Server
$ sudoedit /etc/xrdp/xrdp_keyboard.ini
[default_rdp_layouts]
rdp_layout_us=0x00000409
rdp_layout_ru=0x00000419
[layouts_map_ru]
rdp_layout_us=ru,us
rdp_layout_ru=ru,us
[rdp_keyboard_ru]
keyboard_type=4
keyboard_type=7
keyboard_subtype=1
options=grp:alt_shift_toggle
rdp_layouts=default_rdp_layouts
layouts_map=layouts_map_ru
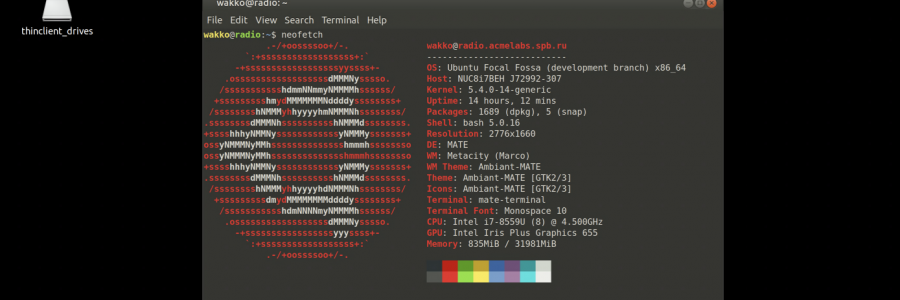
$ sudo systemctl restart xrdp.service xrdp-sesman.serviceAfter connecting the RDP software, we get something like this:

Only this note remains configure the working environment in the console and our Ubuntu is ready to work.